


98
FOLDER/
MENU
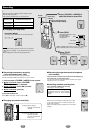
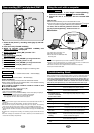
Timer recording (RECF) and playback (PLAYF)
You must set the current time (see page 3).
1 Select the file (PLAYF), recording mode (page 4) and fold-
er (RECF).
2
Press and hold [
$
FOLDER /
%
MENU].
3 Within 10 seconds, press [
$
FOLDER/
%
MENU] until
“RECF” or “PLAYF” is displayed.
4 Within 10 seconds, press [9] to select “On”.
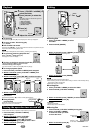
5 Set the times.
1 Within 10 seconds, press [1].
The start time flashes.
2 Within 10 seconds, press [
:,9] to change the ON time.
3 Within 10 seconds, press [1]. (PLAYF is set)
4 Within 10 seconds, press [:,9] to change the OFF time.
5 Within 10 seconds, press [1]. (RECF is set)
When setting is finished, the display changes in the following order:
ON time # OFF time # Current number of files # Normal display
ON time # Selected file number # Normal display
At the set ON time:
≥PLAYF starts playing and stops when the selected file finishes.
≥RECF starts recording into the selected folder, in the selected recording
mode and stops at the set OFF time.
∫ To cancel the timer:
Press [:] to select “OFF” in step 4 and press [1].
∫ To check the timer settings:
1 Press and hold [
$
FOLDER /
%
MENU
].
2 Within 10 seconds, press [
$
FOLDER /
%
MENU
] until the timer display is displayed.
The display will then change to show the following automatically.
Timer recording: ON time, OFF time, folder the file will enter.
Timer playback: ON time, folder and file to be played.
Note .
≥“RECF” and “PLAYF” light to show which timer is set and flash when the timer is
operating.
≥The two timers cannot be used together. The timer set last is activated.
≥The timers can only be set within a single twenty-four hour period. The recording
timer can only be set if there is one minute or more of available recording time.
≥If you make recordings before timer recording begins, be aware that the time avail-
able is reduced. The timer recording can only continue as long as the available time
allows.
≥If VAS is left on during timer recording, the recording may be shorter than the set
time.
≥The timer settings are canceled if the clock is cleared (i.e. the batteries are re-
moved from the battery compartment).
Timer playback
Timer recording
Using the unit with a computer
1 Install Voice Editor 2 (and Dragon NaturallySpeaking
R
Preferred version 5.0 for ) from the CD-ROM.
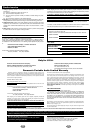
2 Connect the unit to a computer with the included USB
cable.
Now you can:
≥Save and edit sound files you have recorded with the unit.
≥Convert sound files into text using Dragon NaturallySpeaking
R
Preferred
version 5.0, speech recognition software. (Only included in )
For details, read the PDF and installation manual for Voice Editor 2
and Dragon NaturallySpeaking
R
Preferred version 5.0.
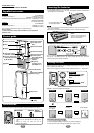
∫Connection
“PC” appears when connected, and
flashes when transferring data.
≥Do not disconnect the USB cable while
transferring data.
Note .
≥Operation is not guaranteed if you connect a USB hub or extension cord.
≥Connect to the root hub terminal if your computer has more than one USB board.
(Read your computer’s operating instructions for details.)
≥The buttons on this unit do not respond while connected to a computer.
≥Use only the included USB cable.
RR-US321
RR-US321
RR-US320
RR-US321
Symptom
Unit doesn’t operate
No sound from the
speaker
When using earphone
(not included), there is
no sound or it is difficult
to hear or there is noise
“U01” appears on the
display
Recording stops
Recording not made
The date of recording
appears as “–– ––”
Playback speed is too
fast or slow
“FULL” appears when
trying to make a
recording
Cannot erase a file
The clock flashes
“12:00”
Troubleshooting Guide
Before requesting service, make the below checks. If you are in doubt about some of
the check points, or if the remedies indicated in the chart do not solve the problem:
In the U.S.A., contact the Panasonic Customer Call Center at 1-800-211-7262, or e-
mail consumerproducts@panasonic.com, or web site (http://www.panasonic.com).
In Canada, contact Panasonic Canada Inc. Customer Care Centre at 905-624-
5505, web site (www.panasonic.ca), or an authorized Servicentre close to you.
Checkpoints
≥Is Hold on? (page 2)
≥Is the the battery cover properly closed?
≥Is earphone (not included) connected?
≥Is the volume turned down?
≥Is the earphone plug fully inserted?
≥Is the plug dirty? (Wipe away dirt on plug.)
≥Have the batteries run down?
≥Has VAS (page 4) functioned?
≥Did the batteries or cover come loose during
recording?
≥Has the time been set? (The date of recording is
not displayed unless the time has been set.)
≥Has playback speed been changed?
(See page 6 to set to the required speed.)
≥Have 99 files been recorded in the folder?
≥Has the recording time limit been made?
– Erase unneeded files.(page 7)
≥Have you selected an empty folder?
≥Is the file locked? (page 7)
≥Set the clock. (page 3)
2
1
Lift from the slit next
to the handstrap
hole.
Insert so the
arrows match.
USB cable (included)