


9 10
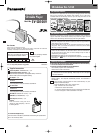
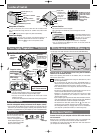
Location of Controls
Microphone
SD Memory Card slot
USB lid
OPR
(operation)
OFF/ON
Volume
MODE,
HOLD
Display panel
• Indicators may
be difficult to see
under direct
sunlight or
fluorescent light.
Earphones jack (M3 jack)
Battery lid
Skip / Search / backward
/ Select
Skip / Search / forward /
Select
Play / Stop / Confirm
1
2
3
4
5
6
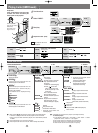
HOLDMODE
Press and hold
This function causes the unit to
ignore button presses during
play and so on, to prevent
interrupting an operation.
1 2 3 4 5 6
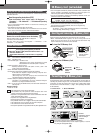
TUNER mode indicator
VOICE mode indicator
AUDIO mode indicator
Play indicator
Recording indicator
Battery /charge
indicator
• To release, press and hold again until “HOLD OFF” is displayed.
• This is cancelled if the is set to OFF or the auto power-off
function turns the unit off.
OPR
Auto power-off function
In order to save power, the unit turns itself off if left unused for more
than 10 seconds after being switched on. (AUDIO mode, VOICE PLAY
mode)
Press to turn the power on again. Play starts automatically.
Power save display
During play, the power save display appears if no
operation is performed for more than 10 seconds.
Press the to return to the previous screen.
MODE
Resume function
Play resumes from where last stopped.
This is cancelled if an SD Memory Card is changed or removed.
HOLD function
• Operation is not guaranteed when using the USB cable only. Insert
the rechargeable battery.
• Do not disconnect the USB cable while “ACCESSING CARD” is
displayed or open the battery lid while recording. This can cause the
data on the SD Memory Card to be lost, or render it unusable.
• If the USB connection is not recognized, disconnect the USB cable
and reconnect it.
• Use only the included USB cable to avoid damage to the unit. Do not
use the included USB cable with any other equipment.
• Operation is not guaranteed when more than two items of USB
equipment is connected to your computer or a USB hub or USB
extension cable is used.
•
If your computer goes into power save mode while connected to this unit,
it may not recognize the unit when it comes out of this mode. Disconnect
the unit and reconnect it or restart the computer if this happens.
• To disconnect the USB cable, double click the icon which is in
the task tray of the computer and follow the onscreen instructions.
• The rechargeable battery is charging while the unit is connected to
your computer by USB cable. However, it cannot charge fully.
Note
5
1
2
OPR
OFF ON
4
3
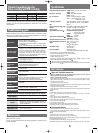
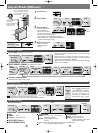
Record tracks to an SD Memory Card using the SD-Jukebox
software on the included CD-ROM.
Refer to the operating instructions for SD-Jukebox (PDF) for information
about how to record tracks.
To USB
port
USB Cable
Large end
to computer
Insert the SD
Memory Card
Insert with
arrow facing
upward
Write the music data to an SD Memory Card
Data Save Function
Connect the unit to your computer with the USB cable when the
unit is turned off.
When this unit is connected to the computer by USB, it is recognized as an
external device by the computer and functions as a USB reader/writer.
This enables you to save (drag and drop) datas other than music data from
your computer to an SD Memory Card.
You can play music data recorded in SD Audio format (AAC/WMA/MP3).
Set the OPR
switch to OFF
Rechargeable battery (included)
Battery indicator
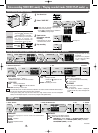
Power Supply Preparations
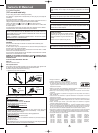
Charging the battery
• You can charge the battery before it is fully discharged.
• Reconnect the AC adaptor to charge the battery again.
• Use only the included AC adaptor and AC mains lead to avoid
damage to the unit.
Do not use the AC adaptor and AC mains lead with any other equipment.
Note
Full Empty
→
Recharge
Charge immediately
after purchase!
→→→
AC adaptor (included)
Insert the rechargeable battery and connect the AC adaptor. (above)
• If you connect the AC adaptor during FM reception, the sound will stop for a
short time. If you connect it during play or recording, these operations will stop.
•
Operation is not guaranteed when using the AC adaptor only. Insert the rechargeable battery.
You can not start Voice recording
and FM recording when the
battery indicator is blinking.
• Use the rechargeable battery
and AC adaptor together, or use
the fully charged rechargeable
battery to start recording.
3
2
1
AC Adaptor
Insert with
arrow facing
upward
Insert the
rechargeable
battery.
Charge the battery.
1
2
OPR
OFF ON
3
2
4
1
Charge indicator
When charging
starts: lights
While charging: scrolls
When charging
finishes: goes out
Remove the
rechargeable battery
Push the battery lock
switch to the outside.
Charging time:
Approx. 3 hours 30minutes
Set the OPR
switch to OFF
Battery lock
switch
1
2