


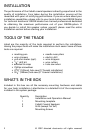


4 © 2007 directed electronics—all rights reserved
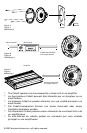
Figure 2
Figura 2
Abbildung 2
Stagger the holes for the wiring and use a rubber or
plastic grommet to protect the wire from damage
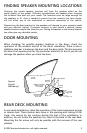
Figure 3
Front Door
Body
Front Dash
Kick Panel
Speaker
cut-out
To the
amplifier
or source
unit
3
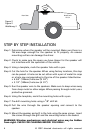
Inside
of Door
Speaker
cut out
Coaxial
Driver
Dampening Mat
Speaker installed
with no gaps
or air leaks
Dampening on
top of outer
door skin
Door
Panel
Rear/Trunk
of Car
Rear Seat
Grille
Screws
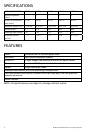
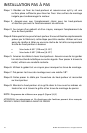
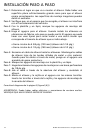
STEP BY STEP INSTALLATION
Step 1: Determine where the speaker will be mounted. Make sure there is a
flat area large enough for the speaker to fit properly. An uneven
mounting surface can damage the driver.
Step 2: Check to make sure the space you have chosen for the speaker will
not interfere with the operation of the vehicle.
Step 3: Using a template, mark the speaker hole with a pen.
Step 4: Cut the hole for the speaker. When using factory locations, this step
can be passed. A hole can be cut either with a pair of metal tin snips
or a hole saw corresponding to the size of the speaker listed below.
• 43/4"(120mm)holesaw(51/4")
• 51/2"(140mm)holesaw(61/2")
Step 5: Run the speaker wire to the speakers. Make sure to keep wires away
from sharp metal or other edges. When passing through metal ,use a
protective grommet.
Step 6: Using the template, mark the mounting holes with a pen.
Step7:Pre-drillmountingholesusinga
1
/
8
" drill bit.
Step 8: Pull the wire through the speaker opening and connect to the
speaker.
Step 9: Mount the speaker and grill in the hole using the same screws. Insert
the screws through the grill and the mounting holes in the basket.
WARNING: Window mechanisms and electrical wires may be hidden
from sight. CHECK FOR CLEARING BEFORE YOU DRILL!