


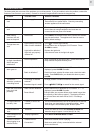
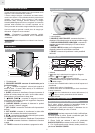

ADJUST VOLUME
ALARM
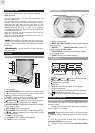
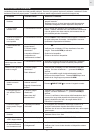
4. While continuously pressing on UNLOCK COVER
tab, place right hand around the side of the product.
Push in the side of the cover (area above tab and hook)
and lift up to release cover.
(Left handed individuals can use right thumb and left
hand if more comfortable).
UNLOCK COVER
5. Unscrew old light bulb.
6. Screw in new light bulb.
7. Holding cover, with the top part at a slight angle away
from you, align the 2 front plastic tabs to the allotted
space.
8. Tilt cover down and towards you until lamp cover
clicks back into place.
NOTE This unit uses 60 W light bulbs. The built-in
protection feature will automatically shut down the unit
when the temperature inside the lamp cover is too high.
Remove the power plug from the socket, and only plug in
again after unit has cooled down sufficiently.
IMPORTANT Please allow this unit to cool until the
temperature inside is within a safe range.
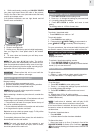
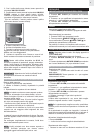
CONNECT TO POWER SOURCE
Memory backup:
1. Remove the battery compartment cover.
2. Insert the batteries (2xAAA), matching the polarities.
3. Replace the battery compartment cover.
NOTE Batteries should not be exposed to excessive
heat such as sunshine or fire.
Before selecting a location to place the unit, consider the
following:
• Ensure there is approximately 15 cm between unit and
closest object, such as walls or other objects.
• Ensure there is at least 40 cm space above the top of
the unit for ventilation purposes.
• Ensure distance between unit location and wall socket
is not longer than the power cord itself.
Batteries serve as a back-up power supply. To fully utilize
all features, plug into wall socket.
To completely disconnect from power, the unit should be
disconnected from the wall socket.
NOTE The main unit should not be exposed to wet
conditions. No objects filled with liquid, such as vases,
should be placed on the main unit.
CLOCK
MANUALLY SET CLOCK
1. Press SET CLOCK to enter setting mode.
2. Press + or - to change the settings or press and hold
+ / – to rapidly change the settings.
3. Press SET CLOCK to confirm and move to next
setting.
The settings order is: 12/24 hr format, time.
RADIO
To activate / deactivate radio:
• Press RADIO to turn radio on / off.
To set radio station:
1. Press RADIO to turn radio on.
2. Press and hold RADIO TUNE to auto search or
press RADIO TUNE to manually select frequency.
For your convenience, the volume and radio frequency will
be stored in memory for the next time radio is turned on.
SOOTHING NATURE SOUNDS
NOTE Deactivate radio first. RADIO OFF will be
displayed on screen.
To activate / deactivate soothing sounds:
1. Press NATURE SOUND to play sounds.
2. Press NATURE SOUND repeatedly to select desired
sound (1-4) or to turn sound off.
To adjust volume:
• Press + / – when radio or nature sound is turned on.
TIP Press and hold + / – to rapidly adjust volume.
To set the alarm:
1. Press SET ALARM to enter setting mode.
2. Press + / - to change the settings or press and hold +
/ – to rapidly change the settings.
3. Press SET ALARM to confirm and move to next
setting.
4. Repeat steps 2-3 for all setting options.
The settings order is: time, alarm sound (select from beep
/ radio / bird sound).
NOTE If radio alarm is selected, radio will play for 60
minutes at set alarm time at maximum volume level.
If bird sound alarm is selected, bird sound will gradually
increase in volume to maximum and play for 2 minutes at
set alarm time .
To activate / deactivate alarm:
• Press ALARM.
-:- - indicates alarm function has been disabled.
To silence the alarm:
• Wave your hand up to 8 cm (3 inches) in front of the
SNOOZE SENSOR to silence it for 8 minutes ( / /
/ will continue flashing to indicate snooze function has
been activated)
3
EN