


EN
4
NOTE ON WHERE TO PLACE THE UNIT
This unit is designed for outdoor usage.
When the unit is relocated from one place to another in
extreme temperatures (e.g. from a very hot area to a very
cold one), water condensation may occur on the lens at
the front. This will not affect the functions of the unit. In
this case, leave the unit in the same location for 2-3 hours
and the water condensation will disappear.
The temperature sensor is located at the top of the unit.
When the unit is placed under direct sunlight, the accuracy
of the temperature display may be affected.
TIP It is suggested to put the unit under shade from
direct sunlight.
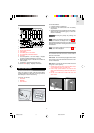
TEMPERATURE DISPLAY
After battery installation, the unit immediately reads and
displays the surrounding temperature.
RADIO RECEPTION
This product is designed to synchronize its calendar
clock automatically once it is brought within range of the
radio signal.
NOTE When the unit is receiving the signal, the
radio
reception symbol with start to blink. Generally, complete
reception takes around 2 to 10 minutes, depending on
the strength of the signal.
To select the most suitable radio signal for your location,
slide the EU / UK switch to the appropriate setting. Press
RESET whenever you have changed the selected setting.
NOTE This EU / UK switch is located inside the battery
compartment at the back of the unit.
RADIO RECEPTION DESCRIPTION
Even though there are areas that may have more difficulty
in receiving a signal, the radio-controlled clock contains
accurate quartz movement and will retain precise timing
if the signal is missed on a rare occasion.
NOTE Reception can be affected by a number of factors.
For best reception, place the device away from metal
objects and electrical appliances. Other causes for signal
interference include electrical transmission tower, steel
reinforced construction, and metal siding. Reception is
ideal when placed near a window.
ENABLING / DISABLING RECEPTION
To manually disable the reception of the radio clock
signal, press and hold the DOWN button for 2 seconds.
(The
radio reception signal will not appear on the LCD
display).
To enable the radio reception signal, press and hold the
UP button for 2 seconds. (The
radio reception signal
will reappear on the LCD display).
SETTING THE CLOCK MANUALLY
To adjust the clock settings manually without automatic
RF synchronization, remember to disable the radio
reception first.
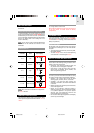
CLOCK SETTING MODE
To set the clock manually:
1. Press and hold the MODE button for 2 seconds. The
clock area will blink.
2. Select the time zone offset (+/- 23 hours), 12/24
format, hour, minute, year, calendar format (M/D or
D/M), month, day, language, and hourly chime on/
off.
3. Press UP or DOWN to change the setting.
4. Press MODE to confirm.
NOTE If no key pressed after 1 minute, it will automatically
return to local time display mode.
NOTE The language options are (D) German, (E)
English, (F) French, (I) Italian, and (S) Spanish.
NOTE The hourly chime function when set to ON will
beep once at the beginning of every hour. The
chime
icon will also show on the display.
UV MEASUREMENT (WITH OPTIONAL UVR138)
With the optional UVR138 Ultra-Violet Radiation Sensor
(which can be purchase separately), the ultra-violet
Index (UVI) can be displayed on this unit.
This UV sensor measures the sun’s ultra-violet radiation
and transmits readings back to the main unit . It is splash
proof and should be placed in an area with maximum
exposure to the sun.
It can also be used with Oregon Scientific’s new line of
weather monitoring tools. Please consult the user manual
of the UVR138 for more details and instruction.
JM888_EN_R8 9/3/04, 6:33 PM4