


2
IMPORTANTSAFE GUARDS (Continued)
The appliance manufacturer does not recommend the use of accessory attachments.
This may result in injuries.
Never place fingers or other utensils into feed or discharge areas.
The cord should be arranged so that it will not drape over the table or counter top in
such a way where it can be pulled on by children. This should also reduce the risk of
becoming entangled or tripping.
Keep hands and utensils out of container while blending to reduce the risk of severe
injury to persons or damage to the MARGARITA OASIS™. A scraper may be used,
but only when the MARGARITA OASIS
TM
is not running.
Do not place on or near a hot gas or electric burner, or in a heated oven.
Before plugging your unit into the main electrical supply, make sure the voltage
corresponds to that indicated on the maker’s nameplate.
Extreme caution must be used when moving the MARGARITA OASIS™
with liquids.
Do not use this appliance for other than intended use.
Blades are sharp. Handle carefully.
To reduce the risk of injury, never place cutter-assembly blades on base without
pitcher properly attached.
Always operate the MARGARITA OASIS™ with cover in place.
A unit that is plugged into an outlet should not be left unattended.
Check the ice shaving chamber for presence of foreign objects prior to use.
Make sure the glass pitcher with blender base is properly attached before inserting
into MARGARITA OASIS™ base unit.
PRE-USE PREPARATION AND ASSEMBLY
Prepare for first use by thoroughly washing the glass pitcher, lid, blending blade and base,
clear ice bowl, see through ice cover, and water reservoir in warm sudsy water and
thoroughly dry. DO NOT put the motor base in water. To clean the motor base when
needed, use a damp cloth to wipe the exterior, and then dry off with a clean, non-abrasive
towel. (See Parts Breakdown on page 3).
1. Check the blending base of the glass pitcher to confirm the mixing blade and rubber
washer are in place and the base has been properly attached.
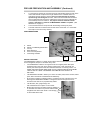
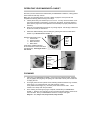
2. Set the pitcher lid on the mouth of the glass pitcher. Note the ice shaving chute
goes up and down to allow for the insertion of the pitcher. Tip the pitcher slightly as
you insert the mouth of the pitcher under the ice shaving chute, pushing upward
and simultaneously setting the pitcher base onto the motor base. (See Photo
Illustration on page 4.)
3. To open the ice shaving chamber located at the top of the motor base, push the
front tab away from you. With your thumb on the tab and your first two fingers
hooked into the lip (located directly across from the tab over clear window), gently
lift up.