


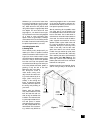
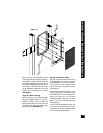

Screw one side of the assembled bracket
with wings to the stud using one of the sup-
plied screws. Level the bracket. Screw the
other side of the bracket to the stud. Two or
three screws (depending upon the size of
the model) on each side makes for a very
secure installation. Attach the wire to the
bracket at the indicated wire tie points
(See Figure 9).
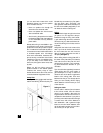
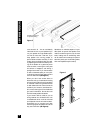
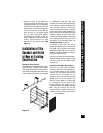
Stage Two: Before Painting
Screw the frame to the installed bracket
using the supplied screws. Do not over-
tighten the screws. This will distort the
frame and the grilles will not fit (this is not
permanent, just loosen the screws and the
grille will pop in) (See Figure 10).
Painting the Aluminum Grilles
The grille is important to the sound of the
AT loudspeakers. Do not fill the holes of
the grille with paint. The grille is construct-
ed of aluminum with a perfectly even
powder coat overall. This powder coat is
an ideal primer.
Remove the grilles before painting. If you
are using spray paint, use two thin coats
without any primer. If you are using a com-
pressor and a spray gun, use the finest,
most diffuse setting. Practice first on some
paper if you have no experience painting
with spray paint.
If you are using an applicator or brush, and
a can of paint, thin the paint first. You do
not want to have to poke hundreds of holes
in your beautifully painted grilles.
Installation of Brackets, Frames and Grilles in New Construction
13
Figure 10