


Page 8 MNCX/MNCXS Owners Manual
M&S Systems Page 9
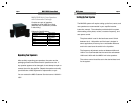
5. Tighten the “knurled” nut (A) using a crescent wrench
until it is firmly seated against the back of the speaker
and has fully locked the ball/shaft (C) and the speaker
cabinet together. Please note that once the nut is
tightened, it may embed some marks on the back of
the speaker where the attachment is made. The nut
(A) will cover these marks.
6. Feed the speaker wire through hole (M) on the wall
bracket (D).
7. The safety cord (H) is provided to prevent the speaker
from falling. One of the two lower screws (I) that attach
the wall bracket (D) to the wall will need to go through
the eyelet (K) at the end of the cord before going
through the wall bracket hole. Mount the wall bracket
(D) onto a wood stud in the wall, using #10 screws that
are a minimum of 1 ¼” long. Make sure that all 4
screws are driven into the stud and not in drywall. If
the bracket needs to be mounted on drywall, the use
of properly selected and installed wall-anchors and
screws is essential. Make sure that the screw head is
at least 0.36 inches (approximately 3/8 inches) or
larger in diameter so that it can properly hold the
backup cord eyelet (K).
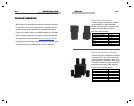
8. Holding the speaker cabinet (G) with both hands,
reinsert the ball portion of the ball/shaft (C) into the
wall bracket (D).
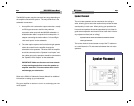
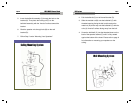
Ceiling Mounting Bracket
A special bracket must be installed prior to mounting the
MNCX speaker to the ceiling. This bracket is included with
your MNCX speaker and is in a separate package. To mount
the speakers to the ceiling follow the instructions below. A
diagram of the ceiling mounting system is shown on page 10.
1. Follow “Mounting Your Speakers” steps 1 – 3.
2. Remove the top black screw from the back of the MNCX
speaker.
3. Place the ceiling bracket (N) in position on the back of the
speaker. Please make sure to line the top screw hole on
the ceiling bracket (N) with the screw hole on the MNCX
speaker.
4. Start both screws [screw (O) from the bracket kit and the
screw you removed from the back of the speaker] but do
not tighten in place until you have completely lined up the
ceiling bracket (N). Then tighten both screws.
9. Hand tighten the molded nut (B) while positioning the
speaker for the intended orientation.
10. Once the orientation of the speaker is finalized, use the
metal bar (E) in one of the holes on the molded nut (B) and
tighten securely.
11. Securely attach the other end (J) of the backup cord (H) to
the MNCX speaker, by engaging it through the bracket
hole (L) on the back of the speaker.