


2
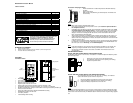
BATTERY CHANGE:
It is recommended to replace the batteries in all units regularly to ensure optimum accuracy of these
units (Battery life See Specifications below).
Please participate in the preservation of the environment. Return used batteries to
an authorised depot.
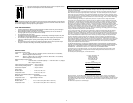
FUNCTION KEYS:
Weather station:
The weather station has four easy to use function keys.
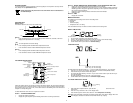
SET key
Press and hold the key to enter manual setting modes: Manual time, Calendar, 12/24 hour
display and Temperature unit °F/°C setting
+ key
To make adjustment for various settings
IN key
Press to display the MIN and MAX indoor temperature records
Press and hold to reset the indoor MIN/MAX temperature records
OUT key
Press to display the MIN and MAX outdoor temperature records
Press and hold to reset the outdoor MIN/MAX temperature records
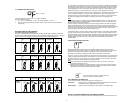
LCD SCREEN AND SETTINGS:
*When the outdoor signal is successfully received by the Weather Station, this icon will be switched on.
(If not successful, the icon will not be shown in LCD) So user can easily see whether the last reception
was successful (icon on) or not (icon off). On the other hand, the short blinking of the icon shows that a
reception is currently taking place.
For better distinctness the LCD screen is split into 3 sections:
Section 1 - OUTDOOR TEMPERATURE
Display the outdoor temperature.
Display the signal reception symbol indicating that receiver is receiving outdoor data
Section 2 - INDOOR TEMPERATURE, INDOOR HUMIDITY, DATE AND WEATHER GIRL ICON
Display the current indoor temperature and humidity in normal display.
Display the weather condition to be expected in form of 15 fancy weather symbols (featured by
Weather girl) which change their appearance depending on the air pressure development and
the current outdoor temperature.
Display the weather tendency indicator and indoor comfort level indicator
Display the date
Section 3 - TIME
Display the current time.
MANUAL SETTINGS:
The following manual settings can be done in the setting mode:
Manual time
Calendar
12/24 hour display
Temperature unit °F/°C setting
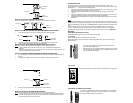
Press and hold the SET key for about 3 seconds to advance to the setting mode:
MANUAL TIME SETTING
To set the clock:
1. The hour digits start flashing in the time display section.
2. Use the + key to adjust the hours and then press SET key to go to the minute setting.
3. The minute will be flashing. Press the + key to just the minutes.
4. Confirm with the SET key and enter the “Calendar Setting”.
CALENDAR SETTING
The date default of the Weather station is 1. 1. of the year 2006 after initial set-up. To set the date:
1. Using the + key, set the year required. The range runs from 2000 to 2029 (default is 2006).
2. Press the SET key to enter the month setting mode.
3. The month digit will be flashing. Press the + key to set the month and then press the SET key to
go to the date setting.
4. The date digit will be flashing. Press the + key to set the date.
5. Confirm with the SET key and enter the “12/24-Hour Display setting”.
12/24 HOUR TIME DISPLAY SETTING
1. After setting time reception ON/OFF, press the SET key, “12h” or “24h” flashes in the LCD.
(default 12 h)
2. Press the + key to select the “12h” or “24h” display mode.
3. Press the SET again to confirm and to enter the “°F/°C Temperature unit setting”.
Note:
When 24h mode display is selected, the calendar format will be "Day. Month." display. When 12h
mode display is selected, the calendar format will be "Month. Day." display.
Year
flashing
SET key
IN key
+ key
OUT key
"Day. Month." (for 24h time display)
"Month. Day." (for 12h time display)
Indoor Relative
Humidity %
Weathe
r
Tendency icon
Weathe
r
Forecast icon
(Weather girl)
Time
Outdoor
Temperature
Outdoor Reception
Signal*
Indoor Temperature
Receiver Low battery indicator
Sensor low batter
y
indicato
r
Date
Indoor comfort indicator
Minutes
(flashing)
Hours
(flashing)