


Connecting
• Your loudspeakers are equipped with positive (Red) and negative
(Black) connection terminals on the rear of the cabinet. These
correspond to the positive and negative terminals on the
appropriate channel (left, right, center, rear etc.) of your amplifi er.
Your Icon loudspeakers will perform well in a variety of locations,
but best results will be achieved using the following guidelines:
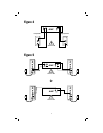
Front Left and Right Speakers (See Figures 2A and 2B.)
• Place on a common wall 6 to 15 feet apart.
• If used in a home theater system, position the speakers
fl anking your video display.
• Position them equal distance from the back wall (if they are
not wall-mounted.)
• Position them at the same height above the fl oor
(for non-fl oor standing models) with the high frequency
drivers at seated ear height.
• Angle speakers toward the listener and even with or forward
of any adjacent obstructions (if they are not wall-mounted.)
• Placing them near a corner or wall provides the greatest
amount of bass while moving the speakers away from room
boundaries reduces bass energy.
• Asymmetrical placement of a pair of speakers from adjacent
side walls can smooth room-induced bass unevenness.
•
Bookshelf models may be placed on shelves or optional fl oor stands.
• Experiment with the above guidelines to suit your taste and to
compensate for your room’s acoustic characteristics.
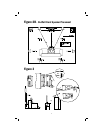
Room Placement
2
Center Channel Speakers (See Figures 2A, 2B and 3.)
• Place immediately above or below the center of your video display.
• These models are supplied with a tilt rod to compensate for
placements above or below seated ear height.
• Use the supplied rubber pad to protect the front bottom edge
of the speaker. (See Figure 3.)
Surround Channel Speakers (See Figures 2A, 2B and 3.)
• Place above seated ear height (approximately 4-5 feet above
the fl oor) on side or rear walls or on optional fl oorstands.
• Attach wall bracket with an appropriately sized screw head
screwed into a wall stud or wall anchor with a suitable weight
bearing capacity. (See Figure 3.)
• See your Klipsch dealer for optional, adjustable wall mounts if
required. These mounts utilize the threaded bushings on the
rear of the cabinet.
Never use the wall bracket for mounting the speaker to
the ceiling.
On Wall Placement (See Figure 3.)
• Icon LCR, center and bookshelf models may be wall-mounted
using the included wall bracket.
Turn your amplifi er off before making any
connections.
Standard Connections (See Figure 4.)(All Models)
• All speakers in your system must be connected in phase with
the positive speaker terminal connected to the positive
amplifi er terminal. Repeat this for the negative speaker
terminal and amplifi er terminals. Most speaker wire has
distinguishing markings on the insulation of one of the
conductors to assist in correct hookup.
• Use 16 gauge (AWG), two conductor, copper wire at a
minimum and larger gauge wire for longer runs. The
connection terminals on your loudspeaker will accommodate
bare wire, and spade terminals.
Active Floorstander Connections
(See fi gure 5.)(XF-48 only)
• In addition to the standard connections, the speakers have
an RCA-jack line-level input that can be used as an input
from your A/V receiver or electronics.
Do not connect both the standard SPEAKER IN and
the LINE IN inputs at the same time as damage to
your equipment could result.
• Your fl oorstanding speakers have a built-in amplifi er that
needs to be connected to an AC outlet. Once plugged in, it
will be either ON or in STANDBY depending upon the position
of the AUTO POWER switch. You must unplug the power cord
from the AC outlet to completely turn off your speaker during
extended periods. (i.e. vacations.)
Power - This switch allows you to select either “AUTO” or “ON”
for the speakers built in amplifi er. When “AUTO” is selected, the
speaker will automatically turn on when it senses a signal. It will
automatically turn off after 20 minutes if no signal is present. In the
“ON” setting the speaker will remain on as long as the AC power
cord is plugged into a wall socket. The power indicator LED on the
front panel will illuminate BLUE when speaker is on and RED when
the speaker is in standby. The LED will be off if the AC power cord
is not connected to an AC outlet.
Input Sensitivity - This switch adjusts the level of the input signal
to optimize the performance of the built-in amplifi er. Select “LOW”
when connecting most A/V receivers via the “SPEAKER” or “LINE”
inputs. Select “HIGH” when connecting devices such as the audio
outputs of a TV to the “LINE” inputs.
Active Floorstander Controls
(See fi gure 5.)(XF-48 only)
With all connection types, take care that there is no
contact between the positive and negative terminals
at the speaker and amplifi er. Damage to your equipment
may result.
e
Bass Management
When using your speakers in a home theater system, consult
the owner’s manual of your surround electronics for proper
application of bass management settings.
• As a general rule, compact speakers (Bookshelf, Center
Channel and Surrounds) are set to the “Small,” or bass-
limited setting.
• Floorstanding speakers are typically set to the “Large,” or
full-range setting.
• Also refer to the electronics instructions for adjusting the
relative volume levels of the speakers so they are at the same
level when in the listening position.