


Recharging of the built-in battery
2
1
Slide the BATT. ON/OFF switch
on the side view to [ON].
It should be set to [ON] before using
the player for the first time after
purchase.
Turning power on and setting the display language,
date and time
3
1
Press the / button shortly to turn the player on.
3
Press the multi-control (Up/Down) button to select the display
language, date or time.
Multi-control (Up) button :
Press to increase the setting value.
Multi-control (Down) button :
Press to decrease the setting value.
4
Repeat steps 2 and 3 for each of other items.
5
Press the multi-control (Center) button.
The display language, date and time are set definitively.
2
Connect the AC adaptor (provided accessory) to the player.
The recharging icon (red) is appeared on the display during re-
charging of the battery. Recharging completes in about 2.5 hours.
When the battery has been recharged, the recharging completion icon
(green) is displayed on the display.
Every time the multi-control (Right) button is pressed, the selected
item switches in order of display language \ [M] (Month) \ [D]
(Day) \ [Y] (Year) \ Hour \ Minute. Pressing the multi-control
(Left) button switches them in the reverse order.
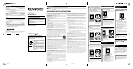
Installation of the application software
4
When the PC is connected for the first time to the player,
the installer of the application software is launched automati-
cally. (The instruction manual and other required data are also
installed in the PC.)
STEP 2
Installation of the application software
STEP 1
Connection of the PC and player
Playback of audio data
6
1
Connect the
headphones
(provided
accessory).
Unpacking
1
Unpack the unit carefully and make sure that all the acces-
sories are present.
AC adaptor (AC-050150A)
If any accessories are missing, or if the unit is damaged or fails to operate,
notify your dealer immediately. If the unit was shipped to you directly, notify
your shipper immediately. Kenwood recommends that you retain the original
carton and packing materials in case you need to move or ship the unit in the
future.
Keep this manual handy for future reference.
OFF BATT. ON
AC adaptor (provided
accessory)
To wall AC outlet
Power cord (provided
accessory)
AC adaptor
(provided accessory)
To wall AC outlet
PC
USB cable
(provided
accessory)
Power cord
(provided accessory)
Names and functions of parts
1 DC 5V (External power)
jack
2 USB jack
3 Phones jack
4 Strap eyelet
5 BATT. ON/OFF (Built-in battery
on/off) switch
6 Display
7 / (Power/Menu) button
When the player is off, press the
button shortly to switch it on.
When the player is on, press and
hold the button for more than 2
seconds to switch it off.
When the player is off, press the
button to open the [MENU] view.
Pressing the button when the dis-
play backlight is dimmed or extin-
guished turns the backlight on.
(Top view)
(Front view)
(Right side
view)
(Left side
view)
7
9
#
@
12 3
8
0
5
4
$
6
!
8 Multi-control (Center) button
9
Multi-control (Right/Left) button
0
Multi-control (Up/Down) button
Press the multi-control (Up/Down)
button deeply makes it possible
to scroll the display or increase the
fast forward/fast reverse speed.
! Triangle LED
@ Volume (+) button
# Volume (
-
) button
$ HOLD switch
Slide the switch in the direction
of HOLD so that the player will
not change the current operat-
ing condition even when a but-
ton is pressed by mistake, for
example when the player is car-
ried in power off status or used
in a train.
Power cord USB cable
Headphones
No CD-ROM is provided with the Player.
The application software, the INSTRUCTION MANUAL and other re-
quired data are stored in the built-in HDD of the Player.
Use the enclosed AC adaptor (AC-050150A) for this product.
Minimum requirements
7 Operating system (OS):
Microsoft Windows XP Professional
Microsoft Windows XP Home Edition
Microsoft Windows 2000 Professional
7 PC: IBM PC/AT compatible model.
7 CPU: Intel Pentium II 300MHz or higher.
(Pentium III, 1 GHz or more recommended)
7 Memory: 128MB or more.
7 Hard disc space:
160 MB or more except for audio data.
7 USB jack (USB 2.0/ USB 1.1)
7 Windows Media Player 9 or Windows Media Player 10
POINT :
¶ Operation is not guaranteed in all the environments meeting the above
requirements.
¶ Use a PC in which the OS has been preinstalled. The operation cannot be guar-
anteed when the application software is run on a PC running an upgraded OS.
¶ Operation is not guaranteed on a PC assembled by the user.
Notes on recorded audio data
Even when the recorded audio data is destroyed or erased due to a trouble in
the player or the PC, KENWOOD will not assume any liabilities for the loss of
data or other associated damages (such as the expenses required to purchase
or obtain the music audio data).
Trademark Information
÷ "Microsoft" and "Windows Media" are trademarks or registered
trademarks of Microsoft Corporation in the USA and other coun-
tries.
÷ "IBM" and "PC/AT" are trademarks or registered trademarks of Interna-
tional Business Machines Corporation in the USA and other countries.
÷ "Pentium" and "Intel" are trademarks or registered trademarks
of Intel Corporation in the USA and other countries.
÷ "Adobe Reader" is a trademark of Adobe Systems Incorporated.
Other system names and product names are also trademarks or regis-
tered trademarks of their respective developers. Note that the "™"
and "®" markings are omitted in the text of this manual.
1
Boot the PC.
2
Connect the AC adaptor (provided accessory) to the player.
4
Connect the PC to the player using the USB cable (provided
accessory).
If a USB cable other than provided is used, the required operations may
be unavailable.
3
Press the / button shortly to turn the player on.
6
Click on [Yes] if you want to view the INSTRUCTION MANUAL
after completion of the setup.
To view the PDF files of the INSTRUCTION MANUAL, it is required to
install the Adobe Reader.
7
Click on [Finish] to finish the installation, then reboot the PC.
The details of the display may be variable depending on PC.
IMPORTANT: If you deleted Kenwood Media Application from the PC by
mistake, open the explorer and select [My Computer] \ [Local disk] \
[Program Files] \ [KENWOOD] \ [HD20GA7] \ [BACKUP] \ [INSTALL]
\ [ Install] to reinstall the application.
1
Double-click on shortcut icon on the desktop.
Kenwood Media Application is can also be launched by clicking on
[Start] \ [All Programs] \ [KENWOOD] \ [Kenwood Media
Application] \ [Kenwood Media Application].
Audio data in the MP3, WMA or WAV format in the PC can be trans-
ferred to the Player using Kenwood Media Application. Copyrighted
audio data should be transferred using the Windows Media Player.
✍ [Kenwood Media Application] INSTRUCTION MANUAL
[Transfer of audio data from the PC to the player] &
[Operations using the Windows Media Player] •
3
After checking the audio data to be transferred with marks,
click on the transfer button in the transfer panel.
2
Select the library or folder to be transferred by clicking
on it in the tree list.
The file list shows the audio data registered in the selected library or
playlist in the PC.
[PC] tab
Transfer of audio data from the PC to the player
5
The audio data with marks in the file list are transferred to the player.
(When a folder listed is checked with the mark, the entire checked
folder can be transferred.)
Transfer button
Drive select button
4
After completing transfer of audio data, disconnect the player
from the PC.
Be sure to exit from all running applications before proceeding
to the following steps.
7 Microsoft Windows XP Professional/ Microsoft Windows XP
Home Edition:
1 Click on [Safely Remove Hardware] on the taskbar.
2 Click on
[ ].
The [Safe To Remove Hardware] window opens.
3 Unplug the USB cable from the player.
7 Microsoft Windows 2000 Professional:
1 Click on [Unplug or Eject Hardware] on the taskbar.
2 Click on [
].
The [
Safe To Remove Hardware] window opens.
3 Click on [OK].
4 Unplug the USB cable from the player.
2
Press the / button shortly to turn the player on.
The Home view appears.
To return to the previous display page, press the multi-control
(Left) button.
Carrying case
1
When the initial display of the installer appears, click on [Next].
3
Specify the installation destination and click on [Next].
2
Read the message in the [Licensing Agreement] display, select
[I accept the terms of the license agreement] to express that you
agree with the message, and click on [Next].
4
Click on [Install].
Installation starts.
5
To create the shortcut icon on the desktop, click on [Yes].
STEP 0
Preparation of audio data
To record the music CD data in the PC, use the Windows Media Player
or a similar application.
2
Press the multi-control (Right/Left) button to select the item to
be changed.
When the player is turned on for the first
time, the [INITIAL SETTINGS] view is dis-
played.
7 Microsoft Windows XP Professional/ Home Edition
Select [Run the program], and click on [OK].
If the installer does not launch automatically:
Open the Explorer, etc., select [HD20GA7] and then double-
click on [ Install].
POINT:
÷ The displayed window is variable depending on the environment of your PC.
÷ For details, refer also to the instruction manual of your PC.
To install the application software, log in with the user having the
Administrator authority and be sure to exit from other running
applications.
The authority of Administrator is required to use Kenwood Media
Application.
*QUICK_5597_EN 2005.06.17, 2:10 PM3