


5
15
POWER SUPPLY
AC power: 230-240 Volt, 50Hz
DC power: 9 Volt battery type (not
provided) for clock back-up system only.
An alkaline type battery is recommended.
For optimum performance, this battery
should be replaced every 6 months
1. Connect the 9V battery inside the
compartment at the bottom of
the unit (11).
2. Insert the AC power cord into a
convenient AC power outlet. Ensure
the switch on the power outlet is in the
off position, plug in the power cord, and
then switch on at the AC power outlet.
Back-up system: Ensures that the unit
will continue to operate as normal during
an AC power disruption (in order to
preserve the battery life the display will
not light).All clock settings will be kept in
the memory, however, the clock time may
require adjustment for exact accuracy. If
this battery is not installed, the display will
blink 12:00 to indicate that you have to
reset the time and alarm settings.
SETTING THE TIME
1. Press and hold TIME (6) and press TIME
SET (1) or (2) to adjust to your desired
time.
2. Release Time (6) to store your settings
in memory.
LISTENING TO THE RADIO
1. Press RADIO BUTTON (3).
2. Switch to AM or FM position with the
Band selector (14).
3. For a better reception in FM, extend
the antenna (15). For better reception
in AM rotate the unit.
4.Adjust the volume (12) to the desired
level.
5. Select your desired radio station (13).
6.To stop listening press STOP BUTTON (4).
SETTING THE ALARM WAKE-UP
MODE
This unit allows you to set two different
wake up times that you can choose to use
independantly or simultaneously.
• AL1 or AL2 or AL1 and 2
• Select (10) to AL1 Position.
Press and hold ALARM (8) and press
TIME SET (1) or (2) to adjust your
desired alarm time, then release the
ALARM (8) to store your setting in
memory.
• Select (10) to AL2 Position.
Press and hold ALARM (8) and press
TIME SET (1) or (2) to adjust your
desired alarm time, then release the
ALARM (8) to store your setting in
memory.
1
13
12
2
8
4
14
3
7
6
• To wake up to the radio follow steps 1
to 5 in “Listening to the Radio”, then
select AL1, AL2 or AL1 and 2, (10), then
select the AUTO position (9). The alarm
indicator will alight (16).
• To wake up to the alarm sound, select
the BUZZER position (9).The alarm
indicator will alight (16).
STOPPING THE ALARM
The alarm is programmed to operate for 1
hour and 59 minutes
1. SNOOZE (5): Press to stop the alarm
temporarily, the alarm will ring again
after 7 minutes.
2. STOP (4):The alarm will stop and will
sound again 24 hours later.
3. OFF (9):Turns off the alarm
permanently, alarm indicator will go off.
SLEEP TO MUSIC
Select AM or FM (14) then press SLEEP
(7), the sound will come on for 59
minutes.To change this sleep time press
and hold SLEEP (7) and use TIME SET
BUTTONS (1) or (2) to increase or
decrease the time by 1 minute intervals.To
turn off the music earlier press STOP (4).
CARE AND MAINTENANCE
Use only a clean, dry cloth to clean the
external surfaces of the radio only.
Do not attempt to open the case of the
radio at anytime, there are no customer
serviceable parts inside.
Have the radio serviced by a qualified
service agent should the unit require
access to internal components.
When not in use, pack the radio in its
original box for best protection and store
in a cool, clean and dry location.
IMPORTANT
Do not throw batteries in fire!
This radio is designed for indoor use only.
Do not immerse in water or allow liquids
to come in contact with the radio.
Extreme caution and supervision is
necessary when appliance is used by
or near children, invalids or animals.
Young children should be supervised to
ensure they do not play with the appliance.
16
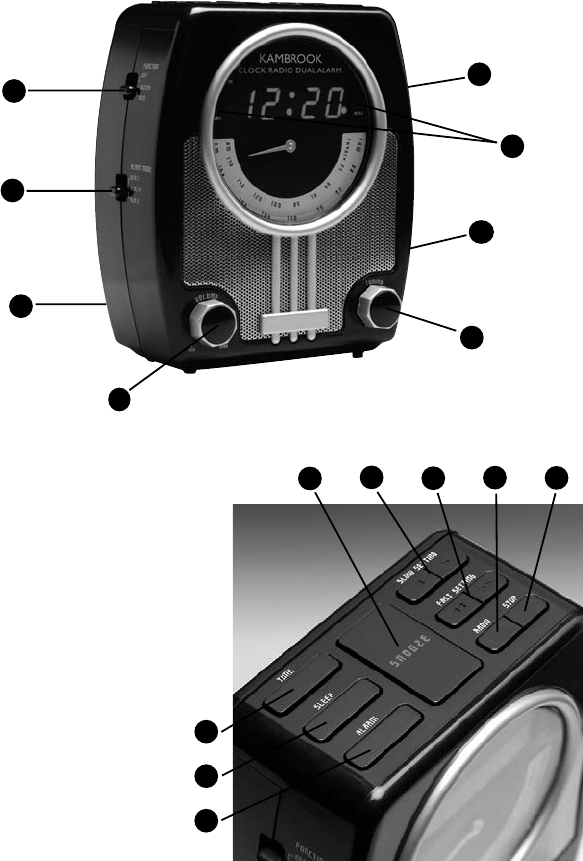
1. Time set – slow
2. Time set – fast
3. Radio
4. Stop
5. Snooze
6. Time
7. Sleep: On / set
8. Alarm Controller
9. Function Controls
10. Dual Alarm Controls
11. Battery Back-Up
Compartment
12. Volume Control
13. Tuning Control
14. AM/FM Band Selection
15. FM Antenna (not shown)
16. Alarm Indicator Lights
9
10
11
Features of Kambrook Clock Radio
10398 KCR90 manual 28/3/07 12:09 PM Page 4