DIGITAL AUDIO PLAYER
XA-MP2
INSTRUCTIONS
ENGLISH
XA-M
P2
256
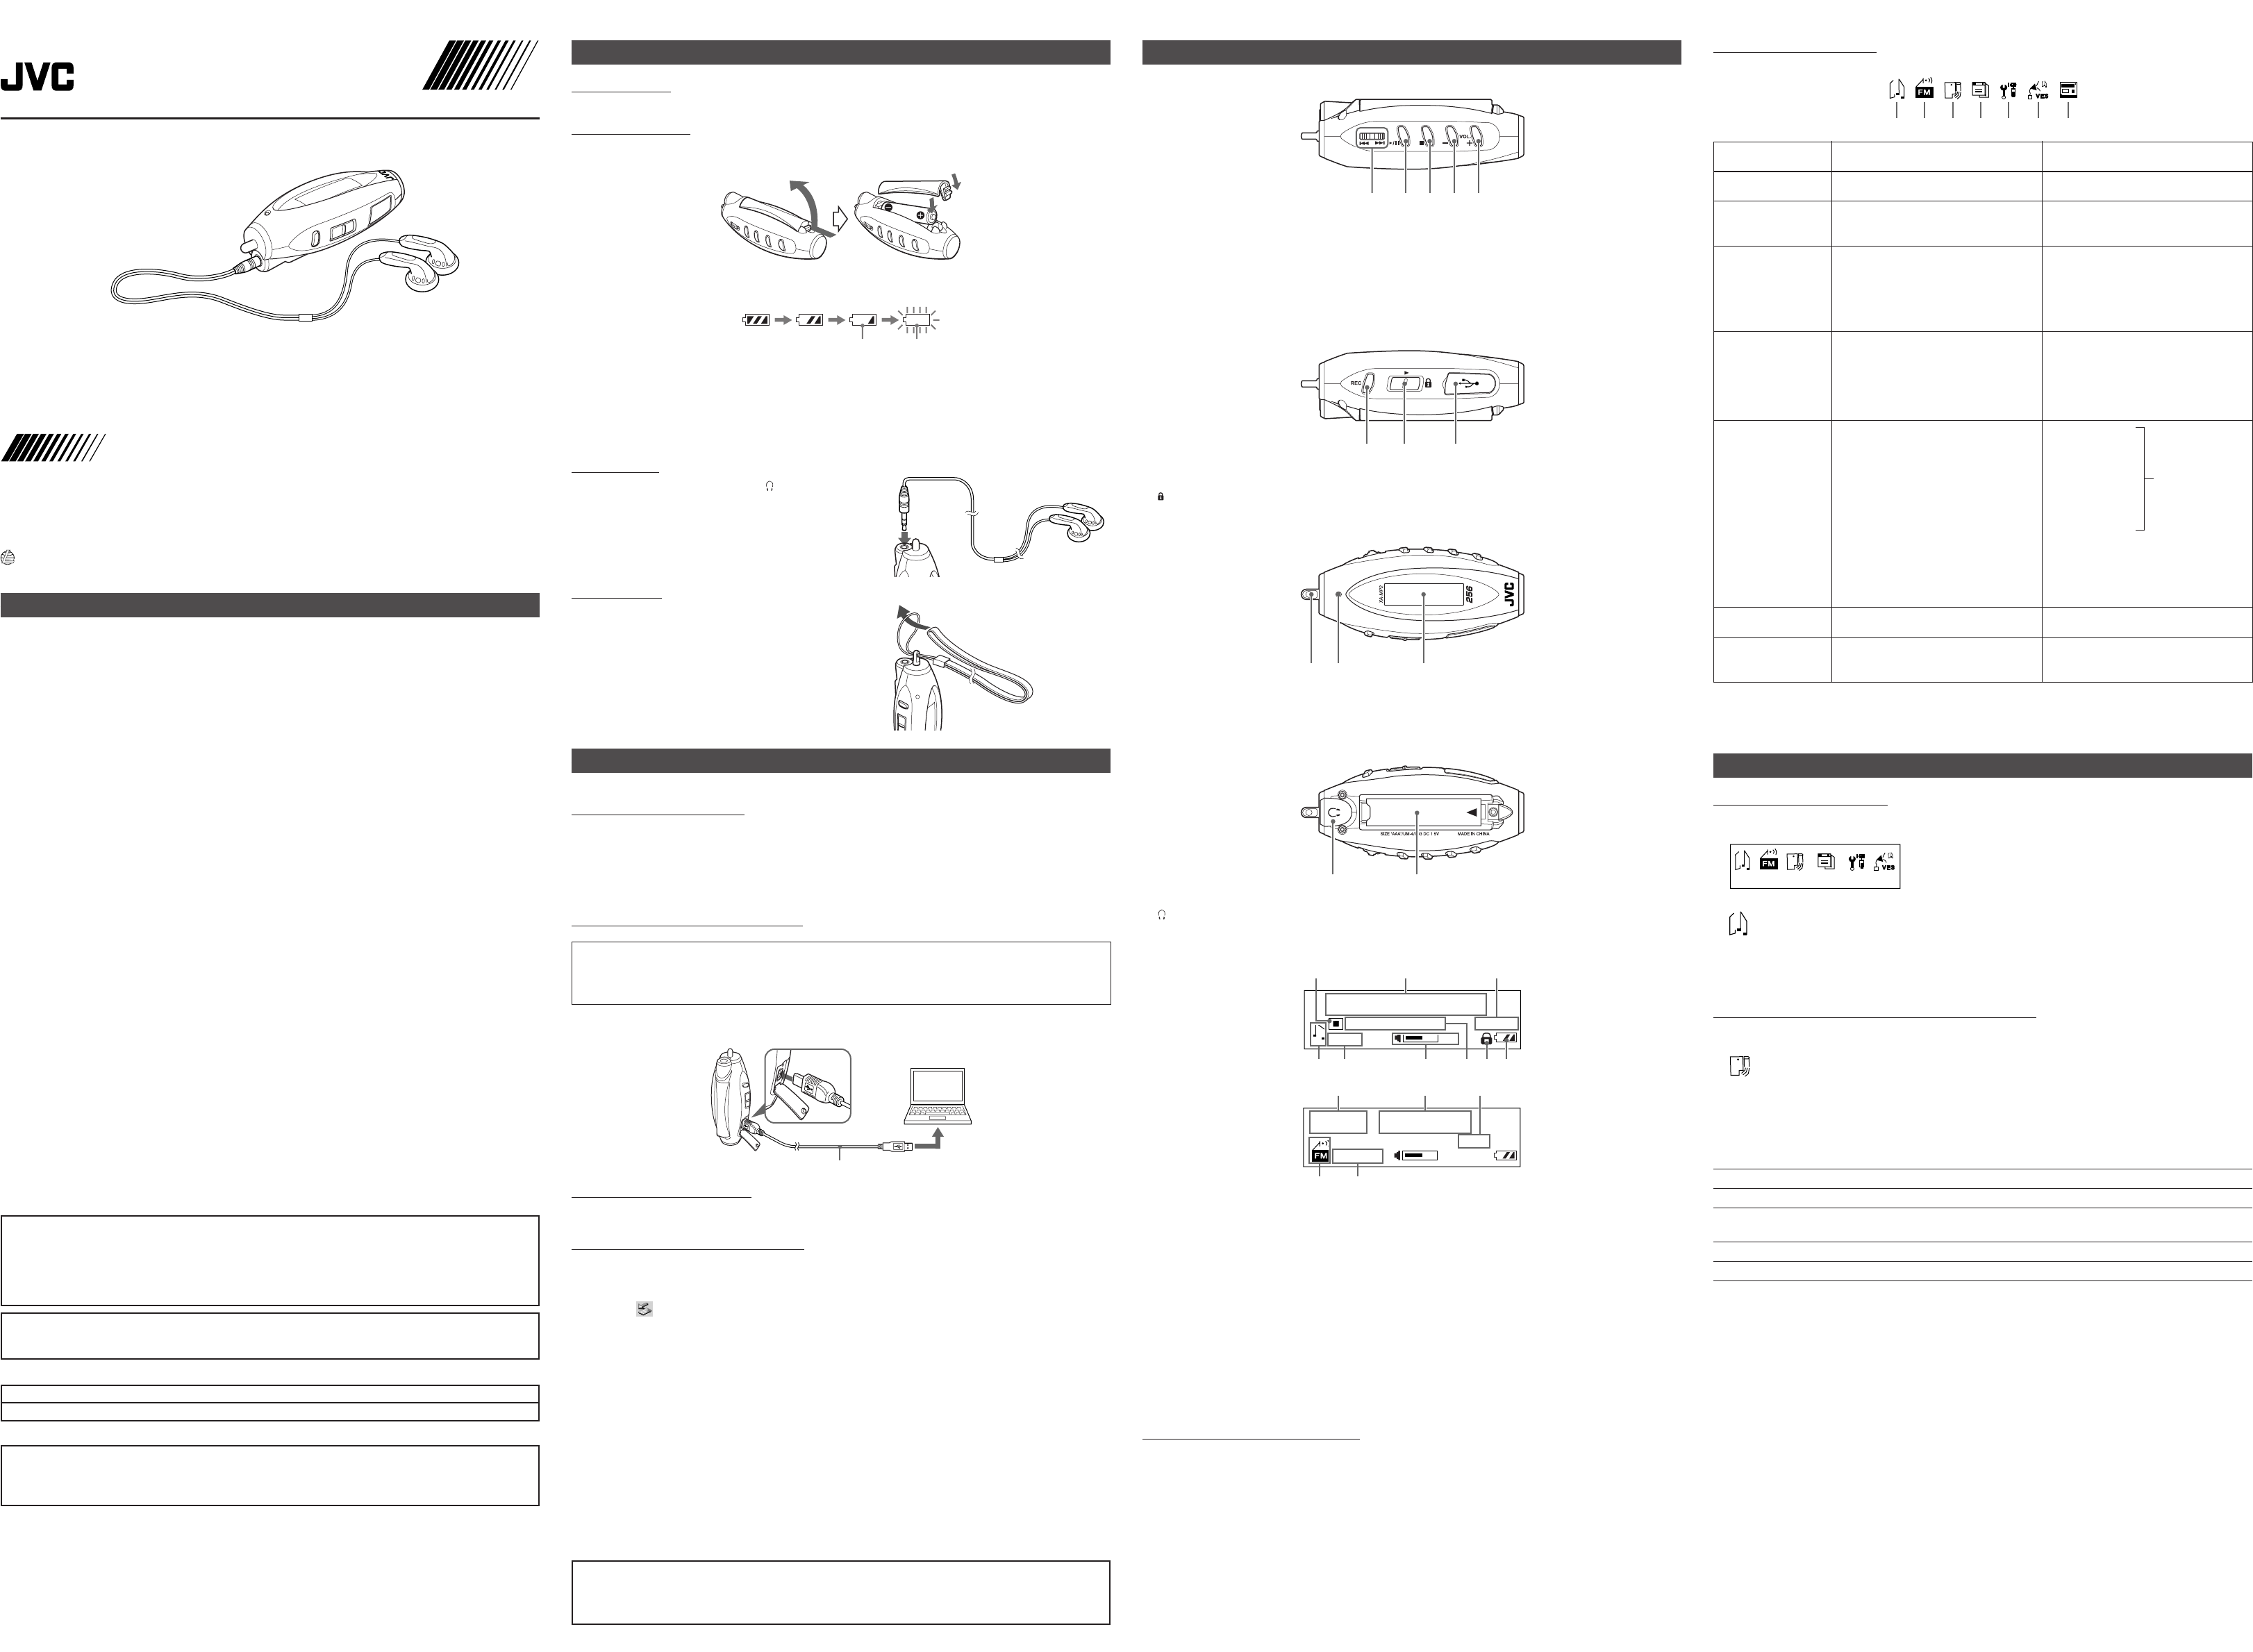
GENERAL CONTROLS
RIGHT SIDE
MENU
1234
5
1 MENU button ...................... Press to display the main menu
¢ (forward) jog dial .......... Slide to skip a track forward
4 (reverse) jog dial .......... Slide to skip a track backward
2 6 (play/pause) button ...... Turns the player on, starts and pauses playback
3 7 (stop) button .................... Stops playback, stops recording, switches the player off
4 VOL– button........................ Turns the volume level down
5 VOL+ button........................ Turns the volume level up
LEFT SIDE
67 8
6 REC button ......................... Press to start voice track recording and FM broadcast recording
7 (hold) switch ..................... Locks and unlocks all controls
8 USB connector
FRONT SIDE
-09
9 Strap hole
0 MIC ..................................... Microphone for recording
- LCD Display
REAR SIDE
=~
= (earphones) jack
~ Battery compartment
DISPLAY
Rock
18
00:00/00:00
002.Another Mp3
02/26
54 98
321
6 7
STEREO
18
LOAD 96.00MHz
P09
=-0
!~
1 Current status of playback
2 File name
3 Current track number / Total track number
4 Music mode
5 EQ (sound mode)
6 Volume level
7 Elapsed time / Total playing time of current track
8 Lock icon
9 Battery remain indicator
0 Current status of the FM mode
- Frequency
= Preset number
~ FM mode
! Mono / Stereo indicator
TURNING ON / OFF THE PLAYER
To turn the player on, press 6 (play/pause).
The backlight turns on.
To turn the player off, press and hold 7 (stop).
NOTES
• The player turns off automatically after 60 seconds without pressing any button.
• When the player is turned on, it resumes the mode it was in when it was last turned off.
ABOUT THE MAIN MENU
The main menu of the player is structured as follows.
1 3 4 5 62 7
NOTE
The menu mode returns to the previous display if no operation is made for 10 seconds.
PLAYING A TRACK
PLAYING A MUSIC TRACK
1. Press MENU while the player is on.
Main menu is displayed.
2. Slide ¢ (forward) / 4 (reverse) to select the “Music Play” icon then press 6 (play/pause) twice.
Music Play
3. Slide ¢ (forward) / 4 (reverse) to select the desired track.
4. Press 6 (play/pause).
The playback starts.
The playback order is in the order of files downloaded.
PLAYING A VOICE AND FM RECORDED TRACKS
1. Press MENU while the player is on.
2. Slide ¢ (forward) / 4 (reverse) to select the “Voice Record” icon then press 6 (play/pause).
Voice Record
3. Slide ¢ (forward) / 4 (reverse) to select the desired track.
4. Press 6 (play/pause).
The playback starts.
OTHER OPERATION
To Do
stop playing press 7 (stop)
pause playing press 6 (play/pause) during playback
skip tracks slide ¢ (forward) / 4 (reverse)
During playback, it skips to the beginning of the next/previous track.
search slide and hold ¢ (forward) / 4 (reverse) during playback
turn the power off press and hold 7 (stop)
NOTE
When you stop playback or turn the power off during playback, the player will resume playback from the beginning
of the track next time when you start playback.
Thank you for purchasing this JVC product.
Please read these instructions carefully before starting operation to be sure to
obtain optimum performance and a longer service life from the unit.
LVT1330-001A [B/C/US/UJ]
0205KMMBICORI
EN ©2005 Victor Company of Japan, Limited
CAUTIONS
Listening precautions
• Do not play your earphones at a high volume.
• Hearing experts advise against continuous extended play.
• If you experience a ringing in your ears, reduce volume or discontinue use.
• Do not use while operating a motorized vehicle. It may create traffic hazard and is illegal in many areas.
•You should use extreme caution or temporarily discontinue use in potentially hazardous situations.
• Even if your earphones are an open-air type designed to let you hear outside sounds, do not turn up the
volume so high that you cannot hear what is around you.
Sound can be deceiving. Over time your hearing “comfort level” adapts to higher volumes of sound. So what
sounds “normal” can actually be loud and harmful to your hearing.
Guard against this by setting your equipment at a safe level BEFORE your hearing adapts.
To establish a safe level:
• Start your volume control at a low setting.
• Slowly increase the sound until you can hear it comfortably and clearly, and without distortion.
Once you have established a comfortable sound level:
• Set the dial and leave it there.
Dry cell batteries
To prevent damage to the batteries and electrolyte leakage, heed the following points.
• Align the ª and · polarities properly when inserting the batteries.
• Remove the batteries if you do not plan to use the player for a long period of time.
• Do not throw batteries into a fire, and do not short-circuit, disassemble or subject them to excessive heat.
• Do not attempt to recharge dry cell batteries.
Carrying dry cell batteries around
When putting dry cell batteries in a pocket or bag, ensure that no other metal objects such as a necklace are
placed together with them. Contact with any metal may cause short-circuiting which may cause a fire.
Player
• No altering or remodeling
This can cause malfunctioning.
• No dropping or strong impacts
This may damage the player.
• Locations to be avoided
Avoid using the player in the following locations since they can cause malfunctioning.
1. Bathrooms and other moisture-prone places.
2. Warehouses and other dusty places
3. Very hot places near heating appliances, etc.
Do not leave the player exposed to direct sunlight for long periods of time
This may deform or discolor the player and may also cause malfunctioning.
CAUTION:
• Do not place any naked flame sources, such as lighted candles, on the apparatus.
• When discarding batteries, environmental problems must be considered and local rules or laws governing
the disposal of these batteries must be followed strictly.
• Do not expose this apparatus to rain, moisture, dripping or splashing and that no objects filled with liquids,
such as vases, shall be placed on the apparatus.
WARNING:
TO REDUCE THE RISK OF FIRE OR ELECTRIC SHOCK, DO NOT EXPOSE THIS APPLIANCE TO RAIN
OR MOISTURE.
For Canada Only:
This Class B digital apparatus complies with Canadian ICES-003.
Cet appareil numérique de la classe B est conforme à la norme NMB-003 du Canada.
For Canada Only:
INFORMATION
This digital apparatus does not exceed the Class B limits for radio noise emissions from digital apparatus as
set out in the interference-causing equipment standard entitled “Digital Apparatus”, ICES-003 of the Department
of Communications.
1 Music Play
Mode
Function
Selectable menu
when you are in this mode
Select to playback music files (see
“PLAYING A TRACK”)
1 2 3 4 5 6 (During playback, 4
will not be displayed.)
2 FM Mode Select to listen to FM broadcast (see
“LISTENING TO FM RADIO
BROADCASTS”)
137
3 Voice Record Select to playback recorded tracks and
to record a voice track and FM
broadcasts (see “PLAYING A TRACK”,
“LISTENING TO FM RADIO
BROADCASTS” or “RECORDING A
VOICE TRACK”)
1 2 3 4 5 6
4 File Delete Select to delete a file (see “DELETING
A FILE”)
1 2 3 4 5 6
NOTE
When you are in 1 Music Play mode or
3 Voice Record mode, the 5 Set up
icon will not be displayed when no
target files are stored in the player.
5 Setup Select to setup the functions (see
“SETTING UP FUNCTIONS”)
A Language
B Play mode
C Back Light
D Contrast
E EQ SETUP
F Sleep Timer
G Format
H Default Setting
NOTE
When you are in 1 Music Play mode or
3 Voice Record mode, the 5 Set up
icon will not be displayed when no
target files are stored in the player.
6 Firmware Version Select to check the Firmware Version of
the player
—
7 Save Station (FM
Mode only)
Select to preset a station (see
“LISTENING TO FM RADIO
BROADCASTS”)
—
GETTING STARTED
POWERING UP
This digital audio player operates on battery.
BATTERY POWER
Remove the battery compartment cover and insert one LR03 (AAA) alkaline battery matching the polarities (+
and –) indicated in the bottom of the battery compartment, then replace the compartment cover.
On the Battery remain indicator
The battery remain indicator in the display changes as follows.
low battery change the battery
If all the slashes disappear and the icon itself blinks, you need to change the battery.
Important Battery Information
- If you are not going to use your player for a month or more, be sure to remove the battery in case the battery
leaks and causes damage.
- Dispose of batteries in the proper manner, according to federal, state, and local regulations.
- Discard leaky batteries immediately. They can cause skin burn or other personal injury.
EARPHONES
Connect the supplied earphones to the jack on the player.
Incorrect connection of the earphones may cause interference
due to static electricity during play.
NECK STRAP
You can use the supplied neck strap for easy carrying.
TRANSFERRING THE DATA
You can transfer MP3 and WMA format audio files from the computer to your player.
SYSTEM REQUIREMENTS
- Microsoft Windows 98SE/Me/2000/XP (Home/Professional)
- CD-ROM drive
- Pentium 200 MHz
- RAM 32 MB (Windows 98SE, Me, 2000) or 64 MB (Windows XP)
- 20 MB HDD space (or more HDD for storing music file)
- USB port
CONNECTING TO THE COMPUTER
For Windows 98SE user:
Before connecting your player to the computer for the first time, be sure to install the USB driver from the
supplied CD-ROM into your computer. Place the CD-ROM in your disc drive and follow the instructions
displayed on the computer.
1. Open the rubber cap of the USB connector.
2. Connect the player to a USB port of your computer using the supplied USB cable.
USB cable (supplied)
DOWNLOADING THE DATA
1. Open the player’s folder (removable disk or device) from My Computer or Explorer.
2. Copy and paste or drag and drop the MP3/WMA files from the computer into the player’s folder.
REMOVING FROM THE COMPUTER
Disconnect the player from the computer by following the necessary steps according to your computer for safety
removal.
For Windows 2000/Me/XP users:
Left-click the icon in the taskbar, and follow the messages appear.
For Windows 98SE users / When the icon is not displayed in the taskbar:
1. Open “My Computer” on your computer.
2. Click on “Removable Disk”, then right-click to select “Eject”.
3. Remove the player from the computer.
NOTES
- The player supports MP3 ID3 V1 tags, ID3 V2 tags and WMA tags.
- The player can be used as a removable disk.
- Music protected by Windows Media Player cannot be played even if you download it. The player skips the
protected music and starts playback of the next track.
- The FM broadcast and voice tracks recorded by this player can be uploaded to a computer. However, MP3 and
WMA files in the player cannot be uploaded.
- MP3 and WMA files in the player cannot be played on a computer.
- When connecting to a computer, the backlight of the player will blink for a short while. Start uploading/downloading
a file or disconnect the player after the backlight turns off.
- The operation with an USB hub or extended USB cable is not guaranteed.
- Operation is not guaranteed with all computers that meet the system requirements mentioned above.
• Microsoft, Windows and Windows Media are either trademarks or registered trademarks of Microsoft
Corporation in the United States and other countries.
• Other names of systems and products mentioned in these instructions are usually registered trademarks of
the manufacturers who developed the system or product concerned.
Music Play mode/
Voice Record mode
FM mode
See
“SETTING UP
FUNCTIONS”
001_XA-MP2_BCUSUJ_A2 3/1/05, 3:12 PM1


