


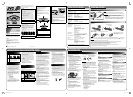

Basic procedure
Playback procedure
3 Select a station.
• In SW reception, you can finely tune in a
desired station by turning the FINE TUNING
knob.
4 Adjust the volume.
1 Set the source to TUNER.
2 Select the band—FM/SW/MW.
To stop playback
• The tape also stops when it reaches its end.
To pause playback
• To resume, press 8 PAUSE again.
To fast-forward/rewind a tape
• When the tape reaches its end, press § STOP/
EJECT to release 1 FF or ¡ REW.
1 Set the source to TAPE/ OFF.
2 Open the cassette holder, then load a
cassette.
3 Close the cassette holder gently and
start playback.
4 Adjust the volume.
To use the beat-cut function
When recording an MW broadcast, beats may
occur. In this case, slide the BEAT CUT switch on
the rear to select the beat-cut setting, 1 or 2.
NOTES
• It may be unlawful to record or play back
copyrighted material without the consent
of the copyright owner.
• You can adjust the volume level while
recording. The proper recording level is set
automatically and it is not affected by the
volume level.
•
If a TV is turned on and it is too close to the unit
while recording, the recorded sound may have
excessive noise. While recording, turn the TV off
or keep the distance between the TV and the
unit.
Recording on a tape
1 Prepare the recording source.
• For the radio recording:
Set the source to TUNER and tune in to a
desired station.
• For the disc or USB device recording:
- Set the source to CD/USB and load a disc
or connect a USB device.
- Select a track or program the playback
order if necessary. (See “Program
playback.”)
• For AUDIO IN recording:
- Set the source to AUDIO IN and turn on an
external device.
2 Load a blank or erasable cassette.
Use only a type-I (normal) tape.
3 Start recording.
• 2 PLAY is also pushed down together with
the ¶ REC button.
• When recording from the disc/USB device,
playback of the disc/USB device starts at
the same time—Synchronized recording.
To stop recording
Press § STOP/EJECT.
Recording also stops when the tape reaches its
end.
• For disc, USB device or AUDIO IN recording:
– If the tape reaches its end first, the playback
of the disc/USB device pauses automatically.
However, the playback of an external device
continues.
– If the playback of the disc, USB device
or external device stops first, recording
continues. In this case, press § STOP/
EJECT to stop recording.
Up to 20 tracks can be programmed to play in a
desired order.
To program the playing order
While playback is stopped...
1 Show the program creation display.
2 Select a desired track.
3 Add the track to the program.
4 Repeat steps 2 to 3.
5 Start playback.
• If you press 7 while you are programming
tracks, the programmed order is erased.
1 Load a disc or connect a USB device.
2 Set the source to CD or USB.
3 Start playback.
4 Adjust the volume.
To stop playback
To pause playback
• To resume, press the same button again.
• When a USB device is played back, indicator
appears on the display.
• When a WMA file is played back, indicator
appears on the display.
To select a track
To select a folder (for MP3/WMA)
During playback...
1 Show the folder selecting display.
2 Select the desired folder while the
indicator is flashing.
To locate a desired position on the disc
During playback...
Adjusting the volume
Turn the VOLUME knob to increase or decrease
the volume.
• Set the volume to minimum when you turn
the unit on or start playing a tape.
TUNER OPERATIONS
Adjusting the antenna
Improving the FM reception
When an FM stereo (FM ST) broadcast is hard to
receive or noisy, select the monaural reception
(MONO).
• To restore stereo reception, switch to FM ST.
MW
The MW antenna is built in, so adjusting the
position of the unit may help MW reception.
FM/SW
GENERAL CONTROLS
Basic procedure
DISC/USB OPERATIONS
Repeat/Random playback
Select the desired playback mode.
Each time you press the button, the playback
mode changes as follows:
Indicator Playback mode
Repeats a single track/file.*
Repeats files in a folder. (For
MP3/WMA only)
Repeats all tracks/files.*
Plays tracks/files at random.
• To cancel, press the same button repeatedly
until the indicator above disappears from the
display.
* Repeat playback is also available during
program playback.
Erasing a tape
Previous recording is overwritten when a new
recording is made.
To erase a tape without making a new
recording
1 Set the source to TAPE/ OFF.
2 Start erasing.
Program playback
TAPE OPERATIONS
Decrease
Selecting the source to play
Slide the FUNCTION selector to select CD/USB,
TAPE/
OFF, TUNER or AUDIO IN.
CD/USB:
To play back a disc or USB device. (See “DISC/USB
OPERATIONS“ for operation.)
TAPE/ OFF:
To play back a cassette tape. (See “TAPE
OPERATIONS“ for operation.)
• Once you start playing a tape, the power turns
on.
TUNER:
To listen to the radio broadcast. (See “TUNER
OPERATIONS“ for operation.)
AUDIO IN:
To playback an external device, such as a DAP
(Digital Audio Player).
Play back a device after you have connected it.
If the AUDIO IN sound is too quiet, turn that
volume up.
• Refer to the instructions supplied with the
device.
Increase
Turning the unit off
Slide the FUNCTION selector to TAPE/ OFF.
• You can play a tape even while the selector is set
to TAPE/ OFF.
Listening with the headphones
Connect the headphones with the stereo mini
plug (φ3.5 mm) to the PHONES jack on the rear.
• While the headphones are connected, no sound
comes out from the speakers.
• Before connecting the headphones, make sure
to turn down the volume.
or
ø
Tape running direction
Moves to indicate the
current frequency
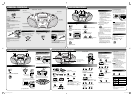
Remote control
Main unit
Remote control
or
or
Press and hold
When using the remote
control, point at the remote
sensor directly.
Tape controls
Disc holder
Cassette holder
Radio controls
Disc / USB controls
Display
Main unit Remote control
Main unit Remote control
Main unit Remote control
Main unit Remote control
Main unit Remote control
or
or
Press and hold
Main unit Remote control
Main unit Remote control
or
or
Main unit Remote control
Main unit Remote control
The total number of tracks or folders
The current track number
Folder number
Lights only when
playing an MP3
file.
• The next program
number flashes on the
display.
Main unit Remote control
• Now you can select the
first track of the program.
AUDIO IN / USB terminal
or
or
To edit the program
1 While playback is stopped, press PROGRAM/
FOLDER repeatedly to select the program
number of the track you want to replace.
• To add a track at the end of the program,
press PROGRAM/FOLDER again when you
reach the last program number. Then the
next program number is shown on the
display.
2 Perform steps 2 to 3 on the left column to
select a new track.
To erase the entire program
Press 7 while playback is stopped. The
indicator disappears from the display.
• The entire program is also erased in the
following cases:
– when you open the disc cover.
– when the unit is turned off.
– when you select another source.
– when you disconnect the USB device.
Main unit
Remote control
or
Main unit Remote control
or
or
Function selector
Volume knob
stereo mini plug
(
φ
3.5 mm)
stereo mini plug
(
φ
3.5 mm)
Main unit
RC_EZ57_USUXUW_eng_2nd.indd 2RC_EZ57_USUXUW_eng_2nd.indd 2 10.3.29 5:57:09 PM10.3.29 5:57:09 PM