


CD PORTABLE SYSTEM
RC-EZ57
RC-EZ57B
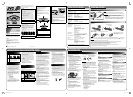
Caution: Proper Ventilation
To avoid risk of electric shock and fire, and to prevent
damage, locate the apparatus as follows:
1 Front:
No obstructions and open spacing.
2 Sides/ Top/ Back:
No obstructions should be placed in the areas shown
by the dimensions below.
3 Bottom:
Place on the level surface. Maintain an adequate
air path for ventilation by placing on a stand with a
height of 10 cm or more.
[European Union only]
Microsoft and Windows Media are either registered
trademarks or trademarks of Microsoft Corporation in the
United States and/or other countries.
Thank you for purchasing a JVC product.
Before operation, please read the instructions
carefully.
To disconnect power from the mains, pull out the
mains plug. When installing the product, ensure that
the plug is easily accessible.
CAUTION
• Do not block the ventilation openings or holes.
(If the ventilation openings or holes are blocked
by a newspaper or cloth, etc., the heat may not be
able to get out.)
• Do not place any naked flame sources, such as
lighted candles, on the apparatus.
• When discarding batteries, environmental
problems must be considered and local rules or
laws governing the disposal of these batteries
must be followed strictly.
• Do not expose this apparatus to rain, moisture,
dripping or splashing and that no objects filled
with liquids, such as vases, shall be placed on the
apparatus.
CAUTION:
Excessive sound pressure from earphones or
headphones can cause hearing loss.
IMPORTANT FOR LASER PRODUCTS
1. CLASS 1 LASER PRODUCT
2. CAUTION: Do not open the top cover or cabinet.
There are no user serviceable parts inside the unit;
leave all servicing to qualified service personnel.
3. CAUTION: Visible and/or invisible class 1M laser
radiation when open. Do not view directly with
optical instruments.
4. REPRODUCTION OF LABEL: CAUTION LABEL, PLACED
INSIDE THE UNIT.
CAUTION:
Battery shall not be exposed to excessive heat such
as sunshine, fire or the like.
Front view
Side view
0410YOMMDWMTS©2009 Victor Company of Japan, Limited
15 cm
15 cm 15 cm
10 cm
15 cm
15 cm 15 cm
10 cm
Warnings, Cautions and Others
CAUTION
To reduce the risk of electrical shocks, fire, etc.:
1. Do not remove screws, covers or cabinet.
2. Do not expose this appliance to rain or moisture.
CAUTION
The TAPE/ OFF switch in any position does not
disconnect the mains line.
Disconnect the mains plug to shut the power off
completely.
The MAINS plug or an appliance coupler is used as the
disconnect device, the disconnect device shall remain
readily operable.
EN
Mains (AC) Line Instruction
Main unit (rear)
CAUTION for mains (AC) line
BEFORE PLUGGING IN, do check that your mains (AC)
line voltage corresponds with the position of the
voltage selector switch provided on the outside of this
equipment and, if different, reset the voltage selector
switch, to prevent from a damage or risk of fire/electric
shock.
Setting the voltage selector
Before plugging in, select the voltage range for your
area with the voltage selector by using a screwdriver or
a similar tool.
INSTRUCTIONS
LVT2063-001C
[US/UX/UW]
• You cannot play back a file larger than 2
Gigabytes.
• When playing a file of a large transfer rate,
sounds may be dropped during playback.
• Some USB mass storage class devices may not
be recognized or may not work properly.
• JVC bears no responsibility for any loss of data
in the USB mass storage class device while using
this unit.
* DRM (Digital Rights Management): Any of
several technical methods used to control or
restrict the use of digital media content on
electronic devices with such technologies
installed.
• Type-I tape is recommended for playback on
this unit. You can also play back type II and type
IV tapes; however, the sound quality (tone) may
not be reproduced properly.
• The use of tapes longer than 120 minutes is not
recommended, since characteristic deterioration
may occur and these tapes easily jam the pinch
roller and the capstan.
• To prevent recordings from being erased
accidentally, remove the tab(s) with a
screwdriver. If you want to re-record on a tape
or erase the content of it after its tabs have been
broken off, reseal the slots with adhesive tape.
• This unit cannot play “packet write” discs.
• If a CD-RW has been recorded in a different
format, erase all data on the CD-RW completely
before recording on it.
• This unit can recognize up to 511 tracks
and 255 folders (groups) in a disc and 999
tracks and 255 folders in a USB device. Those
exceeding the maximum number cannot be
recognized.
• The reflection factor of CD-RW is lower than
that of other CDs, possibly causing CD-RW to
take longer time to read.
• In this manual, “file” and “track” are
interchangeably used for MP3/WMA
operations.
Disc Operations
The disc does not play.
\ The FUNCTION selector is not set to CD/USB.
\ The disc is placed upside down. Place the disc
with the label side facing up.
\ The disc or the lens is dirty. Clean the disc or
the lens.
\ There is moisture condensation. Turn the unit
on and wait a few hours before use.
Tape Operations
No sound is heard.
\ The FUNCTION selector is not set to TAPE/
OFF.
Though you press 2 PLAY, tape does not
move.
\ 8 PAUSE is pressed. Press 8 PAUSE again.
¶ REC does not function.
\ The safety tabs of the cassette tape have been
broken off. Reseal the slots with adhesive
tape.
\ No cassette tape is loaded. Load a cassette
tape.
The tape speed is irregular.
\ The pinch roller or capstan is dirty. Clean the
pinch roller or the capstan.
\ Batteries in the main unit are run down.
Replace the batteries with new ones or supply
the power through the AC IN
jack.
USB Operations
Noise is generated.
\ It is recommended to make the files
according to the proper conditions.
\ The tracks are not properly copied into the
USB device. Copy tracks again, and try again.
If you are having a problem with this unit, check
this list for a possible solution before calling for
service.
General
Power does not come on.
\ No power is supplied. Check the power cord
connection or battery power.
Playback sound is at a very low level.
\ When power is supplied with batteries:
Batteries are run down. Replace the batteries
with new ones.
\ The head is dirty. Clean the head.
Unable to operate the unit from the remote
control.
\ The path between the remote control and the
remote sensor on the unit is blocked.
\ Batteries in the remote control are run down.
Replace the batteries with new ones.
No sound is heard.
\ The volume is set to minimum.
\ Headphones are connected. Disconnect the
headphones.
Radio Operations
Hard to listen to broadcasts because of noise.
\ Direction of the antenna is inappropriate.
Adjust the antenna correctly.
External device operations
The sound from the external device cannot be
heard.
\ The FUNCTION selector is not set to AUDIO IN.
\ Check the connection.
\ Turn the volume of the external device up.
To get the best performance from the unit, keep
your discs, tapes and mechanism clean.
Cleaning the unit
• Disconnect the power cord before cleaning.
• Wipe off stains with a soft cloth. If the unit is
heavily stained, wipe it with a cloth soaked in
water-diluted neutral detergent and wrung
well, then wipe clean with a dry cloth.
• Since the unit may deteriorate in quality,
become damaged or get its paint peeled off, be
careful about the following:
– DO NOT wipe it with a hard cloth.
– DO NOT wipe it forcefully.
– DO NOT wipe it with thinner or benzine.
– DO NOT apply any volatile substances such
as insecticides to it.
– DO NOT allow any rubber or plastic to
remain in contact for a long time.
Cleaning the CD pickup lens
Keep the CD pickup lens clean, or the sound may
be degraded. Use a blower (available at a camera
store, etc.) to blow dust off the lens.
Cleaning the heads, capstan and pinch roller
Clean the heads, capstan and pinch roller every
10 hours of use; otherwise, the following may
occur:
• Sound quality is degraded.
• The sound output level decreases.
• The previous recording is not completely
erased.
• The sound is not recorded well.
Open the cassette holder and clean the heads,
capstan and pinch roller with a cleaning kit
(available at an audio store). Do not use thinner
or benzine for cleaning.
Notes on cassette tapes
Care and maintenance
Pinch roller
Erasure head
Head (recording/playback)
Capstan
Notes on discs/files
For MP3/WMA playback...
• MP3/WMA discs require a longer readout
time than regular CDs. (It depends on the
complexity of the folder/file configuration.)
• Some MP3/WMA files cannot be played back
and will be skipped. This result from their
recording processes and conditions.
• When making MP3/WMA discs, use ISO 9660
Level 1 for the disc format.
• This unit can play back MP3/WMA files with
the extension code <.mp3>or <.wma>
(regardless of the letter case upper/lower).
• It is recommended to make the files at the
following condition:
MP3/WMA files
MP3: 128kbps
WMA: 96kbps
Sampling frequency
MP3/WMA files: 44.1 kHz
• Playback order of MP3/WMA files may be
different from the one you have intended
while recording. If a folder does not include
MP3/WMA files, they are ignored.
Discs CDs with one of the marks below on
the surface.
Files Files in audio CD format, MP3 and
WMA files on a finalized CD-R or
CD-RW. MP3 and WMA files in a USB
device can also be played.
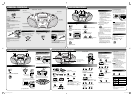
Playable discs/files
This unit plays back MP3/WMA tracks as follows.
The play order in the figure is for MP3/WMA
tracks on the disc.
MP3/WMA tracks on USB mass storage class
device may be played back differently.
Hierarchy
Level 1 Level 2 Level 3 Level 4 Level 5
Folder with its play order
MP3/WMA track with its play order
MP3/WMA folders/tracks
configuration
Inserting batteries
Main unit
PREPARATION
NOTE
• The power can also be supplied through the batteries (see below).
• A small amount of power is always consumed even while on standby.
CAUTION
• Only use JVC power cord provided for this unit to avoid
malfunction or damage to the unit. Remove batteries when using
the power cord.
• Be sure to unplug the power cord from the outlet when going out
or when the unit is not in use for an extended period of time.
NOTE
• The power will not be supplied through the batteries when the power is supplied through the AC IN jack on the unit.
• The battery is consumed more quickly than usual when operating the unit continuously or operating it in a cold place.
CAUTION
To avoid battery leakage or explosion, handle batteries properly.
• If you are not going to use this unit for a month or more, remove the batteries from the battery compartment.
• Dispose of batteries in the proper manner, according to federal, state, and local regulations.
• Do not mix with batteries of different types or with new and old ones.
• Do not attempt to charge any batteries other than rechargeable ones.
• Discard leaky batteries immediately. Battery leakage can cause skin burns or other personal injuries.
• If chemicals leak onto the unit, clean the unit completely.
Match the polarities (+ and –) of the batteries.
Connecting the power cord
Remote control
Power cord
(supplied)
AC outlet
CD player
CD capacity: 1CD
Signal-to-noise ratio: 60 dB
Dynamic range: 60 dB
Tuner
FM tuning range: 88 MHz – 108 MHz
SW tuning range: 6 MHz – 18 MHz
MW tuning range: 530 kHz – 1 600 kHz
Antennas: Telescopic antenna for FM/SW
Ferrite core antenna for MW
Cassette deck
Frequency response: 100 Hz – 8 000 Hz
Wow & flutter: 0.35% (WRMS)
Fast wind time: Approx. 170 sec. (C-60 cassette)
General
Speakers: 10 cm cone x 2
Speaker impedance:
4 Ω
Output power:
2 W + 2W, 10% THD, 4 Ω
Input terminal: USB:
Playable files: MP3, WMA
Compatible device: Mass storage class
Bus power supply: DC5V
500 mA
AUDIO IN:
stereo mini (φ3.5mm)
500mV/47kΩ
Output terminal:
PHONES (φ3.5) x 1
Power supply: AC 110 V – 127 V/220 V – 240 V
adjustable
with the voltage selector, 50 Hz/60 Hz
DC 12 V (R20 (SUM-1)/D (13D)-size batteries x 8)
Power consumption: 18 W (at operation)
1 W or less (on standby)
Dimensions: 407 mm x 147 mm x 254 mm (W/H/D)
Mass: Approx. 2.7 kg (without batteries)
Accessories provided: Power cord x 1
Remote control x 1
R03 (UM-4)/AAA (24F)-size batteries x 2
AC plug adaptor x 1 (not supplied for
Saudi Arabia)
Design and specifications are subject to change without notice.
Battery compartment
R20 (SUM-1)/D(13D)
(not supplied)
SPECIFICATIONS
Troubleshooting
ABOUT DISC/FILE/CASSETTE TAPE
REFERENCES
Blower
Lens
R03 (UM-4)/AAA (24F) (supplied)
• If the range or effectiveness of the
remote control decreases, replace
both batteries.
English
• Always set volume to “VOLUME MIN” when
connecting or disconnecting the USB mass
storage class device.
• Connect one USB mass storage class device to
the unit at a time. Do not use a USB hub.
• This unit cannot recognize a USB mass storage
class device whose rating exceeds 5V/500 mA.
• When connecting with a USB cable, use the USB
2.0 cable less than 1 m in length.
• You cannot connect a computer to the USB
MEMORY terminal of the unit.
• Electrostatic shock at connecting a USB device
may cause abnormal playback of the device. In
this case, disconnect the USB device then reset
this unit and the USB device.
• USB Memory and DAPs compatible with the
USB mass storage class specifications are
connectable.
• Some DAPs are not compatible with the unit.
• Copyrighted tracks (WMA-DRM* tracks) cannot
be played back on the unit.
• Coded or encrypted tracks in a special method
cannot be played on the unit.
• You cannot send any data to your USB mass
storage class device from this system.
• You cannot charge the USB mass storage class
device while connecting it to the USB MEMORY
terminal.
• While playing back a file in a USB mass storage
class device, do not disconnect the device. It
may cause a malfunction of both the system and
the device.
• When connecting a USB mass storage class
device, refer also to its manual.
• You can play back MP3/WMA files on a USB mass
storage class device (maximum data transfer
rate: 2 Mbps).
This unit may not play back some files even
through their formats are listed above.
• This unit is compatible with USB 2.0 Full Speed.
Battery compartment
After cleaning, make sure that the cleaning fluid has
dried completely before loading a cassette.
CAUTION
If the head is magnetized, noise will increase and
the sound quality will be degraded. To avoid this,
demagnetize the recording/playback head every
20 to 30 hours of use with a head demagnetizer
(available at an audio store). Turn off the unit before
demagnetizing the head.
• Do not demagnetize the erasure head as it is of
magnetic type.
Handling discs
• Remove the disc from its case by holding it at the
edge while pressing the center hole lightly.
• Do not scratch or touch the reflective recorded
surface.
• Do not stick or write anything on the label side.
• Do not bend discs.
• Avoid exposure to direct sunlight, extreme
temperature or moisture.
• When cleaning the disc, wipe it with a soft cloth
in a straight line from center to edge. DO NOT use
thinner, benzine, record cleaner or antistatic spray.
Handling cassette tapes
• Take up the slack of tape by inserting a pencil into
one of the reels and rotating. If the tape is played
without taking up the slack, it may get stretched,
cut or caught in the cassette.
• Be careful not to touch the tape surface.
• Avoid storing tapes in the following places:
– In dusty places
– In direct sunlight or heat
– In moist areas
– On a TV or a speaker
– Near a magnet
Important for USB device
RC_EZ57_USUXUW_eng_2nd.indd 1RC_EZ57_USUXUW_eng_2nd.indd 1 10.3.29 5:57:04 PM10.3.29 5:57:04 PM