


17
16
18
20
19
21
6
5
4
1
2
6
7
3
4
5
10
9
11
13
12
14
8
1
3
*
*
2
22
23
24
25
26
27
15
*
8
7
Hierarchy
Root
Main unit
6 hours
4 hours
External
battery case
16 hours
11 hours
Main unit &
External battery case
22 hours
15 hours
Disc played
Audio CD
MP3 disc
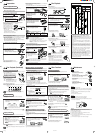
Disc Playback
Before starting play....
• Turn the Volume control to the minimum (to the right).
• Connect the headphones to the Headphones jack ( ).
1
Slide the OPEN switch in the direction of
the arrow to open the lid.
2
Place a disc.
• When placing a disc, press down the portions
around the center hole until the disc is fixed in
place correctly as in the figure.
3
Push the lid to close it.
4
Press 6 (play/pause).
Once the disc type (CD or MP3) is
recognized, playback starts.
To stop playback for a moment
Press 6 (play/pause) during play.
To resume play, press 6 (play/pause) again.
To stop playback, press 7 (stop).
• When you stop playback during MP3 playback, see “Resuming
Playback—Only for MP3.”
To turn off the power, press 7 (stop) again.
• When you turn off the player during MP3 playback, see “Resuming
Playback—Only for MP3.”
If the player is left in stop mode for 10 seconds, it
automatically turns off—Auto power off.
To remove the disc, slide the OPEN switch in
the direction of the arrow to open the lid, then
remove the disc.
• Hold the disc as illustrated when removing it
from the player.
• When you open then close the lid while the
power is on, the player automatically turns off.
DO NOT open the lid during play.
Track number
Playing time
REP
HBS
RANDOM
MP3
1
ALL
Total track number Total playing time
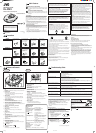
Preparations
How to Supply the Power
You can select the best power source for your own needs.
When using the player indoors
Use the AC adaptor supplied with your player.
1
Connect the AC adaptor to the DC
Input jack (DC IN 4.5V ).
2
Connect the plug of the AC
adaptor to an AC outlet.
When not in use, disconnect the AC
adaptor from the AC outlet.
7 To enjoy the player’s sounds through your audio system
Using a stereo connection
cable—one end with stereo mini-
plug, the other end with two pin
plugs (not supplied), you can
listen to the playback sound of
this player through your audio
system.
• Connect the cable to amplifier
after turning it off.
• Do not connect the cable to
the PHONO jacks on the amplifier.
• Adjust the volume level on the amplifier.
When using the player outdoors
Use two “AAA” (LR03) alkaline 1.5 V dry-cell batteries or rechargeable
batteries (both not supplied).
• When using dry-cell batteries: It is recommended to use Alkaline
batteries (longer battery life than Manganese batteries).
• When using rechargeable batteries: See also “When purchasing
rechargeable batteries” on the reverse page.
1
Open the battery compartment lid.
2
Insert two batteries, by matching
the polarity (+ and –) on the
batteries with the + and –
markings indicated on the player.
3
Replace the lid.
When removing the batteries, open the
battery compartment lid, then pull the strap so
that the batteries come out.
7 To use the player for much longer hours
By connecting the external battery case (supplied), you can extend the
use time of this player.
• Use two “AA” (LR6) alkaline 1.5 V dry-cell batteries (not supplied).
1
Open the battery compartment lid
of the external battery case.
2
Insert two batteries, by matching
the polarity (+ and –) on the
batteries with the + and –
markings on the battery
compartment.
3
Close the lid.
4
Insert the fixing screw and the
external battery case connectors
on the external battery case into
the rear of the player.
5
Turn the LOCK knob in the direction
of the arrow to secure external
battery case tightly in position.
+
1
0
DC
IN
4.5V
L
i
n
e
O
u
t
L
CD/AUX
R
LINE OUT
(Red)
(White)
Amplifier
Stereo connection cable
(not supplied)
Cautions on handling batteries
• Do not charge dry-cell batteries.
• Do not mix the new batteries with the old ones.
• Do not expose batteries to heat or flame.
• Remove the batteries if they are not in use for a long time.
• Remove dry-cell batteries when connecting the AC
adaptor.
When using the player in a car
When purchasing a car audio cassette adaptor (not supplied), check
whether it can be used for your car audio system.
1
Connect a car audio cassette
adaptor (not supplied) to the
headphones jack ( ) on the
player.
2
Insert the car audio cassette
adaptor into your car audio
system as in the figure.
• Adjust the Volume control on this
player properly.
If your car audio system has an line input jack, connect to
the Line Out jack on the unit using a cord with stereo mini-
plug—3.5 mm diameter (not supplied).
Do not operate the player while driving.
Strap
Battery Life (Using alkaline batteries)
D
C
I
N
4
.
5
V
L
in
e
O
u
t
REP
HBS
BATT
RANDOM
CD MP3
ESP
1
ALL
REP
HBS
BATT
RANDOM
CD MP3
ESP
1
ALL
Canceled
REP
1
REP
ALL
REP
HBS
BATT
RANDOM
CD MP3
ESP
1
ALL
REP
HBS
BATT
RANDOM
CD MP3
ESP
1
ALL
Flashes.
REP
HBS
BATT
RANDOM
CD MP3
ESP
1
ALL
Playing a Group—For Only MP3
While playing back an MP3 disc, you can select a group—Group play.
To turn on or off Group play
Press and hold GROUP while loading an
MP3 disc.
• Each time you press and hold the button,
Group play turns on (“On group”) or off (“Off
group”) alternately.
To cancel Group play, press and hold GROUP
again so that “Off group” appears on the display.
• When Group play is turned on (“On group”), you can select a
group and play back files in a group by pressing GROUP (then move
to another group).
• When Group play is turned off (“Off group”), you can select and
play back files in the same way as you select tracks for an audio CD.
(Indications are also the same as while playing an audio CD.)
To skip groups during Group play
Press GROUP repeatedly while loading
an MP3 disc.
• Each time you press the button, the next group
is selected, and the first file in that group starts
playing.
Group play cannot be possible on MP3 discs without
groups (folders) recorded.
Resuming Playback—Only for MP3
When you start playing an MP3 disc, Resume play is automatically
activated.
Resume play works as follows:
• When you stop or turn off the player during MP3 playback, this
player will start the last file you have listened to, next time you start
playback.
To cancel Resume play, press ESP/
RESUME while loading an MP3 file.
• Each time you press the button, Resume play
turns on (“On RESU”) or off (“Off RESU”)
alternately.
To cancel Resume play, press ESP/RESUME
again so that “Off RESU” appears on the display.
GROUP
BATT
E
S
P
Indications on the display
7 Before playback
7 During playback
BATT
ESP
Total group number
Total file number
Playing time
The current file number
in the group and the
group number alternate
(scroll).
MP3 group/file configuration
How are MP3 files recorded and played back?
MP3 “files (tracks)” can be recorded in “group” —folders or
directories, in PC terminology.
During recording, the files and groups can be arranged in a way
similar to arranging files and folders/directories of computer data.
“Root” is similar to the root of a tree. Every file and group can be
linked to the root.
In compliance with ISO 9660, the maximum allowable depth of
nested directories—so-called “hierarchy”—is eight (inclusive of
the root).
Playback order, file search order, and group search order of the
MP3 files recorded on a disc are determined by the writing (or
encoding) application; therefore, playback order may be different
from the one you have intended while recording the groups and
the files.
The illustration above shows an ordinary example of how MP3
files are recorded on a CD-R or CD-RW, how they are played
back, and how they are searched on this player.
• The numbers in circles next to the MP3 files (
) indicate the
playback order and search order of the MP3 files. Normally this
player plays back MP3 files in the recorded order.
• The numbers inside the groups indicate the playback order and
search order of the groups on an MP3 disc. Normally this unit
plays back MP3 files in the groups in the recorded order.
The group marked with asterisk (*) will be skipped since they
are not including any MP3 files.
: Groups
: MP3 files
1
Disc Playback (Continued) Other Functions
Reinforcing the Bass
You can reinforce the bass sound—HBS (Hyper-Bass Sound).
Press HBS.
• Each time you press the button, Group play
turns on (“On Hbs”) or off (“Off Hbs”)
alternately.
To cancel Hyper-Bass Sound, press HBS again
so that “Off Hbs” appears on the display.
Using Electronic Anti-Shock Protection
With Electronic anti-Shock Protection (ESP) turned on, playback will
not be interrupted but will continue normally if the player is knocked or
jolted while listening to a disc.
• This function minimizes sound interruption caused by vibrations, by
utilizing audio data stored in the buffer before being reproduced as
sounds.
• While playing an MP3 disc, ESP is always activated though
the
ESP
indicator is not lit. (You cannot cancel it).
Press ESP/RESUME, while loading an
audio CD disc, so that the
ESP
indicator
lights up on the display.
• Each time you press the button, the
ESP
indicator lights up or goes off alternately.
• When ESP is turned on, the data is stored—:
For audio CD format discs: Up to 45-second signals
For MP3 discs: Up to 100-seconds signals
To cancel ESP, press ESP/RESUME again so that the
ESP
indicator goes off.
ESP is automatically canceled when the voltage power
drops (below 1.7 V).
Preventing Unintended Operations
You can prevent unintended operations while carrying the player, etc.
Slide the HOLD switch to the right (in
the direction of the arrow) to lock the
buttons.
• When the HOLD switch is set to the right
position, no button can work. If you press a
button, “HOLD” will appear on the display.
To unlock the button operations, slide the
HOLD switch back to the left position.
HBS
GROUP
REPEAT/
RANDOM
REPEAT/
RANDOM
+10 +10 +10
15 20 30 40 41 42 43
Locating a Particular Point
You can locate a particular point in a track or file during play—Search.
Press and hold ¢ or 4.
• ¢ : Fast-forwards the tracks (or files) .
• 4 : Fast-reverses the tracks (or files) .
Skipping Tracks or Files
To go to another track (or file)—Skip
Press ¢ or 4 repeatedly.
• ¢ : Skips to the beginning of the next or
succeeding tracks (or files) .
• 4 : Goes back to the beginning of the
current or previous tracks (or files) .
To skip 10 tracks or files at a time
Press +10 while playing back a disc.
Example: To select track (or file) number 43, while playing back track (or file)
number 15.
The +10 button works only if a disc (or a group—during
Group play) includes more than 10 tracks (files).
Playing Repeatedly
You can play back a track(s) or file(s) or entire disc repeatedly
—Repeat play.
Press REPEAT/RANDOM briefly.
• Each time you press the button, Repeat play
changes and the following indicator lights up
on the display.:
REP
1: To repeat the current track or file.
REP
ALL: To repeat playback of all tracks or files.
To cancel Repeat play, press REPEAT/RANDOM so that the
REP
indictor goes off.
Playing at Random
You can play back all track(s) and file(s) at random—Random play.
Press and hold REPEAT/RANDOM so
that the
RANDOM
indicator lights up on the
display.
Random play ends when all tracks or files are
played once.
• Each time you press and hold the button, the
RANDOM
indicator lights up or goes off
alternately.
To cancel Random play, press and hold REPEAT/RANDOM again so
that the
RANDOM
indicator goes off.
You cannot use Repeat play and Random play at the same
time.
REP
HBS
BATT
RANDOM
CD MP3
ESP
1
ALL
HOLD
H
O
L
D
EX.: When playing an audio CD
ESP
RESUME
REP
HBS
BATT
RANDOM
CD MP3
ESP
1
ALL
REP
HBS
BATT
RANDOM
CD MP3
ESP
1
ALL
REP
HBS
BATT
RANDOM
CD MP3
ESP
1
ALL
REP
HBS
BATT
RANDOM
CD MP3
ESP
1
ALL
Car audio system
Cigar lighter
DC IN
(Headphones)
Volume
D
C
I
N
4
.
5
V
ESP
RESUME
Open
E
X
T
B
A
T
T
EXT BATT
D
C
I
N
4
.
5
V
L
in
e
O
u
t
DC IN
REP
HBS
BATT
RANDOM
CD MP3
ESP
1
ALL
REP
HBS
BATT
RANDOM
CD MP3
ESP
1
ALL
Discs
• Handling your discs
Carefully pick up the disc by its edge
without touching the disc’s surface.
• Cleaning your discs
Wash the disc with a neutral detergent diluted in
water, and then wipe gently with a soft dry cloth from
the center of the disc to the outside.
• Deformed discs
Place a heavy book (4 kg – 5 kg) on the disc for at
least one day.
• Irregular-shape discs
(heart-shape, octagonal, etc.)
Continued use of such shape discs can
damage the unit.
The unit
• Wipe the unit with a soft cloth.
• When removing stubborn dirt, use a cloth which has been dipped in
water or soapy water and wrung out, then wipe the unit again with a
dry cloth.
• If you intend to use a chemically treated cleaning cloth, read its
instruction manual first.
• Do not use alcohol or paint thinner.
The lens
Open the lid and clean the lens as shown in the figure.
Use a cotton swab to gently wipe off any fingerprints.
• If moisture has formed on the lens, you need to wait about one hour
for the moisture to evaporate.
Service
Damage Requiring Service—The unit should be serviced by
qualified service personnel when:
(a) The AC adaptor is damaged; or
(b) Objects have fallen or liquid has been spilled into the unit; or
(c) The unit has been exposed to rain; or
(d) The unit does not appear to operate normally or exhibits a marked
change in performance; or
(e) The unit has been dropped, or the enclosure damaged.
Maintenance
Air blower for
camera lens
Lens
Lens
XL-PM1[J]_f 01.6.14, 2:22 PM2