


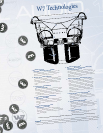


What follows is a simple method for accurately setting the
input sensitivity (commonly referred to as “gain”) of JL Audio
subwoofer amplifiers. You will need the following equipment:
• AC Voltmeter (digital display type)
• A CD with a sine-wave test tone recorded at
0dB reference level in the frequency range to be
amplified (40-50 Hz works well).
Do not use attenuated test tones
(-10dB, -20dB, etc.).
Step 1: Disconnect the W7(s) from the amplifier
(It is only necessary to disconnect one wire).
Step 2: Turn “Off” all processing on the head unit and amplifier
(bass / treble, loudness, EQ, etc.)
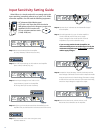
Step 3: Switch “Input Voltage” to “Low” and turn the
“Input Sensitivity” control on the amplifier
all the way down (full counter-clockwise).
Step 4: Verify that you have disconnected the subwoofers from the
amplifier. Then, set the head unit’s volume to 3/4 of full volume.
Step 5: Play a test track with a sine-wave (pure tone)
between 40-50 Hz.
Input Sensitivity Setting Guide
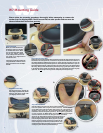
Step 6: Connect the AC voltmeter to the “Subwoofer Output”
of the amplifier.
Step 7: Consult “Appendix A” in your JL Audio amplifier’s
Owner’s Manual and find the correct target
output voltage for that model and the nominal
impedance of your W7 subwoofer setup.
If you are using another brand of amplifier, we
recommend that you use an oscilloscope to verify the
maximum unclipped output in the vehicle at realistic
vehicle supply voltages.
Step 8: Increase the “Input Sensitivity” control (clockwise) until the
listed voltage is delivered. To level-match multiple subwoofer
amps, set each one to the listed voltage. If excessive voltage
is read with the control at minimum (full counter-clockwise),
switch the “Input Voltage” to “High” and re-adjust.
Step 9: Reduce the head unit’s volume and turn it off.
Reconnect the subwoofers to the amplifier.
14