


CR1620 / CR1620SE
17
DIM
MONO
AS/PS
1
2
3
4
5
6
BAND
MODE
R
PT
SHF
CR1620
LOC/DX
IN
T
SCAN
MUTE
DN
UP
DISP
i
X
-BASS
CHANGER
JPTH
EQ
i
4
B
B
L
E
T
A
A
A
D
F
R
E
L
R
E
S
S
B
V
O
L
S
P
U
H
30 WATTSx4
AM/FM/CDC CASSETTE RECEIVER
AUTO REVERSE
EQ
i
25b
25a
24
27
26b
26a
282
292
30
CD Changer Operation
Please call Jensen technical support at 1-800-323-4815 for a list of CD changers compatible with
this unit. The following Jensen models are not compatible with this unit: CH1001, CH600U,
CH6001, XCH6RF (CH6001 with RF modulator), UCH6006 (CH6001 with RF modulator),
KCH6000 (CH6001 with RF modulator) and RF6DCW (CH6001 with RF modulator).
After the CD changer has been installed and properly connected, press the Reset button (11) to
initialize the installation. Refer to the owner’s manual included with the CD changer for instructions
on installing, loading and using the CD magazine.
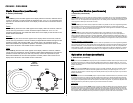
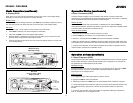
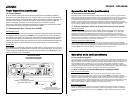
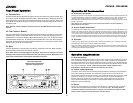
24. CD Changer Mode
Press MODE (24) during tuner or tape play to select operation of the CD changer. “CDC” will
appear in the display. Disc play will begin, and the disc and track numbers will be shown in the
display. If a new magazine has been loaded into the changer, play will begin from the first track of
the first disc. If a magazine was already in the changer, play will resume where it last ended.
25. Disc Select (UP/DN)
To select the desired disc for play, use the UP (25a) button to advance to a higher disc or the DN
(25b) button to move back to a lower disc. The number of the disc in play will appear on the display.
26. CD Changer Error Codes
If problems arise during CD changer operation, the following error codes may appear in the display:
ER-1: No magazine loaded in the CD changer. ER-2:Problem in the disc loading function.
ER-3: Error in the disc loading function. ER-4: Error in the disc unloading function.
ER-5: Error in the magazine position. ER-6: Error in the laser pickup position.
ER-7: Error in the laser focus on the disc.
To resolve any of the above problems, try ejecting the magazine from the changer and ensuring
that the discs are clean, undamaged and loaded correctly. Pressing the reset button (11) may help,
but this will erase the time and preset memories. If the suggested measures do not solve the
problem, contact an approved warranty station near you for further assistance.
Operación del Cambiador de CD
Este radio contiene los controles requeridos para operar un cambiador de CD opcional. Por
favor, contacte Soporte Técnico al 1-800-323-4815 sobre los modelos que funcionarán con
este radio y las recomendaciones necesarias. Los modelos siguientes de Jensen no
funcionarán: CH1001, CH600U, CH6001, XCH6RF, UCH6006, KCH6000 et RF6DCW.
Luego de que un cambiador de CD sea instalado y correctamente conectado, será necesario
presionar el botón de Reset para iniciar la instalación. Diríjase al manual del propietario
incluido en el cambiador de CD para obtener instrucciones de su instalación, carga y uso del
depósito de CD.
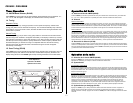
24. Modo de Cambiador de CD
Presione MODE (24) durante la ejecución de la radio o de un pasacassette para seleccionar la
operación de cambiador de CD. "CDC" aparecerá en la pantalla. La ejecución del disco
comenzará y el disco y los números de sus pistas se mostrarán en la pantalla. Si el nuevo
depósito ha sido cargado dentro del cambiador, la ejecución se iniciará desde la primera pista
del primer disco. Si el depósito estaba ya cargada en el cambiador, la ejecución se reanudará
desde la pista en el disco que estaba siendo ejecutado previamente.
25. Selección de Disco (UP/DN)
Para seleccionar el disco deseado, utilice el botón UP (25a) para avanzar hacia un número de
disco superior o el botón DN (25b) para moverse a un número de disco inferior. El número de
disco en ejecución será mostrado en la pantalla.
Opération de changeur de CD
Cette radio contient les contrôles nécessaires pour opérer un changeur de CD optatif.Prenez
contact avec Support Technique au numéro 1-800-323-4815 pour des recommendations sur
les modèles qui iront bien avec cette radio. Les modèles suivants de Jensen ne fonctionneront
pas: CH1001, CH600U, CH6001, XCH6RF, UCH6006, KCH6000 et RF6DCW.
Après l'installation et le branchement correct du changeur de CD il peut être nécessaire
d'appuyer sur le bouton réglage derrière le panneau d'avant de la radio pour initialiser
l'installation. Référez-vous au guide de propriétaire qui accompagne ce changeur de CD pour
des instructions concernant l'installation, le chargement et l'usage de votre changeur de CD.
24. Mode changeur de CD
Appuyez sur MODE (24) pendant une opération radio ou magnétophone pour sélectionner le
mode changeur de CD. Le mot CDC va apparaître sur l'affichage. Le disque va commencer à
jouer et le disque et le numéro de piste vont être affichés. Si un nouveau magazine a été
chargé sur le changeur, le disque va commencer à jouer à partir de la première piste du
premier disque. Si un magazine était déjà dans le changeur, l'appareil reviendra à la piste du
disque le plus récemment joué.
25. Sélection du disque (UP/DN)
Pour sélectionner le disque voulu, utilisez le bouton UP (25a) pour avance jusqu'au numéro du
disque plus haut et utiliser le bouton DN (25b) pour revenir un numéro plus bas. Le numéro du
disque qui est en train de jouer apparaîtra sur l'affichage.
CD Changer Operation
Operación del Cambiador de CD
Opération de changeur de CD