9
BACK PANEL
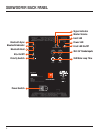
A. Power LED
This LED (White) lights to indicate that the speaker is plugged in and
switched ON.
B. Bluetooth Sync
Depress this button in order to initiate pairing with your
Bluetooth enable device.
C. Bluetooth Indicator
This LED will illuminate blue to indicate that your Bluetooth
connection is established.
D. Front LED On/Off
Toggles the LED (Blue) on front of speaker On or Off.
E. Bluetooth Boot
Depress this button to reset the pairing with your Bluetooth enabled device
without having to turn the speaker off.
F. EQ Presets (Full-Range Only)
Use this button to toggle through the four different settings.
MAIN:
This is the default setting for the EON600 loudspeakers. Use this
setting when your EON600 loudspeaker is being used either on a
tripod or pole and facing towards your audience.
MONITOR:
Use this setting when your EON600 loudspeaker is being used as a
stage monitor facing towards you.
SUB:
Use this setting when your EON600 loudspeaker is being used in
conjunction with a separate subwoofer. This preset enables a High
Pass Filter (HPF) set at 100Hz.
SPEECH:
Use this setting when your EON600 loudspeaker is being used for
Speech only or Spoken Word only applications and is facing towards
the audience.
G. EQ+ Button
Once enabled via the app, the EQ+ toggles the applied EQ settings on/off.
H. CH1 & CH2 Gain (Full-Range Only)
Controls the gain of CH1 & CH2 respectively. By turning the signal counter-
clockwise you will be lowering the gain of your source material. By turning
the control clockwise you will be increasing the gain.
I.
Limit Indicator
The LIMIT LED (Red) illuminates to indicate that the system is approaching
limit. If this LED is on for more than the duration of brief dynamic peaks,
the system is being over-driven. Continuously over-driving the system will
result in unpleasant and fatiguing distortion and may lead to premature
failure of your speaker system.
J. Signal Indicators
The SIGNAL LEDs (Green) illuminates to indicate a usable signal is
present at connected INPUTS.
K. Mic/Line Toggle (Full-Range Only)
The MIC/LINE buttons selects between two sensitivity ranges. The buttons
are used to match the input sensitivity with the output level of the devices
connected to CH1 or CH2. Depressing the MIC/LINE switch selects
MIC (High Sensitivity).
CAUTION: Before adjusting this switch, be certain to rotate the control fully counter-clockwise.
After the MIC/LINE switch has been depressed, slowly rotate the control clock-wise until the
desired volume has been reached.
• Use the MIC position (depressed) when a microphone is
connected.
• Use the LINE position (disengaged) when a line level source
such as an audio mixing console, audio playback device or
electronic musical instrument is connected.
L. Master Volume
Controls the master volume of the unit. By turning the knob counter-
clockwise you will be lowering the overall volume of the speaker. By turning
the control clockwise you will be increasing the overall volume of the
speaker.
M. XLR-1/4” Combo Inputs
These balanced inputs accepts a standard XLR (female) connector and
also a 1/4” TRS phone plug. A broad range of signals from microphones,
audio mixing consoles and electronic musical instruments may be
connected here. The sensitivity of these inputs are controlled by the MIC/
LINE SWITCHES.
N. XLR Male Loop Thru
This XLR (male) output connector provides a method of sending audio
out to an external source. If signal is present on both inputs, the inputs will
be summed and sent out as a 50/50 mix
O. Power Switch
Enables the AC power to the unit on and off.
P. Polarity Switch (Subwoofer Only)
Switches the polarity of the subwoofer between 0 and 180 degrees. Useful
for correcting summing issues between the subwoofer and the top boxes.
Users should experiment with the switch at both positions and select the
best sounding option for their specific application.


