


2
Connecting your speakers
Use high-quality wire for connecting your speakers to
the amplifi er. For distances up to 10 feet, conventional
speaker wire or lamp cord is acceptable. For longer runs,
you should use heavier wire.
For best performance, you must connect the speaker
wires correctly. All two-conductor wire is marked in some
way to help you do this. One side will be marked with a
colored stripe, a raised rib, or a different-color conductor.
Use the marked side for the “red” connections.
Installing the brackets (optional)
You can connect the speakers to wall-mount brackets for
elevated wall positioning.
1 Screw the wall-mount brackets onto the wall where
you want to mount the speakers. If the location is
backed by wall studs, you can use the wood screws
provided. If the location is backed by only dry wall
(gypsum board), use wall anchors (not included).
2 Slide a speaker into each mounting bracket.
3 Line up the screw holes (one on top, one on bottom),
then screw a knob into each hole to secure the
speaker to the bracket. You can loosen the knob to
adjust the direction the speakers are pointing.
Connecting the speakers
1 Connect the red speaker terminals to the red amplifi er
terminals.
2 Connect the black speaker terminals to the black
amplifi er terminals.
Adjusting volume
• If you hear distortion, immediately reduce the volume.
Permanent speaker damage can occur within
seconds. Distortion indicates that the amplifi er or
speaker is operating beyond its design limits. Do not
ignore distortion just because the volume control is
not all the way up.
Most amplifi ers deliver full power when the volume
control is set near the middle of its range. Using
loudness, bass boost, treble boost, or an equalizer
can produce full output at even lower settings, so
distortion is the only true indicator that damage is
imminent.
• Almost any speaker can be used with almost any
amplifi er, but almost any speaker can be damaged
by almost any amplifi er (despite either unit’s power
rating). Insignia’s power recommendations are
accurate only if our assumptions concerning the
amplifi er, the type of music, and the conditions of use
are correct. Our most important assumption is that the
volume never is set above the point of distortion.
Positioning your speakers
Because of their excellent, off-axis response and
dispersion, your speakers’ positioning is less critical than
for most speakers. Often, placing them where they best
fi t into the decoration scheme is all that is necessary
for exceptional performance. If you are installing your
speakers outdoors, select locations facing your listening
area that are protected from rain and snow, and out of
direct sunlight.
High-performance positioning
For best speaker performance, however, you should
perform the procedure below. Speaker positioning can be
time consuming, but the rewards justify the effort.
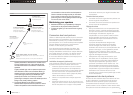
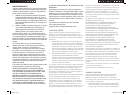
Arrange the speakers and room furnishings
• Choose a single “primary listening position” where
you will stand or sit to evaluate the sound quality. Most
Insignia speakers’ performance is optimized for a
listener location 10-12 feet from the speaker.
• Position the speakers directly in front of your primary
listening position, and 1-2 feet away from the wall.
• Avoid hard vertical edges (such as bookcases) within
3 or 4 feet of either side of the speakers.
• Viewed from your seat, the angle between the
speakers should be 30 to 60°.
Select the sound sample
• Carefully select a few recordings.
• Choose recordings made with simple miking and
strong vocals by a single performer.
• Avoid recordings with piano accompaniment unless
you know that the recording microphones were at
least 15-20 feet from the piano. Because the piano is
a large instrument and is often recorded with multiple
microphones, the notes arrive at the microphones
from many directions. The speakers reproduce the
directional clues which makes the positioning process
more complicated.
• Physically small sound sources localize much more
precisely. Horns, strings, vocals, and drums snap into
place when the speakers are optimally positioned.
Sound-test the speakers
1 Listen to one of the recordings you selected. Pay
close attention to the positions of the instruments and
vocalist.
2 Move the speakers a few inches at a time, then return
to the listening position to evaluate the results. The
Using your speakers I Utilisation des haut-parleurs I Uso de sus altavoces
Wall W
a
3-4 feet (no hard edges)
3 à 4 pi (90 à 120 cm) - pas
d’obstacles compacts
3-4 pies (sin orillas fuertes)
1-2 feet from wall
1 à 2 pi (30 à 60 cm) du mur
1-2 pies de la pared
30-60° angle bet
w
Angle de 30 à 60° ent
r
Ángulo de 30-60° e
n
10-12’
10 à 12 pi (3 à 3,6 m)
10-12
3-4 feet (no hard edges)
3 à 4 pi (90 à 120 cm) - pas
d’obstacles compacts
3-4 pies (sin orillas fuertes)
NS-E2111.indd 2NS-E2111.indd 2 2/13/2006 8:57:25 AM2/13/2006 8:57:25 AM