


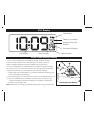

Setting the Clock Time
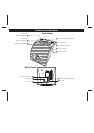
1. Press and hold the Time sync/set Button for 2 seconds until the display flashes. Press the Hour Set Button until
the current hour is displayed. Next, press the Sleep/Minute Set Button to set the current minute.
2. Press the Time sync/set Button again to confirm the clock setting. You should hear 2 beeps indicating the clock time
is set.
3. For 12 hour or 24 hour time format setting: Press the Alarm Set Button during time setting to set 12-hour or 24-hour
display format. Remember to set the correct AM or PM time (an icon to the right of the time display is the PM indicator;
there is no AM indicator).
4. During daylight saving time, set the DST Switch located on the backside of the unit to +1 to advance the time one
hour. The DST Icon will appear next to the time display to indicate DST is on. Set the switch to -1 to quickly set the time
back one hour at the end of daylight saving time.
Using the Time Sync Feature
The iP11 Time Sync feature allows you to sync the time setting on the iP11 to the time from your iPhone or recent model iPod
(iPod Touch, iPod Nano and iPod Classic; older iPod models such as iPod mini do not support this feature).
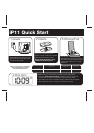
1. Dock your iPhone using the proper insert.
2. Press the Time sync/set Button to sync the iP11 clock to the time on your iPhone/iPod. The display will show a moving
cursor, indicating the unit is syncing. When successfully completed, two beeps will confirm the time has been synced. Retry
if sync is not successful.
Note: iPhone time is automatically updated to the correct time via cell phone towers. The time on your iPod is accurate only
to the time on the computer the last time the iPod was synced to it. An iPhone or iPod cannot sync to exact seconds; it’s
possible to have up to 59 seconds difference between the iP11 and synced iPhone or iPod.
4
Setting the Clock