


6
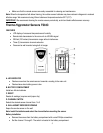
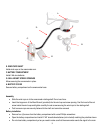
• Set one sensor to Channel 1 and the second sensor to Channel 2, etc. The sensors must operate on separate
channels. Install 2 “AA” size batteries matching the polarities shown in the battery compartment.
IMPORTANT
: When channel number is selected, it will be displayed on the sensor’s LCD display
• Replace the battery compartment door and secure the screws.
• Secure the thermo-hygrometer remote sensor in the desired location.
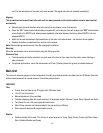
Mounting
• The remote thermo-hygrometer sensor can be placed on the flat surface or mounted on the wall in vertical position
• Use the screws when mounting the thermo-hygrometer sensor on the wall
Placement tips:
• The remote thermo-hygrometer sensor should be placed in the area with a free air circulation and sheltered from the
direct sunlight and an extreme weather conditions.
• Ideally, place the thermo-hygrometer sensor above the natural surfaces (such as a grassy lawn).
• Avoid placing the thermo-hygrometer sensor near sources of heat such as chimneys and heating elements.
• Avoid areas that collect or radiate heat from the sun, such as metal, brick/concrete structures, paving, or patio decks.
• The best location for temperature measurements is 4 feet (1.25meters) above the ground.
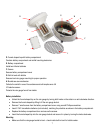
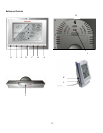
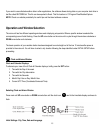
Rain Gauge TS906
FEATURES
• Precipitation measurement
• Remote rainfall data transmission to the main unit via 433 MHz signal
• 100 feet (30 meters) transmission range without interference
• Built-in installation level
A. Rain gauge bucket
Contains electronic components
B. Knob
Secures the top on the rain gauge bucket
C. Rain gauge feet
Secures the rain gauge in place