


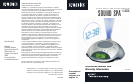
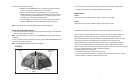

6 7
NOTE: Battery must be installed in order for clock memory back-up to operate. In the event of a power
failure or disconnection, if the battery is not installed, the clock and alarm will need to be re-set when
power is restored.
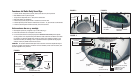
4. To install battery, remove compartment cover. Insert one 9 Volt battery into the compartment on the
bottom of the unit. Replace cover and snap into place.
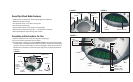
5. Attach the DC adaptor jack to the base of the unit (Fig 5) and insert the cord into a 120V household
outlet.
Setting the Clock
1. Press the HOUR button (Fig 4) until you reach the correct hour.
2. Press the MIN button (Fig 4) until you reach the correct minute.
3. Press the HI/LOW button (Fig 5) to choose between high and low clock brightness.
Note: An LED light (PM indicator) will appear in the upper left hand corner of the clock face during the
PM hours. Be sure to set the time for the correct 12-hour period – AM (morning) or PM (evening)
(Fig 3).
Listening to Nature Sounds
1. Select the sound you wish to listen to and press the corresponding button (Fig 2). A green LED will
light above the POWER button (Fig 4) to indicate the unit is on.
2. To adjust the volume, turn the VOLUME knob (Fig 1) to your desired level.
3. When finished listening to the sounds you may turn them off by pressing the POWER button, or
switch to the radio by pressing RADIO (Fig 4).
Note: When the unit is turned on it will always default to the last mode used.
Listening to the Radio
1. Press the RADIO button (Fig 4).
2. Rotate the TUNER (Fig 1) to select a radio station.
3. To adjust the volume, turn the VOLUME knob (Fig 1) to your desired level.
4. When finished listening to the radio you may turn it off by pressing the POWER button, or switch to
a nature sound by pressing the corresponding button (Fig 2).
Note: To change between bands there is an AM/FM switch located on the back of the unit (Fig 5).
Using the Auto-Timer
1. When the power is on and you are listening to a nature sound or the radio you may set a timer so
the unit will automatically turn off.
2. Toggle through the TIMER button (Fig 4) until the corresponding LED illuminates next to the time of
your choice, 15, 30 or 60 minutes.
Setting and Using the Alarm
1. Press the AL SET button (Fig 4). The time will flash.
2. While the time is flashing press the HOUR button (Fig 4) until you reach the correct hour. Then
press the MIN button (Fig 4) until you reach the desired minute.
3. After 5 seconds the alarm set time will stop flashing and it will be programmed, or you may press
the AL SET button.
Note: The PM indicator also applies to the alarm. You can review the alarm setting anytime by
pressing the AL SET button.
4. To activate the alarm you may choose one of 3 wake options:
a. To wake to BUZZER (Fig 4) press the AL MODE button (Fig 4) once.
b. To wake to a SOUND press the AL MODE button a second time. It will set to the last
sound you listened to. If you wish to change it press the sound you wish to
wake to and then press the POWER button (Fig 4).
c. To wake to RADIO press the AL MODE button a third time. You may leave it on the
current station or adjust the TUNER.
Note: A green LED will appear next to the wake mode selected to indicate the alarm is set.