


Setting and Using the Alarm
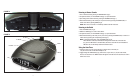
1. PresstheALSETbutton(Fig3).Thealarmhourwillflash.
2. Whilethetimeisflashingpress+button(Fig3)untilyoureachthecorrecthour.Thenpress
the-button(Fig4)untilyoureachthedesiredminute.
3. After10secondsthealarmsettimewillstopflashinganditwillbeprogrammed,oryoumaypress
theALARMSETbutton.
NOTE: ThePMindicatoralsoappliestothealarm.Youcanreviewthealarmsettinganytimeby
pressingtheALARMSETbutton.
4. Toactivatethealarmyoumaychooseoneof3wakeoptions:
a. TowaketoRADIO(Fig.3)presstheALMODEbutton(Fig.3)once.Youmayleaveitonthe
currentstationoradjusttheTUNER.
b.TowaketoaSOUND,presstheALMODEbuttonasecondtime.Itwillsettothelastsound
youlistenedto.Ifyouwishtochangeit,pressthesoundyouwishtowaketoandthenpress
thePOWERbutton(Fig3).
c.TowaketoBEEP,presstheALMODEbuttonathirdtime.
NOTE: TheALARMMODEindicator(RADIO/SOUND/BEEP)willappearontherightsideoftheclock
face(Fig.3),andwillindicatethatthealarmisset.
5.Whenthealarmsounds,thecorrespondingALARMindicator(RADIO/SOUND/BEEP)blinks.
Youmayeither:
a.SNOOZE:PresstheSNOOZEbutton(Fig1).Yoursleeptimewillbeextendedby9minutes.
Youmayusethisfeatureuntilyouturnthealarmoff.
b.RESET:TurnthealarmoffbypressingANYbuttonontheunit,exceptfortheSNOOZEbutton
(Fig1).Thealarmclockwillautomaticallyresetforthenextdayinitscurrentmode.The
correspondingALARMindicator(RADIO/SOUND/BEEP)willindicatethis.Ifyouwishtochange
thewakemodefollowstep1underSetting and Using the Alarm.
c.OFF:Tocompletelyturnoffthealarmsoitisnotsetforthenextday,continuetopresstheAL
MODEbuttonuntilalltheALARMindicators(RADIO/SOUND/BEEP)arealloff.
NOTE: Ifthealarmsoundsfor30minutescontinuouslyitwillautomaticallyturnoffandresetforthe
nextday.
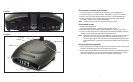
Using the Projection Feature
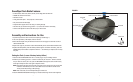
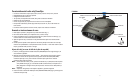
1.Toturntheprojectionfeatureon,pressthePROJECTON/OFFbuttononthebackoftheunit(Fig2).
Thetimeisnowprojectedontheceiling.Pressthebuttonagaintoturnoffprojectionfeature.
NOTE:IftheprojectionfeatureisoffyoumaypresstheSNOOZEbutton(Fig1)totrigger5seconds
ofprojection.
2.Toturntheangleofthetimethatappearsontheceiling,rotatetheTIMEROTATIONKNOB(Fig.1)
untilyouhavereachedyourdesiredresult.
NOTE:TheTIMEROTATIONKNOBwillrotateupto350degrees.
3.Tofocusthetimeontheceiling,rotatetheFOCUSKNOB(Fig1)untilyouhavereachedyourdesired
result.
4.Theangleoftheprojectorcanbeadjustedbyanglingforwardorbackward.
8 9
Setting the Time/Date
NOTE: Thisunitfeaturesautomatictimeset.Theunitispreprogrammedwiththecurrentdateand
easternstandardtime.UsetheTIMEZONEslideswitch(Fig2)tochangetoyourtimezone
(E-EST,C-CST,M-MST,P-PST).Thetime/datewillonlyneedtoberesetifthebackupbattery
fails.Thebelowinformationshouldbeusediftheautomatictimeisnotcorrect.
1.PressandholdtheHOURbuttonfor5seconds(Fig3).Thetimewillbegintoflash.
2.Whilethetimeisflashing,presstheHOURbuttonuntilyoureachthecorrecthour.Thenpressthe
MINUTEbutton(Fig3)untilyoureachthecorrectminute.
NOTE: PMindicatorwillappearontheleftsideoftheclockfaceforeveninghours(Fig3).Ifthe
PMindicatorisnotilluminated,thehourissettoAM.Besuretosetthetimeforthecorrect12-hour
period—AM(morning)orPM(evening).
NOTE: After5seconds,thetimewillstopflashinganditwillbeset.
3. PresstheBACKLIGHTHIGH/LOWbutton(Fig2)tochoosebetweenhighandlowclockbrightness.
4. Intheeventofbatteryandpowerfailure,youwillneedtoresetthealarm.
Maintenance
To Store
Youmaystoretheunitinitsboxoracool,dryplace.
To Clean
Wipeoffdustwithadampcloth.NEVERuseliquidsorabrasivecleanertoclean.
Modificationsnotauthorizedbythemanufacturermayvoidusersauthoritytooperatethisdevice.
NOTE: ThisequipmenthasbeentestedandfoundtocomplywiththelimitsforaClassBdigitaldevice,
pursuanttoPart15oftheFCCRules.Theselimitsaredesignedtoprovidereasonableprotection
againstharmfulinterferenceinaresidentialinstallation.Thisequipmentgenerates,usesandcan
radiateradiofrequencyenergyand,ifnotinstalledandusedinaccordancewiththeinstructions,
maycauseharmfulinterferencetoradiocommunications.However,thereisnoguaranteethat
interferencewillnotoccurinaparticularinstallation.Ifthisequipmentdoescauseharmful
interferencetoradioortelevisionreception,whichcanbedeterminedbyturningtheequipment
offandon,theuserisencouragedtotrytocorrecttheinterferencebyoneormoreofthe
followingmeasures:
• Reorientorrelocatethereceivingantenna.
• Increasetheseparationbetweentheequipmentandreceiver.
• Connecttheequipmentintoanoutletonacircuitdifferentfromthattowhichthereceiveris
connected.
• Consultthedealeroranexperiencedradio/TVtechnicianforhelp
NOTE: ThemanufacturerisnotresponsibleforanyradioorTVinterferencecausedbyunauthorized
modificationstothisequipment.Suchmodificationscouldvoidtheusersauthoritytooperatethe
equipment.