


© 2003 TDM Audio, Inc. Electronic Crossover Owner’s Manual Page 14
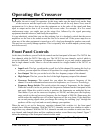
Operating the Crossover
nce you have mounted your TDM 24CX series crossover in a rack and connected all of the
cables, the unit is ready for operation. At this time, make sure the input levels on the front
of the crossover and the input levels of the amplifiers are all the way down. Next, turn all
equipment on. It is always best to turn the equipment on in the order of the signal path from
input to output and to turn it off in exactly the reverse order. For example, in a live sound
reinforcement setup, you might turn on the mixer first, followed by the signal processing
equipment, then the crossover, and finally the amplifiers.
It is not absolutely critical that you use this ordering, but it is absolutely critical that the power
amplifiers are the last to be turned on and the first to be turned off. If the power amps are on
when any of the other equipment is turned on or off, a loud pop through the speakers can result.
This pop can very easily damage speakers. This is especially true in multi-amped systems (using
active crossovers).
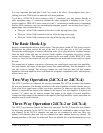
Front Panel Controls
At this time, familiarize yourself with the controls on the front panel of the unit. The 24CX-4 has
four channels while the 24CX-2 has only two. The 24CX-3 has two channels, each of which is
set up for dedicated 3-way operation. All channels are identical, so you only need to understand
how a single channel works. Here is a list of the controls for a single channel of the 24CX-2 or
24CX-4.
• Input Level: This lets you adjust the overall level of the channel. By turning this level up
or down, you can adjust the volume of all speakers for a single channel simultaneously.
• Low Output: This lets you set the level of the low-frequency output of the channel.
• High Output: This lets you set the level of the high-frequency output of the channel.
• Crossover Frequency: This control lets you adjust the crossover frequency of the
channel. For more information about crossover frequencies, see Crossover Terminology.
• Frequency Range Switch: This switch selects the range of frequencies for the channel.
When this switch is in the out position, the frequencies indicated on the front panel of the
unit apply. When this switch is in the in position, the frequencies are multiplied by ten.
That means if you set the crossover frequency to 200 Hz, and then press the frequency
range switch in, the real crossover frequency for the channel is 2000 Hz. Never press this
switch unless the amplifiers are off or their inputs are all the way down. If the amplifiers
are on and passing signal when you change this setting, the resulting “pop” through the
speakers will be very loud, and can easily damage your speakers.
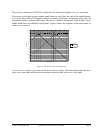
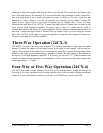
When the unit is set up for three-way operation (channel link switches in), the front panel
controls have different meanings. With the 24CX-2, channels one and two combine to make a
single three-way channel. With the 24CX-4, channels one and two combine to make one three-
way channel, and channels three and four combine to make a second three-way channel. Figure 7
shows the meanings of the front panel controls in this mode.
Control Meaning for Three-Way Operation
O