


© 2003 TDM Audio, Inc. Electronic Crossover Owner’s Manual Page 10
Mounting the Unit in a Rack
DM 24CX series crossovers can be mounted in any standard 19” rack. Each TDM 24CX
series crossover takes up one rack space. To make mounting easier, lay the rack on its back
with the equipment front panels facing up. Remove any rack screws from the part of the
rack where you are planning to mount the crossover. Position the TDM 24CX series crossover in
the rack as desired. Make sure the mounting holes in the crossover line up with the screw holes
in the rack rails. Use four standard 10-32 rack screws for each crossover. We recommend that the
rack screws have plastic washers to prevent damage to the paint on the face of the crossover.
Install each screw loosely through a mounting hole in the crossover and into the rack. Do not
tighten the screws until they are all in place. After all four screws are installed loosely, make sure
the crossover is placed exactly as you desire and then tighten the four screws until they are nice
and snug, but not overly tight.
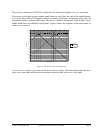
Using the Security Cover
The security cover is used to prevent unwanted tweaking of the crossover settings. If your
crossover will be installed permanently for one particular purpose, and will be set up once to
operate properly, use the security cover.
If you want to use the security cover on a 24CX-2 or a 24CX-4, make sure all of your settings
are correct, then install the cover. There are two holes in the face plate of the crossover—one on
either end. Position the cover so that its two screws line up with the two holes. Then, using an
Allen wrench, tighten the screws so that they are snug, but not overly tight.
The procedure is slightly different for the 24CX-3. This unit has buttons that protrude from its
face. To use the security cover, the buttons must be removed. You can do this by simply pulling
them off. They can be replaced at any time by pushing them back on. After the buttons have been
removed, unscrew the two Allen-head screws from the two ends of the face of the crossover
using an Allen wrench. Position the security cover over the face of the unit, insert the screws
through the holes in the security cover and into the holes in the face of the unit, and then tighten
the screws with an Allen wrench so they are snug, but not overly tight.
T