


4. Installation4. Installation
4. Installation4. Installation
4. Installation
Contents of Genelec 2029AContents of Genelec 2029A
Contents of Genelec 2029AContents of Genelec 2029A
Contents of Genelec 2029A
Digital delivery packageDigital delivery package
Digital delivery packageDigital delivery package
Digital delivery package
Please make sure that you can identify
these parts.
1. Two loudspeakers
2. Two mains cables.
3. One interconnect cable, with
male XLR connectors on both
ends.
4. A user manual
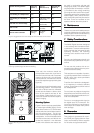
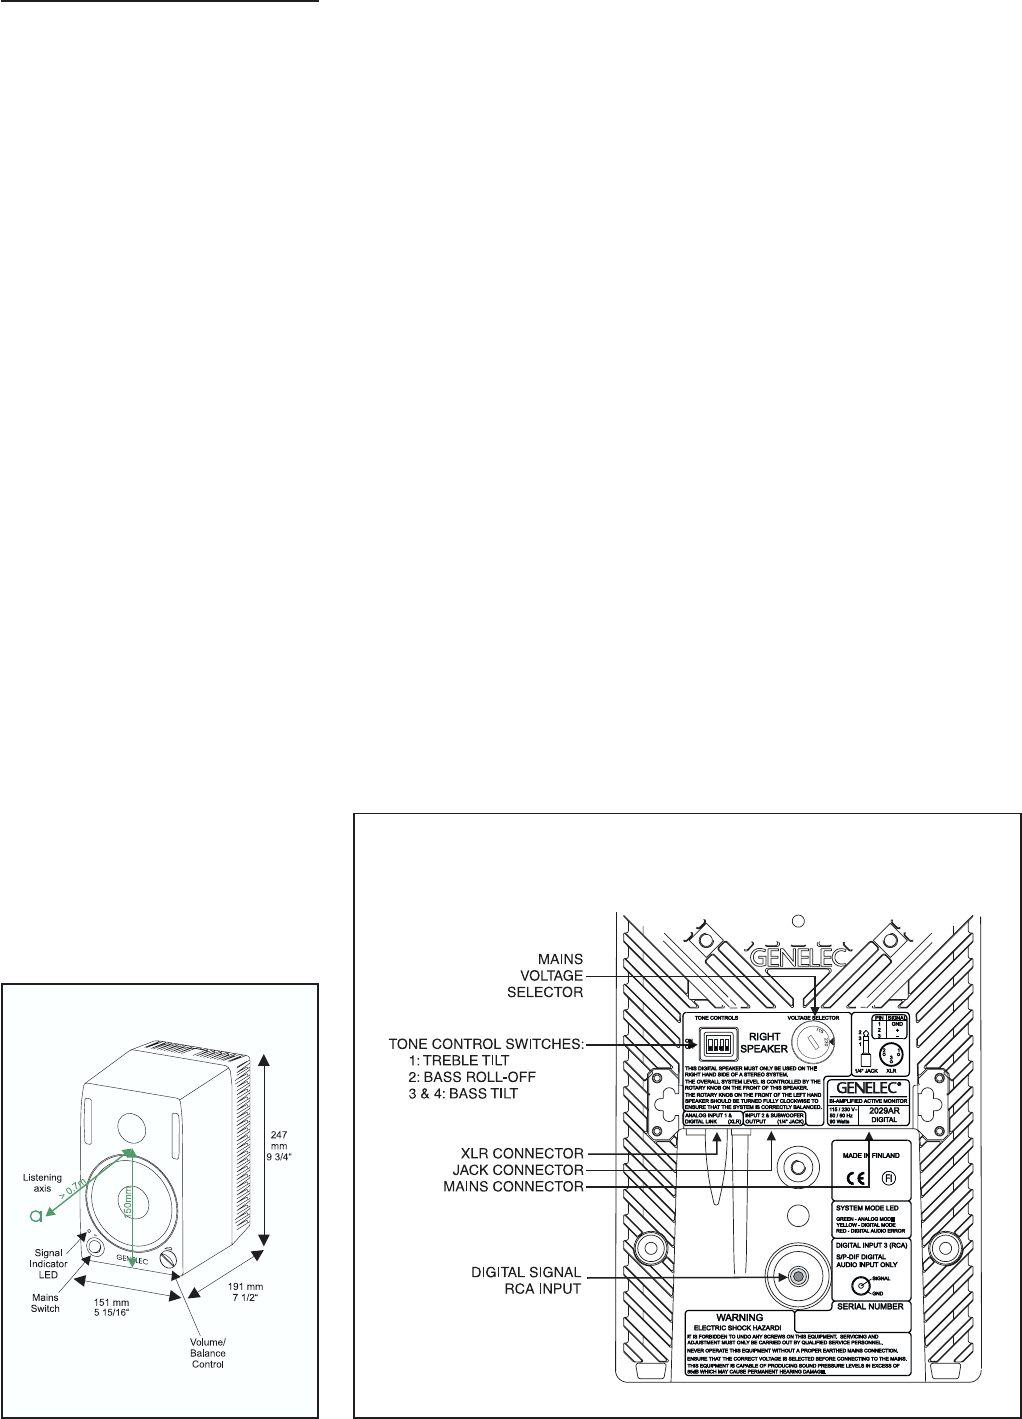
After unpacking, check that the mains
voltage selector (see figure 2) is cor-
rectly set and place the loudspeakers
at their listening position, taking note
of the listening axis (see figure 1). En-
sure that the mains switches are off and
the volume controls fully counter-clock-
wise.
How to set up for digital signalsHow to set up for digital signals
How to set up for digital signalsHow to set up for digital signals
How to set up for digital signals
Connect the special interconnect ca-
ble between the XLR connectors of the
two 2029A Digital monitors.
Connect an digital audio interface
cable to your digital audio source. You
can identify the right RCA connector
on your audio source by looking for the
words “Digital Output” or “S/P-DIF”. If
you are sure your audio source has a
digital audio output, but the cable does
not fit the connector, you may have an
equipment that is using a BNC con-
nector instead of the standard RCA.
You can find interface plugs that con-
vert the BNC to an RCA. Before you
use one you should make absolutely
sure that the connector is carrying the
IEC958 formatted digital audio signal.
One of the 2029A Digital units (Right)
has a matching RCA connector in the
back of the unit. Locate the RCA con-
nector (see figure 2) and notice the
signal indicator LED in the front. Con-
nect the RCA cable and switch on the
power on both speakers. The LED
should change colour from green to
yellow.
Turn the output level at the left speaker
to maximum value. This calibrates the
balance between the speakers. Adjust
the desired output level at the right
speaker (the one receiving the digital
audio). Note that the output level ad-
justment scales the maximum sound
pressure level produced by the digital
audio signal. Monitoring at very low
output levels may not be accurate.
To help you solve any problems, here
are a few pointers.
• Make sure that your audio signal
source has been set to transmit the
audio to the S/P-DIF output.
• Make sure the digital interface ca-
ble is properly connected at both
ends.
• Make sure the LED turns yellow as
you plug in the digital audio cable
to the 2029A Digital unit. If this is not
the case, go back to your audio
source and check once more that
the right output is selected. If the
LED stays green you do not have a
valid digital audio carrier on the
cable.
• If you see the LED flashing red co-
lour, check your cabling. Red co-
lour indicates a bit error in trans-
mission.
How to set up for analog signalsHow to set up for analog signals
How to set up for analog signalsHow to set up for analog signals
How to set up for analog signals
Remove the digital audio cable at the
2029A Digital. Observe that the LED
should turn green.
Remove the interconnect cable be-
tween the two Genelec 2029A Digital
units.
Run normal XLR cables from your an-
alog audio source to the XLR connec-
tors on both 2029A Digital units.
Adjust the output levels at the front of
both 2029A Digital units independent-
ly for left and right channels.
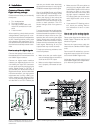
Figure 1: 2029A outer dimensions, with the
reference axis between the bass and the
treble drivers.
Figure 2: 2029A Digital Right speaker backpanel