


(2)
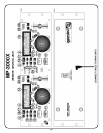
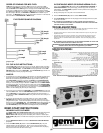
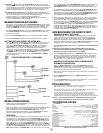
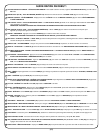
VOLTAGE SELECTOR: To set the proper voltage, adjust the VOLTAGE SELECTOR (1) switch to 115 or 230 volts.
POWER JACK (AC IN): Connect the power plug into the POWER JACK (2) for power.
REMOTE CONTROL: Use the included CABLE & REMOTE CONTROL (3) jacks to connect the REMOTE CONTROL
to the MAIN UNIT.
LINE OUTPUT JACKS: LINE OUTPUT JACKS (4) provide stereo sound via RCA cables to your mixer or receiver.
NOTE
:
MAKE SURE CABLES ARE PLUGGED IN TIGHT FOR OPTIMAL SOUND.
BNC (DIGITAL OUTPUT): Use the BNC (5) jack to connect to any type of device that accepts digital signals.
POWER: Press the POWER (6) button to turn on the CD player.
NOTE
:
MAKE SURE VOLTAGE SELECTOR SWITCH (1) IS SET BEFORE USE.
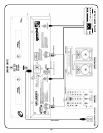
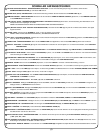
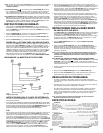
DISC TRAY:
Put a CD in the DISC TRAY (7) after pressing OPEN/CLOSE (8); trays hold both 12 cm and 8 cm CDs.
OPEN/CLOSE: Tap OPEN/CLOSE (8) once to open the tray and again to close it.
DISPLAY: The DISPLAY (9) shows the various functions for the CD Player. See
FUNCTION DESCRIPTIONS
for
details.
PLAYBACK DISPLAY BAR: The PLAYBACK DISPLAY BAR (10) shows the TIME ELAPSED and TIME REMAINING
.
PLAY/PAUSE: Press PLAY/PAUSE (11) button to activate PLAY or PAUSE mode. See
CUE
or
ROBO START
INSTRUCTIONS
for details.
CUE/PREVIEW: Tap CUE/PREVIEW (12) to come back to a set CUE or press and hold to PREVIEW from a CUE,
refer to
CUE INSTRUCTIONS.
SEARCH: Use the SEARCH (13) buttons to scan forward and reverse directions on a TRACK
.
TRACK SEARCH:
Press the TRACK SEARCH (14) buttons to select which TRACK to play.
TIME: Tap the TIME (15) button to switch the TIME preference in three modes: ELAPSED, REMAIN, TOTAL REMAIN.
STOP: Press STOP (16) once to stop the CD.
SINGLE AUTO CUE/CONTINUE: Tap SINGLE AUTO CUE/CONTINUE (17) for:
SINGLE AUTO CUE, CONTINUOUS,
and NORMAL
modes.
FLY CUE: FLY CUE (18) sets a CUE POINT on the fly.
B/EXIT: Press B/EXIT (19) in PLAY mode, after a CUE POINT is memorized to start a LOOP, press again to exit LOOP.
B-EDIT: Press B-EDIT (20) and use the JOG WHEEL (22) to edit an existing LOOP, press again to exit EDIT mode.
RETURN: To play from a saved CUE POINT or a LOOP, press RETURN (21) to play the LOOP or the CUE
again
.
JOG WHEEL: The JOG WHEEL (22) has various functions: PITCH BEND, CUEING, and TRACK SEARCHING.
SEARCH MODE: Press to change the SEARCH MODE (23) of the JOG WHEEL (22) from MUSIC to TRACK mode.
SEARCH MODE LED: The SEARCH MODE LED (24) displays which SEARCH MODE (23) is in use.
PITCH: The PITCH (25) button activates the PITCH CONTROL SLIDE (27)
PITCH BEND: Buttons for PITCH BEND (26), lower or raise the pitch percentage (- or +) 4% when pressed.
PITCH CONTROL SLIDE: Moving the PITCH CONTROL SLIDE (27) up or down will lower or raise the pitch
percentage (- or +) 4%, 8%, & 16%.
VPS (VARIABLE PITCH SELECTOR) 4%, 8% & 16%: Use the VPS (28) buttons use to change the PITCH settings
from 4%, 8%, & 16%.
ROBO START: Using ROBO START (29) enables you to alternate play between two CDs using both sides.
QUICK START GUIDE:
1
2
3
4
5
6
7
8
9
10
11
12
13
14
15
16
17
18
19
20
21
22
23
24
25
26
27
28
29