


IMPORTANT:
When you connect a cable to the AUX IN input jack of this unit the FUNCTION
selector automatically switches from Radio or CD to Auxiliary Input.
You must disconnect the cable from the AUX IN input jack in order to listen to the
Radio or CD again.
After connecting your external device to the AUX IN input jack, slowly adjust both the
volume controls on this unit and your external device to find the desired setting.
Please note that if the VOLUME control on this radio is set to a low level while the
VOLUME control on your external device is set too high, the sound will be distorted.
Remember to disconnect the connection cable after use in order to be able to listen
to the Radio or CD player again.
Press the REPEAT/RANDOM button in STOP or PLAY mode. A single track, all tracks
can repeat or random can play.
Each press changes the repeat mode as follows:
1 REPEAT 2 REPEAT ALL 3 RANDOM/REPEAT OFF 4 REPEAT/RANDOM OFF
(Repeat indicator
will flash)
Up to 20 tracks can be programmed to play in a specific order by following these steps.
1.Set the CD/AM/FM/BUZZER switch to CD.
2.Press the ON/OFF button into ON status, the ON indicator will light up on display.
3.In STOP mode press the PROGRAM button.
4.Press the I<< /MINUTE or >>I/HOUR button to select the track number.
5.Press the PROGRAM button when the desired track number is displayed.
6.Repeat step 4 and 5 to program more tracks.
7.Press the PLAY/PAUSE button to start programmed playback.
To check the program:
Press the PROGRAM button during STOP mode. The programmed track number will be
displayed in programmed order each time you press the PROGRAM button.
To erase the program:
• Press the PROGRAM button and then the STOP button when the CD is stopped.
Opening the disc compartment will also erase the contents of program memory.•
The radio, buzzer or CD automatically sounds at the designated time every day.
You can set in total two wake up times(ALARM 1, ALARM 2) into this unit.
Wake by CD/AM/FM/BUZZER.
1.Press the ALARM 1 or ALARM 2 button, the display will flash.
2.Use the MINUTE or HOUR button to set the desire wake up time.
3.Press the ALARM 1 or ALARM 2 button after setting, The Alarm 1 /Alarm 2 active
indicator will light up on the display respectively.
4.Slide the CD/AM/FM/BUZZER selector into BUZZER position for BUZZER wake up.
In order to wake by CD, slide the CD/AM/FM/BUZZER selector into CD. In order to
wake by radio, slide the selector into AM or FM position then tune to your desired
AM or FM station and adjust the volume.
5.To Turn off but not cancel the alarm, press the "ON/OFF" button. The alarm will
stop and automatically resets for the following day.
6. To cancel the alarm if the alarm is off, press the ALARM 1 and/or ALARM 2 buttons
once. The respective ALM indicator should disappear. To cancel the alarm if the
alarm is on, press the ALARM 1 and/or ALARM 2 buttons twice. Again, the
respective ALM indicator should disappear.
NOTE:
1. When you connect a cable to the "AUX IN" input jack, ALARM SOUND will be
"BUZZER SOUND" only once ALARM is activated.
2. If there is no CD in CD compartment or CD is not readable, ALARM SOUND will be
"BUZZER SOUND" only once ALARM is activated while FUNCTION (CD/AM/FM/
BUZZER) switch is set to "CD" position
(Repeat indicator
will be steady on)
(Random indicator will be
steady on) (Repeat
indicator will be off)
(Repeat indicator ,
and random
indicator will turn off)
REPEAT/RANDOM
PROGRAMMED DISC PLAY
10
TO SET THE ALARM TO WAKE TO BUZZER/CD/ RADIO
The alarm can be temporarily turned off by pressing the SNOOZE button; the
ALARM 1 or ALARM 2 indicator will flash at this time/ the alarm will turn back on
automatically 6 minutes later.
Turn on your desired radio station or play a CD as previously instructed.
1. Press the SLEEP button and the SLEEP indicator will light up on the display.
2. Repeatedly press the SLEEP button for the desired sleep time, 90,60,30,15
minute the SLEEP indicator will light to indicate the sleep mode is activated.
3. To cancel sleep time, press the SLEEP button again until the SLEEP indicator
goes off.
SNOOZE
TO ACTIVATE THE SLEEP FUNCTION
FOR ADDITIONAL SET-UP OR OPERATING ASSISTANCE
PLEASE CALL:
1-800-898-9020 OR
1-800-695-0098 OR
E-MAIL TO: internet @ emersonradio.com
11
LIMITED WARRANTY
Emerson Radio Corp. Warrants manufacturing defects in original material,including
original parts and workmanship, under normal use and conditions, for a period of
ninety(90)days from the date of original purchase in the U.S. With your dated proof
of purchase, we will provide repair service at no charge for labor and parts or
replace the productat our discretion. For repair or replacement,pack your unit
in a padded box, enclose your check or money order payable to Emerson Radio
Corp.in the amount of $9.00 to cover shipping and handling costs,and enclose
a copy of your proof of purchase. Send your unit to:
Emerson Returns Facility
11500 Philadelphia ST
Mira Loma, CA 91752
ATTN: Returns Department.
This warranty does not cover damage from negligence ,misuse, abuse, accident,
failure to follow operating instructions, commercial use, rental, repairs by an
unauthorized facility, or products purchased, used, serviced or damaged outside
of the United States.
The Serial Number can be found on the bottom cabinet. We suggest that you record
the Serial Number of your unit in the space below for future reference.
Model No:CKD2020
Serial Number:
THIS WARRANTY GIVES YOU SPECIFIC LEGAL RIGHTS, AND YOU MAY ALSO
HAVE OTHER RIGHTS WHICH VARY FROM STATE TO STATE.
AU898N
12
Printed in China
8
9
CKD2020-905-02
ANTENNA
FM: Extend the FM aerial wire to improve FM reception.
AM: Turn the unit for better AM reception.
CD PLAYING
1. Press OPEN button to open the disc compartment.
2. Place a disc in the centre with the label side facing up and close the Disc
compartment.
3. Slide the function (CD/AM/FM/BUZZER) switch to CD position, then press the
ON/OFF button into ON status.
4. The total number of tracks will show on the display for 2 seconds and then the
display will turn back to clock display.
5. Press PLAY/PAUSE button to start playing the disc.
Notes: You can press the DISPLAY button to show the current track number that is
playing current to the total number of tracks during STOP position in CD
mode.
BASIC OPERATION
To stop Playback
To pause Playback
To search for the beginning of a track
To locate a desired passage
Press STOP button
Press PLAY/PAUSE button, To resume
playback, press it again
Press I<< /MINUTE or >>I/HOUR button
briefly
Keep I<< /MINUTE or >>I/HOUR pressed.
Release the button at the start of the
desired passage.
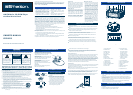
AUX IN FUNCTION
Connect the audio output socket of your auxiliary sound source to the AUX IN socket
on the top of unit.
DON’T FORGET! The auxiliary function can only be used when there is a connection
made to the AUX IN socket from another source.
Auxiliary Input Jack (Connection Cable Not Included)
This unit includes an AUX IN input jack to allow you to connect external devices,such
as portable MP3 player, and listen to the music stored on your external device through
the speakers of this radio.
Connect the AUX jack of your external device to the AUX IN input jack located
on the top cabinet of this unit. The connection cable is not included.