


2-16 Dell PowerVault SAN Administrator’sGuide
NOTICE: Do not turn on the server(s) or the PowerVault storage systems
until all cabling is complete.
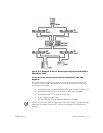
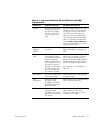
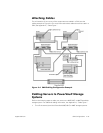
2. Create an interface between the 50F, 51F, or 56F Fibre Channel switches and
each of the servers that you want to install in the SAN (see Figure 2-4).
a. Connect the high-speed serial data connector (HSSDC) on the interface
cable to the QLogic HBAs on each server.
b. Connect the other end of the cable to the 5
x
F Fibre Channel switch.
3. Create an interface between each of the storage processors (SPs) or RAID con-
trollers on the storage systems and the Fibre Channel switch.
a. Connect the HSSDC connector on each cable to the switch.
b. Connect the DB-9 connector on the other end of the cable to one of the 9-
pin connectors on the SP modules or RAID controllers (I/O modules).
4. For each NetWare server, verify the connection between the server and a
Windows NT or Windows 2000 management station on the local area network
(LAN). Otherwise, proceed to step 5.
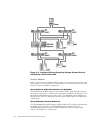
5. Power on all Fibre Channel switches, and then power on the PowerVault storage
systems.
This step takes 3–5 minutes and ensures that the PowerVault storage systems
are completely booted.
6. Power on the server(s).
7. Complete any switch zoning before continuing. For information about zoning, see
Chapter 15, “Managing Fibre Channel Fabric Switch Zones.”
Powering Up and Shutting Down a SAN
To power up or shut down the complete, fully configured SAN, follow the procedures
provided in this section.
NOTE: If this is the first time you are bringing up your SAN, follow the applicable pro-
cedures in Chapters 5 through 8. Use the following procedure for an existing (fully
installed and configured) SAN.
Powering Up a SAN
NOTE: All devices identified in a step must be fully booted before continuing to the
next step.
1. Verify that all cables are properly attached.
2. Power up all Fibre Channel switches and bridges.
3. Turn on all 224F and 630F storage enclosures.