


6
7
SETUp AND opERATIoN
1. Install 8 “C” size alkaline batteries as indicated inside the battery compartment on the back of the
TravelTunes (Fig.4), after pressing the tab at the top of the compartment cover to remove it (be sure
the batteries are all securely in place before replacing the battery compartment cover), or connect the
included AC adapter to the “DC 12v” input jack located behind the rubber strip on the lower right of
the back panel, then plug the AC adapter into a wall outlet. Note that the AC adapter will charge a
docked iPod, but the batteries will not. Make sure the TravelTunes power is off before “docking” an
iPod or making any other connections.
2. The versatile metal handle can be used in the upright position to carry the TravelTunes around, but
should be moved down into the lower position to act as a stand when using the TravelTunes. Be sure
the handle has locked securely into the stand position before proceeding.
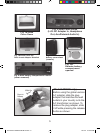
3. If you will be using an iPod that has a docking port on the bottom, rst lift the rubber dock connector
cover (Fig 1a) on the TravelTunes up and press it into place in the indented area above the dock
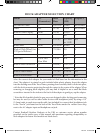
connector cover (Fig.1b). Then snap the plastic docking adapter designed for your model of iPod (see
chart on next page) in place over the TravelTunes dock connector. Then insert the iPod carefully into
the adapter, making sure the connector goes into the docking port on your iPod. If the iPod does not
seem to t, please check to make sure you installed the correct adapter for your model. iPod models
without a docking port (Shuf e, etc.) as well as other MP3 players and audio devices may be used as
well, by connecting their headphone or line out jacks to the “Aux” jack on the back of the TravelTunes,
located behind the rubber strip (Fig 2). This connection can be made with a short male-to-male
1/8”(3.5mm) stereo cable (not included, but provided with many portable audio devices or available
at electronics retailers).
4. Turn on the iPod or connected audio device (if it is not already on), then press the power button
( ) on the top of the TravelTunes. The LED power indicator will come on, and glow green. The LED
will turn red to indicate a low battery condition.
5. Press Play on the iPod or connected device, and adjust the listening level with the volume rocker
switch located next to the power button on top of the TravelTunes. Press and release or hold down the
end of the volume control marked “+” to increase the volume level, and press the end marked “-” to
decrease the volume level. Note that the volume control on the iPod itself is bypassed when docked in
the TravelTunes. As with any speaker system, distortion may occur at very high volumes. If so, reduce
the volume to a lower level. Refer to the “Troubleshooting” section of this manual if you experience
other audio quality problems.
6. The included wireless remote control can be used instead of the controls on the TravelTunes to turn
on the power, raise or lower volume and also play/pause and select the next or previous song on a
docked iPod. The remote uses an infrared beam, and must be pointed towards the sensor behind the
front grille of the TravelTunes to control it. Before using it, pull out the plastic protective battery cover
sheet (Fig 3a) If the remote does not seem to work, please check the following:
( ) on the top of the TravelTunes. The LED power indicator will come on, and glow green. The LED
• Move the remote closer to the TravelTunes and try again (max. range is about 18 ft.)
• Be sure you are not at too much of an angle relative to the front of the TravelTunes
• Make sure the iPod is securely mounted on the dock connector, and the iPod’s display is on
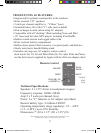
• Open the remote battery compartment by sliding it straight out, and replace the battery with a new
3 volt lithium #CR2025 battery (Fig.3b).
TravelTunes 940001G-6LIM rev3.in7 7 2/17/07 3:13:05 PM