


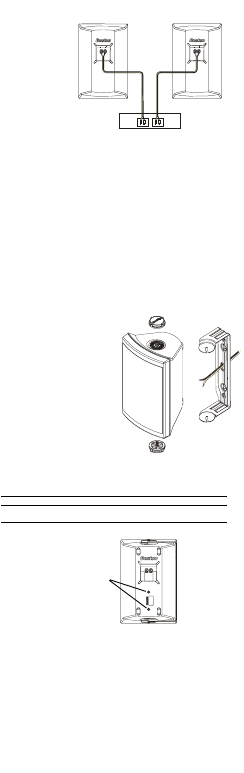
Basic Hookup
1. Connect the speaker
terminals to the amplifier
speaker outputs.
2. When making all
connections, be sure to connect
+ to + (red) and – to – (black).
Note: The Voyager
®
Metro
requires connection of both left
and right speaker wires to the
one speaker.
Checking the Speaker Connections
It is important that your speakers are hooked up with similar polarity or “in phase.” A simple
listening test will tell you if your speakers are connected properly. Place the speakers face to face,
as closely together as possible. While listening to music with your amplifier set to MONO, reverse
the connections at one speaker only. You’ll hear a dramatic change in sound. The connection that
yields the fuller bass and louder sound is correct.
Listening Levels and Power Handling
The listed power recommendations assume you will operate your system in a way that will not
produce distortion. Even these rugged speakers can be damaged by a modest amplifier if it
produces distortion. If you
hear a harsh, gritty noise, turn down the volume. Prolonged or repeated
operation of your speaker with a distorted signal from the amplifier can cause damage that is not
covered by the warranty.
How to Place Your Speakers
Placement is one of the most important factors for sound quality. Taking a few minutes to place
your speakers correctly ensures that your speakers will sound best in any indoor or outdoor
environment. For best stereo effect, separate the speakers by at least 3-6 ft. (1-2m). Typically,
placement near a wall or other surface will increase the bass output of the speaker. Corner
placement will give still more bass. Outdoors, placement under the eaves of a roof reduces
exposure to constant direct sunlight and precipitation, which will extend the speaker’s life.
Placement under the eaves or on a wall near the ground will increase bass. In situations where you
need to avoid disturbing neighbors, you may wish to install the speakers on a post or railing facing
the house and listening area (the sound area will be more contained).
Mounting the speakers
Before running permanent wires and mounting the
speaker, you may wish to test the speaker
placement first for coverage and good stereo
sound.
Use the supplied bracket to mount the speaker
vertically or horizontally on walls or other surfaces.
The bracket includes keyhole sockets and other
holes to suit a variety of hardware. Consult a
knowledgeable person about the best hardware to
use for your particular wall surface.
For mounting, remove the bracket from the speaker.
If running wires, you may wish to route the wiring
through the bracket’s large middle hole; the
bracket will cover the hole in the wall. Mount the
bracket and attach the speaker. Adjust the speaker
to face the listening area.
Alternatively, you may use mounting brackets
made by other companies. The 1⁄4–20 threaded
inserts for the knob match various brackets and
mounting plates. The Voyager
®
7 includes two
more inserts on the rear of the cabinet. Consult
your dealer or the bracket manufacturer for more
information.
Public address installations
The Voyager models include internal screw holes for 70V matching transformers used in
professional PA installations. These holes are designed for transformers with two mounting points
spaced 2-3" (52-76mm) apart (Voyager 4,5, and 7) and for a transformer adaptor plate with four
holes (Voyager 6 and Metro). Use self-tapping #6 x 3/8" screws (metric equivalent: M3.5 x 10mm).
To mount a transformer, remove the speaker grille (see above), and then remove the recessed
screws holding the front baffle. Connect the transformer wires with wire nuts or solder. Test the
speaker and reattach the front baffle, making sure the sealing gasket is in place. Do not over-
tighten the recessed screws, or the plastic screw threads will strip.
Maintenance
Voyager speakers require no more than occasional dusting or wiping with a soft cloth. When the
speakers are installed in hard-to-reach locations, you may brush them with a soft broom. Avoid
directing a garden hose at the speaker—it can damage the drivers or dislodge the wiring.
If Service Seems Necessary
First, contact the dealer from whom you purchased the speakers. If that is not possible, write to:
Boston Acoustics, Inc. 300 Jubilee Drive Peabody, MA 01960 U.S.A.
We will promptly advise you of what action to take.
amplifier or receiver
Mounting Options Voyager
®
7 All other models
Insert Size 1/4–20 1/4–20
Insert Location Top, Bottom, Top and Bottom
and 2 on rear, 3" (76.2mm) apart
Voyager
®
7 mounting inserts