


English
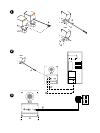
1. Satellite Speaker Assembly
a
) Connect the stereo mini-plug from the left
satellite speaker to the rear of the control pod on
the right satellite speaker.
b
) Allow the blue control cable from the right
satellite to be cradled by the "U" cut on the
pedestal stand.
c
) With both satellite speakers' audio cables free
of pinching, slide on each speaker's pedestal
stand.
d
) Attach rubber pads to bottom tips of each
pedestal stand. The rubber pads absorb vibra-
tions between the speakers and the desktop for
a cleaner sound.
2. Input Panel Connections
e
) Connect the right satellite's control cable (blue
plug) to the subwoofer's "control" input (blue).
Make sure to line up pins carefully or damage
may occur.
STOP: For step
f
, you will need to
identify which type of audio connection
you wish to make – analog or digital.
For digital connections make sure you
have a PC sound card with digital output
as an option. Check your PC's specifica-
tions or manufacturer's technical support
for more information.
f1
) Analog: Using the stereo cable included,
connect the purple end to the subwoofer's purple
"analog input" jack. The stereo cable's green end
may be plugged into any audio device with a line
level out or headphone jack (PCs, portable CD
players, MP3 players, etc.). On PCs, the analog
audio output will normally appear green on the
sound card or be labeled "1" or "Front".
f2
) Digital: Digital connections will normally be
limited to PCs. Using the digital cable included (2
black RCA ends) connect one end to the
subwoofer's gold "digital input" jack. Connect the
opposite end to your sound card's digital output (it
may be necessary to use your RCA to 1/8"
adapter here depending on the type of output jack
on your sound card). The computer's digital
output is usually located on the main sound card
and can be identified by the color green, or
labeled "1", "Digital" or "SPDIF". In some cases,
your system may have a digital "daughter card" for
Dolby Digital decoding and streaming. If so, the
digital audio output will be located on this daugh-
ter card. NOTE: On most sound cards it will be
necessary to activate the sound card software's
"Digital Output Only" option. For more information
on activating or deactivating your sound card's
digital options, consult your sound card manual or
manufacturer's technical support.
g
) Plug in power cable/transformer into back of
subwoofer and available AC outlet.
h
) Apply large rubber pads to the subwoofer's
bottom four corners.
1. Montaje de los altavoces satélite
a
) Enchufe la miniclavija estéreo del altavoz
satélite izquierdo en la parte posterior de la
unidad de control situada en el altavoz satélite
derecho.
b
) Permita que el cable de mandos azul del
altavoz satélite derecho encaje en la muesca en
forma de “U” del pedestal.
c
) Con los cables de audio de ambos altavoces
satélite bien estirados, deslice los pedestales de
cada altavoz.
d
) Fije las almohadillas de goma en los extremos
inferiores de los pedestales. Las almohadillas
absorben las vibraciones entre los altavoces y el
escritorio, mejorando la calidad del sonido.
2. Conexiones del panel de entrada
e
) Enchufe el cable de mandos del altavoz
satélite derecho (clavija azul) en la entrada
“Control” del subwoofer (azul). Asegúrese de que
las púas estén bien alineadas o, de lo contrario,
se podrían causar desperfectos.
ATENCIÓN: Para el paso
f
, deberá
identificar el tipo de conexión de audio
que desea realizar: analógica o digital.
Para conexiones digitales, asegúrese
de que la tarjeta de sonido de su PC
tenga salida digital como opción.
Consulte las características técnicas
de su PC o el servicio de asistencia
técnica del fabricante para obtener más
información.
Español