5
TRUTH B2030A/B2031A
2. CONTROL ELEMENTS
1.1 Before you get started
1.1.1 Shipment
The B2030A/B2031A was carefully packed at the factory to
assure secure transport. Should the condition of the cardboard
box suggest that damage may have taken place, please inspect
the unit immediately and look for physical indications of damage.
+ Damaged units should NEVER be sent directly to us.
Please inform the dealer from whom you acquired
the unit immediately as well as the transportation
company from which you took delivery of the unit.
Otherwise, all claims for replacement/repair may
be rendered invalid.
1.1.2 Initial operation
Please make sure the unit is provided with sufficient ventilation,
and never place the TRUTH on top of an amplifier or in the vicinity
of a heater to avoid the risk of overheating.
+ Before plugging the unit into a power socket, please
make sure you have selected the correct voltage:
The fuse compartment near the power plug socket contains
three triangular markings. Two of these triangles are opposite
one another. The voltage indicated adjacent to these markings is
the voltage to which your unit has been set up, and can be
altered by rotating the fuse compartment by 180°. ATTENTION:
This does not apply to export models that were for
example manufactured only for use with 120 V!
+ If you alter the units voltage, you must change
the fuse accordingly. The correct value of the
fuse needed can be found in the chapter
SPECIFICATIONS.
+ Faulty fuses must be replaced with fuses of
appropriate rating without exception! The correct
value of the fuses needed can be found in the
chapter SPECIFICATIONS.
Power is delivered via the cable enclosed with the unit. All
requiered safety precautions have been adhered to.
+ Please make sure that the unit is grounded at all
times. For your own protection, you should never
tamper with the grounding of the cable or the unit
itself.
1.1.3 Warranty
Please take a few minutes and send us the completely filled
out warranty card within 14 days of the date of purchase. You
may also register online at www.behringer.com. The serial number
needed for the registration is located on the rear of the unit.
Failure to register your product may void future warranty claims.
2. CONTROL ELEMENTS
The control elements described in the following are the same
on both loudspeakers.
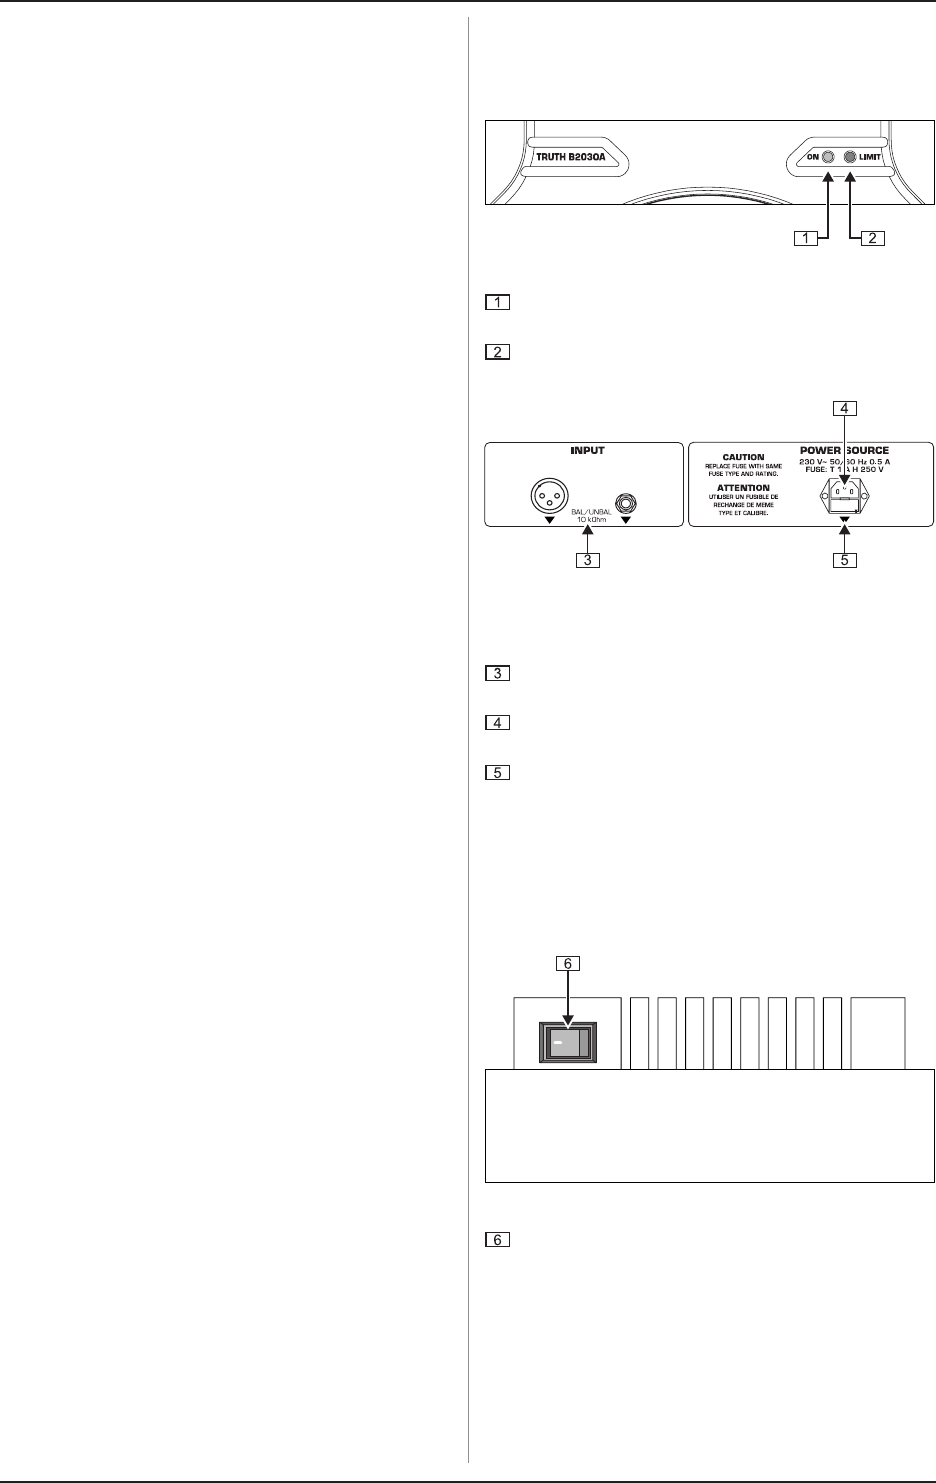
Fig. 2.1: Front panel display elements (here: B2030A)
ON. This LED lights up as soon as you switch on the
speaker.
LIMIT. Lights up as soon as one of the built-in protections
is activated.
Fig. 2.2: Rear panel connectors
All connectors of the TRUTH face downwards, so as to allow
you to place the speaker as closely to a wall as possible.
INPUT. These are the balanced inputs of your TRUTH, laid
out as 1/4" TRS and XLR connectors.
The mains connection is achieved via the standard IEC
connector. A matching power cord is included.
FUSE COMPARTMENT/VOLTAGE SELECTION: Before
plugging the unit into a power socket, please make sure
you have selected the correct voltage. Faulty fuses must
be replaced with fuses of appropriate rating without
exception. Some units feature a fuse compartment that
can be operated in two different positions, allowing
alternating between 230 V and 120 V. Attention: when
using the unit outside of Europe (running on 120 V), you
have to implement a fuse with a higher rating.
Fig. 2.3: The POWER switch
Use the POWER switch to power up your TRUTH. The
POWER switch should always be in the Off position when
you are about to connect your unit to the mains.
+ Attention: The POWER switch does not fully
disconnect the unit from the mains. Unplug the
power cord completely when the unit is not used
for prolonged periods of time.


