1
INSTALLATION CONSIDERATIONS
The following is a list of tools needed for installation:
#2 Phillips screwdriver
Battery post wrench
Hand held drill w/assorted bits
Wire strippers
Wire crimpers
Wire cutters
18 gauge (min.) wire kit (not included)
to provide power to the LED's.
Since some of these Jensen Full Range Speakers are most often used as direct
replacements for stock speakers, some of the following instructions will not apply.
For custom installations see your Authorized Jensen Dealer.
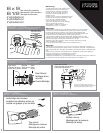
1. Determine where the speakers will be mounted. Ensure an area large enough for the speaker to
mount evenly. Be sure that the mounting location is deep enough for the speaker to fit; if mount-
ing in a door, operate all functions (windows, locks, etc.) through their entire operating range to
ensure there is no obstruction.
2. Refer to the cut out template to determine the proper diameter hole to cut for your speaker
model.
3. Using the enclosed mounting template, mark the locations for the mounting screws.
Drill the holes with a 1/8" bit.
4. Feed the speaker wires through the cutout and connect to the speaker terminals.
Be sure to observe proper polarity when connecting the wires.
The speaker's positive terminal is indicated with a "+" and the negative terminal is indicated with a "-".
INSTALLATION
MOUNTING


