


Page 6 ©2007 • All rights reserved.
Storm Series Outdoor Speakers
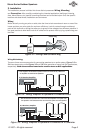
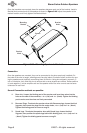
Once the brackets are mounted, place the speakers between each end of the bracket. Install a
Bracket Knob on each end of the speaker as shown in Figure 3.10. Adjust the speaker to the
desired location, and fi rmly tighten the Bracket Knob.
Connection
Once the speakers are mounted, they can be connected to the wires previously installed. Cut
the ends of the wire to length, allowing some free play (about 6 inches of slack) to allow for mov-
ing the speakers and physically connecting them to the wire. Using wire strippers, remove 1/2
inch of insulation, then twist the wire to ensure that no stray strands are evident. Defi ne positive
(+) and negative (-) at the amplifi er end and the speaker end of the wire run and use the same
conductor on each end.
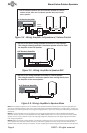
Several Connection methods are possible:
Bare wire - Loosen the binding post of the speaker and insert bare wires into the
holes on the side of the connector; + to + (red) and - to - (black). Tighten the binding
post to make sure the wires are fi rmly connected.
Bannana Plugs - Terminate the speaker wires with Bannana plugs, loosen the bind-
ing posts, then insert the plugs into the center holes; + to + (red) and - to - (black).
Tighten the binding posts to ensure a snug fi t.
Spade Lugs - Terminate the speaker wires with Spade Lugs, loosen the bind-
ing posts, then position the spade lugs behind the binding post; + to + (red) and - to
- (black). Tighten the binding posts to ensure a snug fi t.
1.
2.
3.
Mounting
Bracket
Screws
Bracket
Knob
Bracket
Knob
Figure 3.10 - Mounting Speaker to Bracket