


SPEAKER MOUNTING - WS-15
To mount the WS-15 on a wall, first decide its mounting position, and mark the spot on
the wall with a pencil. If possible, locate a wall stud and insert the screw directly into
the wall stud. If the wall stud is not near your desired mounting location, then utilize
proper wall anchors to ensure secure mounting of the speaker.
NOTE: Improper installation can result in damage or injury!
To mount the speaker, invert it upside down, and insert the large hole on the
rear bracket through the screw head, allowing the speaker to sit into the
narrower slot. Once lowered down, gravity will keep the speaker into the
narrower part of the slot, and keep it securely mounted to the wall. There are
three mounting slots, the center one is for a straight on appearance, the two to
the sides provide an angled installation in case you need to point the speaker
towards the listening area.
For mounting diagrams instructions, please see WS-15 diagrams 1-6
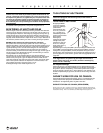
SPEAKER MOUNTING - WS-60
The WS-60 is designed for both vertical and horizontal mounting arrangements. To
mount the WS-60 on a wall, first decide its mounting position. Separate the round base,
and the mounting bracket from the speaker. Hold the bracket up to the desired mounting
position, then mark the screw locations with a pencil. There are 5 possible screw
locations on the multi-function bracket. Please see diagram 11 If possible, locate a wall
stud and insert the screw directly into the wall stud. If the wall stud is not near your
desired mounting location, then utilize proper wall anchors to ensure secure mounting of
the speaker.
NOTE: Improper installation can result in damage or injury!
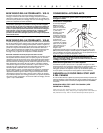
To mount the speaker to the bracket, first ensure the two bolts on the rear of the speaker
are hand tightened all the way until they no longer turn. Then, holding the speaker up to
the wall bracket, insert the head of the bolts through the larger openings on the bracket
and slide the speaker into the narrower part of the slot. If the mount is a vertical one,
slide the speaker down into place. If this is a horizontal mount, please ensure the
bracket is oriented correctly, as there is a right side up. The head of the bolt needs to sit
into the small indent in order to ensure secure installation. Please see diagram 12.
After installing the bracket, there are multiple positions that the speaker can be placed.
The bracket has been designed to allow minor changes in speaker position without
having to remove and reinstall the bracket. In vertical mounting applications, the speaker
can either face forward or angled to the left or right to best facilitate your particular
installation. In horizontal mounting applications, its possible to shift the speaker position
either left or right in 2” increments.
For mounting diagrams instructions, please see WS-60 diagrams 1-15
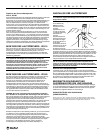
SPEAKER CONNECTIONS
Caution: Turn off all power in your audio/video system before proceeding with
your installation. Not doing so could result in potential damage to the system.
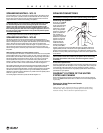
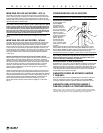
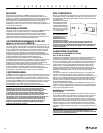
Connecting the Speakers
On the rear of your athena
TECHNOLOGIES
®
speakers
are two gold plated spring
loaded connectors, one
marked red (+), the other
black (-). Using standard
speaker wire, connect the
system one channel at a
time, and start your
process at the Receiver. To
attach the wire, press the
connector in until a hole
appears. Insert the wire
through the hole and
release the connector.
Connect the speaker wire
from the positive (RED +)
terminal on the receiver to the positive (RED+) terminal on the speaker. Connect the
negative (BLACK-) terminal on the receiver to the negative (BLACK-) terminal on the
speaker. Do this one channel at a time until all of your speakers are connected properly.
Be careful to correctly match positive and negative, as well as the correct speaker to the
correct channel.
NOTE: If you inadvertently reverse one of the connections (i.e, red to black),
you will notice a severe lack of bass from your system. This is called wiring
the system "Out of Phase". If this occurs, check the wiring and re-connect
as necessary.
A Note about Speaker Wire
Contrary to popular belief, not all speaker wire is the same. The speaker wire is the only
contact the speaker has with the amplifier. If thin, low quality cable, such as "lamp cord"
is used, then the overall sound quality will suffer, particularly in lengths of 10 feet or
more. We strongly recommend the use of high quality speaker cable to obtain the best
performance from your speakers.
WARRANTY OUTSIDE OF THE UNITED
STATES AND CANADA
Outside of North America the warranty may be changed to comply with local regulations.
Ask your local athena
TECHNOLOGIES
®
retailer for details of the limited warranty applicable
in your country.
Warranty for United States and Canada
(SEE BACK COVER)
athena TECHNOLOGIES
®
, SCT
™
, and Create Your Sound
™
, are trademarks of Audio Products
International Corp. "Dolby", "Dolby Pro-Logic", and "Dolby Digital" are trademarks of Dolby
Laboratories Licensing. "DTS" is a trademark of Digital Theater Systems Inc.
owners manual
3