


CABINET CARE
Great care and craftsmanship have gone into the construction and finish of the cabinet.
Periodically use a soft, dry cloth to remove dust or fingerprints. Do not use paper towel
or other abrasive materials as it may damage the finish.
NOTE: Please retain the carton and packing material for the athena TECHNOLOGIES
®
products to protect them in the event of a move or if they need to be shipped to
a service center. Product received damaged by a service center that has been
shipped by the end user in other than the original packaging will be repaired,
refurbished and properly packaged for return shipment at the end user’s
expense.
SUBWOOFER PLACEMENT
The usual placement for a subwoofer is near the front speakers in your system. Whether
it is an audio system, a video system, or both. The closer the proximity to the front
speakers, the best balance and phase relationship is usually obtained. Be careful when
placing the subwoofer too close to corners or walls as this increases the “boominess” of
the subwoofers sound. This may or may not be to your liking. The position of the sub
must be cosmetically acceptable, but keep in mind the position plays a large role in the
overall sound of the system.
If after set up you are unhappy with the overall sound, try experimenting with the
position of the sub. It’s surprising, but moving the unit a few inches one way or another
can make dramatic changes to the sound of the bass response.
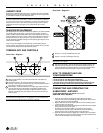
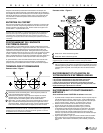
TERMINOLOGY AND CONTROLS
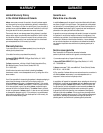
Front Panel - Diagram 1
1 Subwoofer Volume Control - This controls the volume level of the subwoofers’
internal amplifier.
2 Low Pass Filter Control - This controls the effective frequency range of the
subwoofer. It has a range of 40-120 Hz to allow you to correctly match the output of
the subwoofer with that of the rest of the system.
3 Status Indicator - The Status indicator will emit a green light when the subwoofer
is actively producing sound. The subwoofer is automatically activated by any
signal from any of the inputs on the subwoofer. When the indicator is red, the
subwoofer is in standby mode, and is ready to turn on as soon as the subwoofer
receives a signal.
NOTE: The auto-on auto-off circuit does not instantly turn off the subwoofer.
The subwoofer will remain in the “on” mode (green) for up to 10 minutes after
the last signal, even when the system is turned off completely.
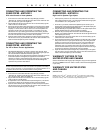
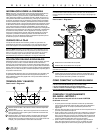
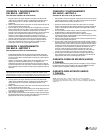
Rear Panel - Diagram 2
1 Direct Input - This input is an RCA type mono input.
2 Sub Input - This input is an RCA type mono input.
NOTE: Please see the connections section for suggestions on which input is
appropriate for your system.
3 High Level Inputs/Outputs - These are binding post type speaker connectors. The
High Level inputs are designed to be used on receivers or amplifiers that do not
incorporate any RCA type subwoofer outputs. If your receiver is equipped with an
RCA type subwoofer output, these inputs & outputs will not be utilized.
HOW TO CONNECT AND USE
YOUR SUBWOOFER
Caution:
• Do not use both low level RCA inputs simultaneously
• Do not use both low level and high level inputs simultaneously
• Turn off all power in your audio/video system before proceeding with your
installation. Not doing so could result in potential damage to the system.
CONNECTING AND OPERATING THE
SUBWOOFER - METHOD 1
If your front speakers are athena TECHNOLOGIES
®
AUDITION Series Speakers
1. On the rear of the receiver there should be a single RCA type jack named
“Subwoofer Out” Connect a single RCA type audio cable from the “Subwoofer Out”
jack to the “Sub Input” (jack #2 on diagram #2)
2. Plug the Subwoofer’s AC cord into an AC outlet. Do not use the accessory type AC
outlets on the rear of the AV receiver.
3. Set the Low Pass Filter Control (knob #2 diagram #1) to match the model of speaker
that you have in the front of your system.
For example if you have AS-F1 speakers, set the control to the F1 position.
This will adjust the frequency output of the subwoofer to precisely match your
speakers, and will result in a seamless system for music and movies.
4. Adjust the Volume Control (knob #1 diagram #1) to match the output of the system.
This can be done to suit your personal taste, and room size. Start somewhere in the
middle of the dial and adjust as you feel is necessary.
owners manual
3