


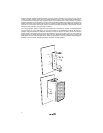

Drive the mounting screws through the bracket, into the holes, until they are firmly set. Connect the
wire to the speakers (see wiring tips in following section). Set the speakers in the mounting brackets,
placing a rubber washer between the speaker cabinet and the bracket on each side. Secure the cabinet
to the brackets with the threaded knobs, placing a second rubber washer around the threaded part of
each knob. Position the speaker as desired, and tighten the knobs.
wiring
Wire
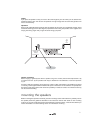
Use two-conductor stranded-type, insulated wire to connect the speakers to the amplifier. “Lamp” wire
or “zip cord” works well. If you are running wiring within the walls, make sure that it complies with
your local building codes pertaining to low-voltage wiring. Use at least 16 gauge for runs of less than
50 feet. Use 14 gauge or larger wire for longer runs. The resistance of 18 gauge or smaller wire can
cause a bass response peak if used for more than a few feet.
Preparing the wire
Estimate the amount of wire needed. Allow enough extra wire so you can move the speakers if
necessary. Separate the conductors of each wire pair a few inches in from the end. Strip about 3/8”
insulation from each conductor. Be careful not to cut into the wire itself. Twist the strands of the
conductor together to avoid fraying. For outdoor use, terminate the wire with gold-plated pin-type
terminals and insulate the wire-to-pin connection with silicone filled heat-shrink tubing. Bare copper
wire can corrode and cause unreliable connection over time.
Polarity
The polarity - the positive/negative orientation of the connections - for every speaker-to-wire and wire-
to-amplifier connection must be the same so the speakers will be “in phase”. If the polarity of one
connection is reversed, bass output is reduced and stereo imaging is degraded. All wire is marked so
you can identify the two conductors. There may be ribs or a stripe on the insulation of one conductor.
The wire may have clear insulation with different color conductors (copper and silver). Decide which
conductor you will use for “positive” and which for “negative”. Then be consistent with every speaker-
to-wire and wire-to-amplifier connection.
Speaker input connectors
The speakers have color coded push-to-connect input terminals that accept virtually all types of speaker
wire. Push the back of the terminal to open the wire access hole. Put the stripped wire or pin terminal
into the hole and release the terminal.
Making the connections
Connect the positive conductor of one wire to the red input connector of one speaker and to the red
or “+” speaker output connector of the associated amplifier channel. Connect the negative conductor of
the wire to the black terminal of the speaker and to the black or “-” connector of the associated
amplifier channel. Repeat the procedure for the other channel. Be sure to follow exactly the same
connection procedure for both channels.
speaker protection
The speakers have a solid-state, fully automatic tweeter protector. This device reduces the power to the
tweeter when the speaker is operated at unsafe power levels. The protector resets itself when power
is reduced to a safe operating level. If high power operation causes the tweeter to stop playing, turn
down the volume control until normal sound resumes. Note: The tweeter protector provides a significant
level of protection. However it does not guarantee that the tweeter cannot be damaged. Always be
careful when operating the speakers at a high volume level.
4