


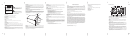

Front Panel Features Continued:
9.
SNOOZE (top of cabinet):
When the
Alarm sounds, press, hold, and then release the Snooze button to
silence the Alarm for approximately 5 minutes. After 5 minutes, the alarm sound will automatically resume.
10. CLOCK: This quartz analog clock features a fine mechanical quartz movement for superb accuracy. The
clock operates off of a single “AA” battery so power failures will not affect the clock’s accuracy. Check the
battery annually so the clock remains accurate. The clock’s illumination cannot be turned off or adjusted. It
is normal for the light to take several seconds to extinguish if the power supply is disconnected.
Guide to features (rear panel):
1. BALANCE:
If The Stereo Speaker or Dual Alarm Speaker (sold separately) is not connected, the Balance
knob should be set to the Left channel position and the Mono/Stereo switch should be set to Mono. If the
Dual Alarm Speaker or Stereo Speaker (sold separately) is connected, set the Balance control to the center
detent position for equal balance, or upward to hear the main unit speaker, or downward to hear the (right)
Stereo Speaker
, and set Mono/Stereo switch to Stereo.
2 R-SPR: Connect the male RCA cable from the right Dual Alarm or Stereo Speaker (sold separately) to this
output, switch the Mono/Stereo switch to Stereo, and place the Balance knob in the center detent position.
Connecting a speaker other than
The Stereo Speaker or Dual
Alarm Speaker may cause damage to the
Model Three and void your warranty.
3. 12VDC, 1.5A: Connect the included AC power supply to this input. Use only the power supply provided with
this product. To obtain a replacement, contact your authorized dealer or Tivoli Audio, USA: 1.877.297.9479.
The power supply connector is 5.5mm/2.1mm x 13mm long, center positive. Do not connect the power sup-
ply to an electrical outlet controlled by a wall switch. It is normal for the power supply to become warm dur-
ing use. An optional 12VDC nominal, 1.5A fused source may also be used.
OWNER'S MANUAL
Model Three
MODEL THREE
HENRY
KLOSS
Tivoli Audio
1
2
6
93
1
2
4
5
7
8
10
11
88
108
1700
1400
1200
1000
800
700
600
550
90
106
92
1
04
94
102
96
98
100
FM
O
FF
A
UX
AM
Tiv
oli
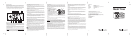
4.
ANTENNA SWITCH:
Switch between internal and external FM antennae. If the included FM antenna is
used, set this switch to external. This switch has no affect on AM reception.
5.
EXTERNAL FM CONNECTION:
The Model
Three has built-in AM and FM antennae. To improve FM
reception, insert the end of the supplied FM antenna into the center of this “F” connector and set the switch
to External. Adjust the wire for best reception. See the section marked “Reception” for more information.
This connection has no affect on AM reception.
6. HEADPHONE: Connect a headset (not included) to this stereo output for private listening. The headphone
volume is controlled by the Model Three’s volume knob. Connecting a pair of headphones will mute the
Model Three’s speaker. This jack accepts a 1/8" stereo male mini plug.
7. SUB OUT: Connect Tivoli Audio’s Model Subwoofer (sold separately) to this output to enhance the bass.
This jack accepts a 1/8" stereo male mini plug.
8. AUX IN: To hear audio from another device, such as Tivoli Audio's Model CD, connect the device’s audio
output to this stereo input and switch the source knob to Aux. Note that you may need to adjust the volume
level differently for an auxiliary device than the level normally used for radio listening. This jack accepts a
1/8" stereo male mini plug.
9. REC OUT: You may record from the Model Three by connecting a cassette deck or other recording device
to this fixed level, stereo output. You may also use the Model Three as a high-performance AM/FM analog
tuner by connecting a preamplifier or integrated amplifier to this output. The Model Three’s speaker will not
be muted when using this output. This jack accepts a 1/8" stereo male mini plug.
10. MIX IN: Connect your computer’s (or other device) audio output to this stereo input to hear audio mixed-in
with either the tuner or auxiliary device if one is connected. The volume level of this input must be adjusted
at the source. This jack accepts a 1/8" stereo male mini plug.
11. MONO/STEREO: This switch should remain in the Mono position unless the right Stereo Speaker (sold
separately) is connected, in which case the Stereo position should be selected. If you are using the Stereo
Speaker and have the switch set to Stereo, you may wish to experiment with this switch during radio listen-
ing, as the Mono position may help to clean up FM static noise. The Headphone and Record outputs are
Stereo and are not affected by this switch, unless the Source knob is set to AM (which is always Mono) or
FM and this switch is set to Mono.
12. TIME SET: Briefly press and release this button to advance the hands in small increments. Press and hold
this button to continuously advance the clock’s hands. Release the button when the clock is set properly.
Be sure the alarm button is in the Off position when setting the time. See “How to set the clock”.
13. ALARM GRILLE: The alarm beep emits from this grille. Do not block this grille
14. BA
TTERY BACK UP:
Remove the battery cover and install a fresh major brand 1.5V “AA” alkaline battery
,
observing correct +/– polarity. The clock operates off of the battery continuously and the battery
also acts as a back up. In the event of a power failure, the battery back up will maintain the clock’s
operation and sound the wake-up tone if the alarm button is in the On position, provided a fresh
battery is correctly installed.
The clock face will not illuminate and the radio will not operate during a power
failure in order to conserve battery life. Check the battery’
s strength annually and replace only with a major
brand, 1.5V “AA” alkaline battery. If the clock stops operating, replace the battery. To reduce the risk of fire
or injury, do not leave a dead battery in the clock. Do not dispose of the spent battery into a fire. Do not
open or tamper with the battery. Do not recharge the supplied battery. Dispose of the spent battery accord-
ing to your state/country's regulations. See also "How to set the clock".
How to set the clock:
The clock hands will automatically rotate when the battery is correctly installed to indicate the clock is function-
ing. Within 5 minutes of inserting a fresh battery, a beep will be heard indicating the alarm is functioning. This
beep will not be heard if the radio is on at the time. Set the hands to the correct time with the Time Set button
once the hands have finished rotating. Push the Time Set button in and release to move the hour hand in small
increments or hold the button in to continuously advance the hands. Be sure the front panel alarm button is in
the off position when adjusting the time.
How to set the alarm:
1. Rotate the alarm thumbwheel counter-clockwise and
set the alarm hand to the approximate time you wish to
wake to.
DO NOT TURN THE ALARM BEZEL
CLOCKWISE OR YOU MAY DAMAGE THE
MECHANISM.
2. Turn the source knob to AM or FM and tune to a sta-
tion that will be broadcasting during the set wake-up
time. Set the volume to the desired level you wish to
wake to. If you prefer to wake to the tone, set the
source knob to Aux instead of AM or FM.
3. Press the Alarm button ON. The green alarm LED will
light and the radio sound will turn off. The radio will turn back on when the clock time roughly coincides with
the setting of the alarm hand.
If the Alarm is in the ON position and the source knob is in the OFF position, the tone will sound during the set
wake-up time.
If the Alarm is in the ON position and there is a power failure, the tone will sound in lieu of the radio during the
set wake-up time, provided a fresh battery is properly installed.
4. To turn the Alarm OFF, press the Alarm button again and the Alarm LED will extinguish.
Important Note:
Due to the nature of the alarm thumbwheel
’
s analog mechanism, which was designed
for simplicity, there can be up to a five-minute deviation from when the alarm activates. For example, if
the alarm is set for 10.00, it is possible it could activate at 9:55 or 10:05. We recommend you set the
alarm early the first time you use it to accommodate for this. As you use your Model Three you will get
a better idea of where you need to set the-- alarm in order to wake-up at the desired time.
A word about radio reception:
For difficult FM reception conditions, if an outdoor antenna is not an option, attach the included antenna to the
external FM antenna jack on the back panel and set the switch to “External”.
Alternately
, an FM dipole antenna
or amplified indoor FM antenna may be used. The best place to locate an indoor antenna is near a window or
outside wall. Sometimes just reorienting the radio will improve reception. Since the power cord acts as an
extension of the internal FM antenna, moving the power cord may also improve reception. Connecting your
cable television wire to the external antenna jack may also provide clear local FM reception, although you usu-
ally must request activation of this service through your local cable company.
Although there is no connection to wire an external AM antenna, a wireless AM loop antenna (not included)
often provides better AM reception than most wire-type AM antennas. Reorienting or relocating the radio some-
times improves
AM reception as well. Note the rear panel “External” switch has no af
fect on
AM reception.
Buildings made with concrete, steel, or aluminum siding will hinder reception. Household appliances, electric
blankets, computers, CD players, and other electronic devices can also adversely affect reception or cause
noise. If you experience this, plug the Model Three into an outlet not shared by another device or move it
further away from the offending device.
Placement:
Placing your Model Three inside a bookshelf or against a wall will inflate the bass as well as confine the speak-
er’s output. For best sound reproduction, allow the sound from the speaker to reflect off of a ceiling without
restriction. Do not place objects over the speaker grille. Do not obstruct the rear bass port.
The Model Three is not magnetically shielded and should be kept at least 5” away from a computer monitor or
television set.
Cleaning:
Never use harsh cleansers or solvents or abrasive pads. The face may be cleaned with a slightly damp,
soft cloth. Take care not to rub too hard. For the wood cabinet, liquid polish usually yields better results than
spray-on waxes.
Painting or staining the cabinet is not recommended and will void your warranty.
Since the cabinet is natural wood, it is not always possible to achieve an exact color/grain match
between the main unit and other Tivoli Audio products. You may also notice the wood darken over time.
Do not use glass cleaner or other chemicals to clean the clock’s window.
Warranty:
Tivoli Audio manufactures its products to very high standards and we are confident our products will perform
well. Accordingly, we warranty this product against manufacturing defects in material and workmanship to the
original owner, for a period of one year from the original date of purchase.
This warranty does not extend to damage caused by improper use/installation, faulty ancillary equipment, modi-
fications, unauthorized repair, shipping damage or loss, abuse, accidents, use on improper voltage/current, light-
ning or other acts of God, normal wear and tear, commercial use, or purchases from unauthorized dealers.
Proof of purchase as evidence the unit was purchased from an authorized dealer within the warranty period
may be required for warranty service. Should service be necessary, DO NOT return the product without first
contacting your dealer or Tivoli Audio. This warranty is non-transferable.
Please resist the temptation to take apart your clock radio. There are no user serviceable parts, and any attempt
at modifying or repairing your radio will void the warranty.
T
ivoli
Audio will not pay for loss of time, inconvenience, loss of use of your product, or damaged caused by this
product.
This warranty gives you specific legal rights, and you may also have other rights which vary from state to state.
Some states do not allow limitations on implied warranties or the exclusion of consequential damages, there-
fore, these restrictions may not apply to you. If you purchased an extended warranty from your dealer and ser-
vice is required after the manufacture’s warranty has expired, you should contact your dealer to obtain service.
Please complete and return the enclosed card within 30 days of purchase to register your product for warranty
coverage, or you may register on-line at: www
.tivoliaudio.com
Tivoli Audio
3
2
67
101 9
4
5
11
8
13
12
14
Specifications:
Model: Model Three™
Type: Quartz analog clock AM/FM radio
Driver: One 3" full-range driver
Power Supply: M3-PS, 12VDC, 1.5A, 120V-60Hz (UL); 230V-50Hz (CE)
Clock Battery: “AA” 1.5V alkaline
Dimensions: 8 3/8" W x 4 1/2" H x 5 1/4" D
Weight: 4.25 lbs
Specifications subject to change without notice.
Tivoli Audio reserves the right to make product changes without notice.
Tivoli Audio, the Tivoli Audio logo, Model Three, Model Three Dual Alarm Speaker
and The Stereo Speaker are trademarks of Tivoli Audio, LLC.
For more information about other exciting audio products by Tivoli Audio,
please visit our web sites or contact us directly:
Tivoli Audio
One Broadway, Suite 600
Cambridge, Massachusetts 02142
Tel: 877-297-9479
www.tivoliaudio.com
™
MO
DEL T
HREE
HE
NR
Y
K
LOS
S
Tivoli
Audio
12
6
93
1
2
4
5
7
8
10
11
8
8
1
0
8
1
700
1400
1200
1000
800
700
600
5
5
0
9
0
1
0
6
9
2
1
0
4
9
4
1
0
2
9
6
9
8
1
0
0
V
O
L
FM
OFF
A
UX
AM
Tivoli
M3403