Specifications
Time display
UK 12-hour system
Other countries/regions 24-hour system
Frequency range
Band Frequency
DAB (Band-III) 174.928 - 239.200 MHz
DAB (Band-III) frequency table (MHz)
No. Channel Frequency No. Channel Frequency
15A 174.928 20 9D 208.064
25B 176.640 21 10A 209.936
35C 178.352 22 10B 211.648
45D 180.064 23 10C 213.360
56A 181.936 24 10D 215.072
66B 183.648 25 11A 216.928
76C 185.360 26 11B 218.640
86D 187.072 27 11C 220.352
97A 188.928 28 11D 222.064
10 7B 190.640 29 12A 223.936
11 7C 192.352 30 12B 225.648
12 7D 194.064 31 12C 227.360
13 8A 195.936 32 12D 229.072
14 8B 197.648 33 13A 230.784
15 8C 199.360 34 13B 232.496
16 8D 201.072 35 13C 234.208
17 9A 202.928 36 13D 235.776
18 9B 204.640 37 13E 237.488
19 9C 206.352 38 13F 239.200
Speaker:
Approx. 7.7 cm (3.0 inches) dia. 8 Ω
Power output:
0.3 W (at 10 % harmonic distortion)
Output:
i (headphone) jack (ø 3.5 mm, stereo mini jack)
Power requirements:
6 V DC, four LR6 (size AA) alkaline batteries
External power source:
DC IN 6 V
Dimensions:
Approx. 189 × 102.8 × 37.9 mm (w/h/d)
(Approx. 7
1
⁄
2
× 4
1
⁄
8
× 1
1
⁄
2
inches) incl. projecting parts and controls
Mass:
Approx. 486 g (1 lb 1.1
oz
) incl. batteries
Supplied accessories:
AC power adaptor (1)
Design and specifications are subject to change without notice.
English
WARNING
To reduce the risk of fire or electric shock, do not expose this
apparatus to rain or moisture.
To avoid electrical shock, do not open the cabinet. Refer servicing to
qualified personnel only.
Do not install the appliance in a confined space, such as a bookcase or built-in
cabinet.
To reduce the risk of fire or electric shock, do not place objects filled with
liquids, such as vases, on the apparatus.
Connect the AC power adaptor to an easily accessible AC outlet. Should you
notice an abnormality in the AC power adaptor, disconnect it from the AC outlet
immediately.
Features
• DAB(Band-III) Digital Radio.
• Easy view, 2-line character dot LCD display.
• Simple operation for station selection.
• Three Direct preset station buttons.
• Sleep timer and clock display.
• Stereo headphone jack.
• Battery (LR6 × 4) or mains operated.
Choosing power sources
Installing Batteries (See fig. A)
1 Open the battery compartment at the rear of the unit.
2 Install four LR6 (size AA) alkaline batteries (not supplied),
observing polarity, and then close the lid.
Battery Life (Approx. hours) (JEITA*)
When using DAB
Sony alkaline LR6 (size AA) 9
* Measured by JEITA (Japan Electronics and Information Technology Industries
Association) standards. The actual battery life may vary depending on the
circumstance of the unit.
Knowing when to replace the batteries
When the batteries become weak, the sound becomes weak and distorted.
When the batteries are completely exhausted, “E” appears on the display and
the power is turned off.
When “E” appears, replace all batteries with new ones. After the batteries are
replaced, press POWER to turn the indication off.
Notes on replacing the batteries
• Do not take more than about 1 minutes to replace the batteries, otherwise the
clock, any lists of receivable broadcasts for DAB scan, preset favourite services
and all settings will be initialized. Should that happen, set the functions again.
• If the batteries are replaced while the power is on, the unit may revert to the
factory setting.
Notes on batteries
• Do not attempt to recharge dry batteries.
• Do not carry batteries with coins or other metallic objects. It can generate heat
if the positive and negative terminals of the batteries are accidentally contacted
by a metallic object.
• If you are not going to use the unit for a long time, remove the batteries to
avoid damage from battery leakage and corrosion.
• Do not use different types of batteries at the same time.
•When you replace the batteries, replace all with new ones.
If the battery compartment lid comes off
(See fig. B)
The battery compartment lid is designed to come off when opened with excessive
force. To put it back on, see the illustration.
1 Insert the right hinge of the lid into the right hole of the unit.
2 Insert the left hinge in the left hole of the unit.
Using House Current (See fig. C)
Connect the AC power adaptor (supplied) to the DC IN 6 V jack firmly, and plug
it into a wall outlet.
Notes on the AC power adaptor
•When operating the unit with the internal batteries, remove the AC power
adaptor from the wall outlet and the DC IN 6 V jack. Make sure that the plug of
the external power source is disconnected before operating the unit.
• Use the supplied Sony AC power adaptor only. The polarity of the plugs of
other manufacturers may be different. Failure to use the supplied AC power
adaptor may cause the unit to malfunction.
Improving the reception
(See fig. D)
DAB Band-III:
Extend the telescopic aerial and adjust the length and the angle for best reception.
Note
Adjust the direction of the aerial by holding the bottom of it.
The aerial can be damaged when you move the aerial with
excessive force.
Initial setting for the DAB
When the batteries are installed, or when the AC power adaptor is plugged in for
the first time after purchase (or after resetting), the unit will automatically scan
and create a list of receivable broadcasts.
If you wish to scan for the DAB broadcasts again, or when the unit is reset, do the
following:
1 Adjust the aerial accordingly.
2 Press POWER to turn on the radio.
3 Hold down AUTO TUNE for more than 2 seconds.
“INIT INITIALIZE OK?” appears in the display.
4 Press PRESET/ENTER.
No sound will be heard, and “<SCANNING>” appears in the display. DAB
scan takes about 30 ~ 90 seconds. When finished, the unit receives the first
service in alphabetical order stored by the DAB scan.
INIT <SCANNING>
Notes
• If you do not operate within 65 seconds, the initial scan mode will be cancelled.
• If no broadcasts are found by the DAB scan, “SIGNAL NOT FOUND” appears
in the display.
SIGNAL NOT FOUND
•To cancel the DAB scan halfway, press AUTO TUNE. Any services received
before you cancel are added to the list of receivable services.
• If the batteries are removed for a certain period, the received history list will be
deleted, requiring you to scan again.
• If you set the initial setting, any DAB services registered as PRESET are
erased.
• If you change the unit’s location of use, or want to add a new service after the
initial setting, press and release AUTO TUNE. “FULL <SCANNING>” appears
in the display and the unit will automatically scan and create a list of receivable
services.
DAB DIGITAL
RADIO
Operating Instructions
Manual de instrucciones
XDR-S50
© 2006 Sony Corporation Printed in China
Printed on 100% recycled
paper using VOC (Volatile
Organic Compound)-free
vegetable oil based ink.
A
Setting the clock
“AM 12:00” (or “0:00”) will blink in the display when the batteries are installed
or the AC power adaptor is plugged in, and then POWER is pressed for the first
time after purchase, or after resetting.
1 Hold down CLOCK for more than 2 seconds to show the time set
display.
2 Turn U (up)/u (down) to select “OFF” and press PRESET/
ENTER.
The hour indication starts blinking.
Example: 12-hour system.
TIME SET
AM 12:00
3 Turn U/u to set the hour, and then press PRESET/ENTER.
The minute indication starts blinking.
4 Turn U/u to set the minute, then press PRESET/ENTER.
The clock starts operating, and “:” starts blinking.
Tips
•To set the current time rapidly, hold U/u.
•To set the current time exactly to the seconds, adjust the minute function in step
4 and then press PRESET/ENTER to synchronize it with a time signal (such
as the telephone time signal).
•The clock system varies depending on the model purchased. For example, in
the 24-hour system, “0:00” is indicated as midnight, and “12:00” is indicated as
noon.
Notes
• If you do not operate within 65 seconds while setting the clock, the clock
setting mode will be cancelled.
•To cancel the clock setting mode halfway, press CLOCK.
•To show the current time as DAB is received, press DISPLAY.
(See “Changing the display”).
Setting the Clock Auto
Adjustment Function
This function enables the built-in clock of this unit to automatically synchronize
with any DAB data being received.
1 Hold down CLOCK for more than 2 seconds to show the time set
display.
2 Turn U/u to select “ON” and press PRESET/ENTER.
AUTO TIME SET
ON OFF
“
CLOCK ADJ
” lights and DAB data adjusts the clock as it is received.
Notes
• If DAB is not available (depending on area), you can disable this function.
• If this function is active while adjusting the clock manually, DAB data will
adjust the clock the next time the unit receives it.
Operating the radio
The unit can receive DAB services, and features
ALPHABETICAL, PRESET, and MANUAL modes.
ALPHABETICAL: To select a stored service in alphabetical order.
PRESET: To select preset services. “
P
” appears in the display.
MANUAL: To adjust the frequency incrementally.
1 Press POWER to turn on the radio.
When the unit is turned on again, the last band you listened to is received.
2 Press TUNE MODE to select the desired mode.
Each press changes the tuning mode between ALPHABETICAL and
PRESET.
To change to MANUAL, hold down TUNE MODE for more than 2 seconds.
Press again to return to the previous mode.
3 Turn U/u to tune to the desired service.
Two short beeps sound when the lowest ensemble of DAB is received during
tuning.
4 Adjust the volume using VOL.
Notes in DAB usage
• Before receiving DAB broadcasts, one or more ensembles should be stored in
the list by the DAB scan. (See “Initial setting for the DAB”).
• If there are no services, you can choose only MANUAL mode.
•“< NO ENSEMBLE >” appears when the ensemble for the selected service
cannot be received.
BETA 1
<NO ENSEMBLE>
• If a selected service finishes broadcasting, sound stops and “< NO SERVICE >”
appears. In this case, turn U/u to select another service.
About the SC (Secondary Component)
If the selected primary component has a secondary component, “
SC
” blinks on
the display.
BETA 4
EUROPEAN EQUITIE
Press SC to receive the desired secondary component. “
SC
” appears while the
secondary component is received.
Turn U/u or pressing SC does the following:
Ensemble
Component
Service 1
Component
Service 2
Service 3
Service 4
Secondary Component A
Secondary Component B
Secondary Component
Component
Component
U (up) or u (down)
SC
Note
When the selected secondary component is finished, the unit returns
automatically to the primary component.
B
D
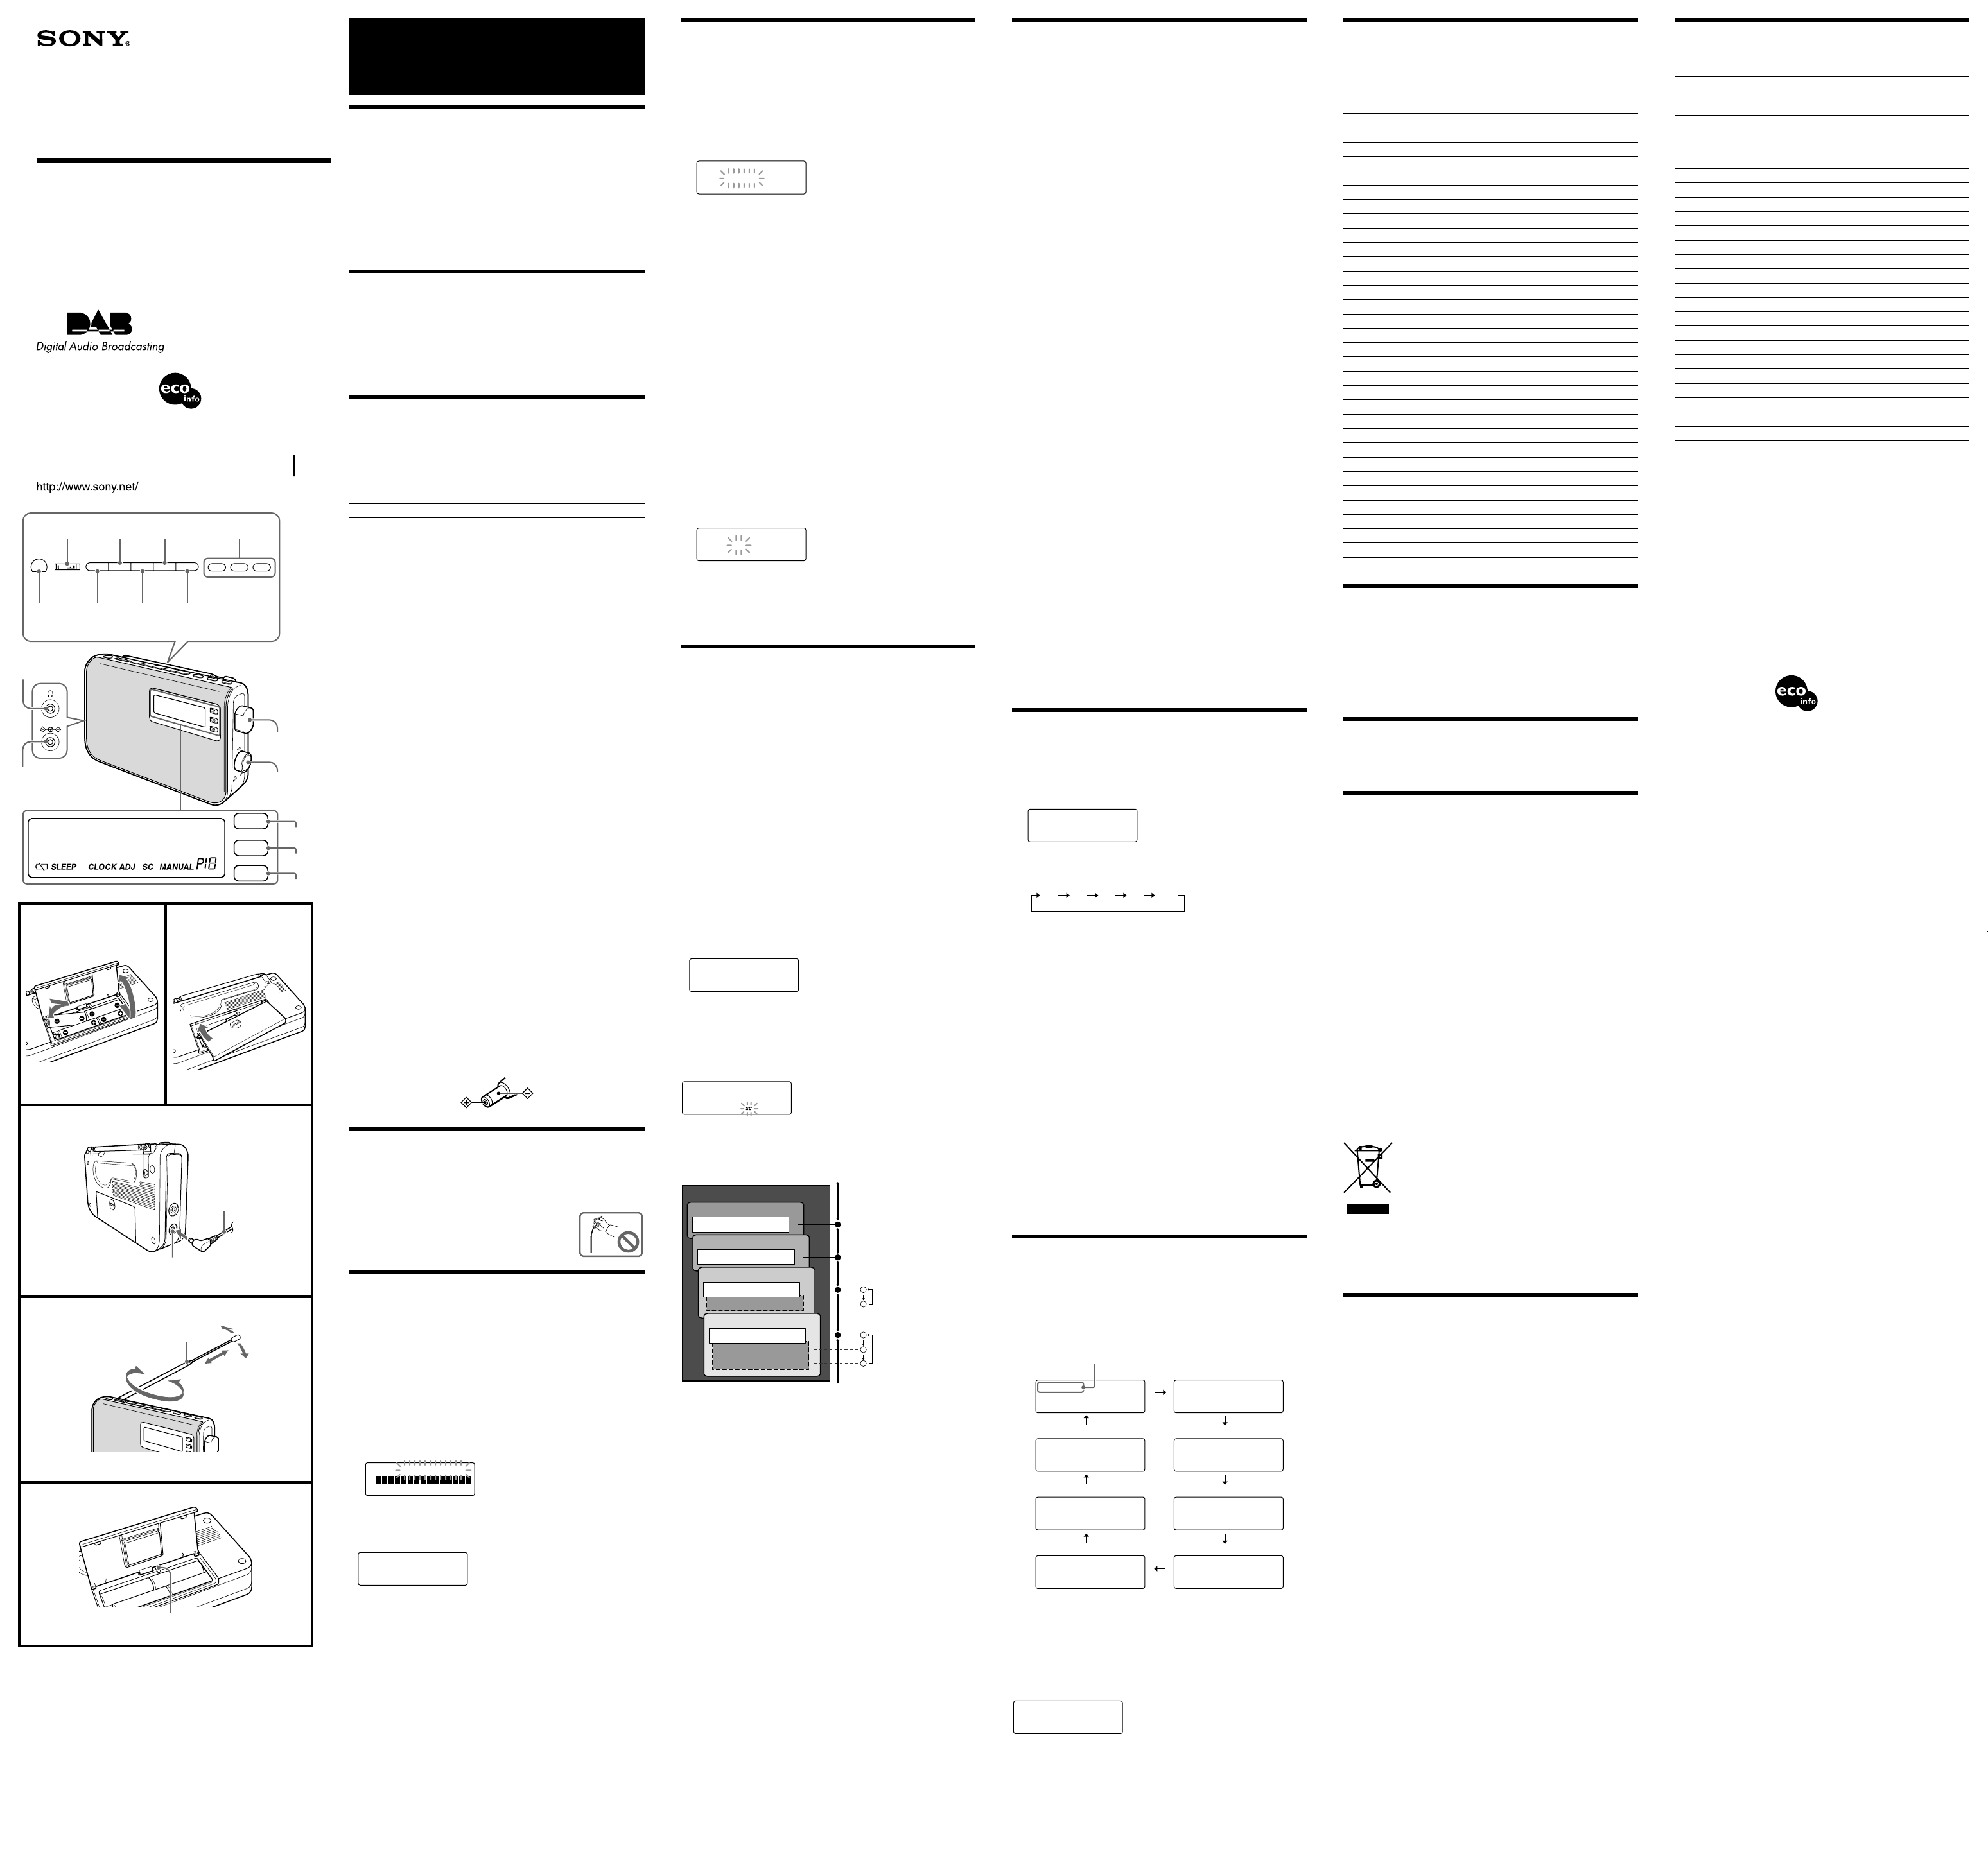
1
2
C
E
RESET button
2-698-587-11(2)
Presetting your favourite
services
There are two ways to preset services, Direct Preset and Preset Mode.
You can preset 10 services, including 3 services stored on the Direct Preset
buttons (PRESET 1 – 3).
You can enjoy any three preset services as Direct Presets, for immediate recall by
pressing one of the PRESET 1 – 3 buttons. Preset services you use often to
Direct Preset for your convenience.
Presetting
services
To preset by Direct Preset
1 Follow steps 1 to 3 in “Operating the radio” and manually tune in
to the service you wish to preset.
2 Hold down one of the PRESET buttons (PRESET 1 – 3) for
more than 2 seconds.
A beep sounds and “STORED” appears for one second in the display, and the
service is stored.
To preset by Preset Mode
1 Follow steps 1 to 3 in “Operating the radio” and manually tune in
to the service you wish to preset.
2 Hold down PRESET/ENTER for more than 2 seconds.
The component label and the preset number appears in the display.
3 Turn U/u to select the favourite number to preset, then press
PRESET/ENTER.
“STORED” appears for one second in the display and the service is stored.
Notes
•To preset another service, repeat these steps.
•To change the preset service, tune in to the desired service and repeat steps 2
and 3. The new service will replace the previous service.
Tuning in to a preset
service
Direct Preset
Press one of the PRESET buttons (PRESET 1 – 3) on which the
desired service is stored.
Preset Mode
1 Press TUNE MODE repeatedly until “
P
” appears in the display.
2 Turn U/u to select the desired preset favourite service.
Note
If you do not operate within 65 seconds during the above steps, the current mode
will be cancelled.
Deleting a preset service
1 Follow steps in “Tuning in to a preset service” and tune in to the
service you wish to delete.
2 Hold down PRESET/ENTER for more than 4 seconds.
“DELETE OK?” appears in the display.
3 Press PRESET/ENTER.
When the preset service is deleted, the preceding preset service is received.
Note
To cancel deleting during the procedure, press DISPLAY. The preset service
tuned in to in step 1 is received.
Other useful functions
Setting the Sleep Timer
You can enjoy falling asleep to the radio using the built-in sleep timer that turns
off the radio automatically after a preset duration.
1 Press SLEEP.
“SLEEP” and the timer setting appear.
SLEEP 60
If you press SLEEP while the unit is turned off, the unit is turned on.
2 Press SLEEP repeatedly to select the desired sleep timer setting.
Each press changes the setting time as follows:
Two short beeps sound when the display returns to “SLEEP 60”.
After about 3 seconds, “
SLEEP
” appears in the display when the duration time is
set.
The unit automatically turns off when the duration time is passed.
To change the Sleep Timer setting
Press SLEEP repeatedly to select the desired sleep timer setting even after the
sleep timer has been activated.
To deactivate the Sleep Timer
Press POWER to turn off the unit before the setting time has elapsed, or press
SLEEP repeatedly to set the sleep timer to “SLEEP OFF” in step 2.
“
SLEEP
” disappears from the display.
To listen with headphones (not supplied)
Connect headphones to the i (headphone) jack. The sound through the speaker
will not be heard.
To illuminate the LCD
Press LIGHT to select the backlight on or off.
Notes
•The first time you turn on the unit in AC operation, the backlight is set to on
(default). Any change to this setting will be retained.
•When DC operation, the backlight will turn off automatically if no operation is
performed for 30 seconds.
Changing the display
To change the display mode
Press DISPLAY. The selected display mode remains even if you turn the unit off
and on again, or change the band.
A dynamic label can be up to 128 characters long. PTY, service and ensemble
labels can be up to 16 characters long.
Each time you press DISPLAY, the bottom in a display changes as follows:
BETA 1
EUROPEAN EQUITIE
BETA 1
NEWS
BETA 1
SIGNAL LEVEL:100
BETA 1
BETA 1
BETA 1
BIT RATE:192kbps
BETA 1
BETA DIGITAL ONE
BETA 1
AM 11:55
BETA 1
12B 225.648MHz
PTY label
Service label
Ensemble label
Frequency
Dynamic label
Signal level
BIT rate
Clock
If you turn U/u to change the service, the display does not change.
Notes
• If there is no service label, no message will be displayed.
• If there is no dynamic label, “<NO DLS>” will appear.
Stretched display
While a component label is displayed in the fist line of the display, hold down
DISPLAY for more than 2 seconds. The display changes to stretched display.
BETA 1
Each time you press DISPLAY while the first line is displayed as stretched, it
changes as follows:
Component label t Dynamic label t PTY label t Service label t
Ensemble label t Frequency t Clock t BIT rate t Signal level t
Component label
Holding down DISPLAY for more than 2 seconds returns the display to normal.
PTY (Programme Type)
This function indicates services in programme type, such as NEWS, SPORTS of
the PTY list, transmitted in the DAB.
If the received service does not transmit the programme type, “ NO PTY Data ”
appears.
Programme type Display
Undefined None
News News
Current Affairs Current Affairs
Information Information
Sport Sport
Education Education
Drama Drama
Culture Cultures
Science Science
Varied Varied Speech
Pop Music Pop Music
Rock Music Rock Music
Easy Listening Music Easy Listening
Light Classical Light Classics M
Serious Classical Serious Classics
Other Music Other Music
Weather Weather & Metr
Finance Finance
Children’s programmes Children’s Progs
Social Affairs Social Affairs
Religion Religion
Phone In Phone In
Travel Travel & Touring
Leisure Leisure & Hobby
Jazz Music Jazz Music
Country Music Country Music
National Music National Music
Oldies Music Oldies Music
Folk Music Folk Music
Documentary Documentary
Preventing Accidental
Operation
— HOLD Function
This function prevents the radio from being unintentionally turned on, or the
radio service frequency from being accidentally changed. Slide HOLD in the
direction of the arrow. When any key is pressed, “<HOLD>” blinks for 3 seconds
and all buttons on the radio become inoperative.
To cancel hold, slide HOLD in the opposite direction of the arrow.
To reset the unit (See fig. E)
Press this button with a pointed object when the radio fails to function properly.
The clock settings, and the services you have preset, etc., will revert to the
factory preset.
Precautions
• Operate the unit only on the power sources specified in “Specifications”. For
battery operation, use four LR6 (size AA) alkaline batteries. For AC operation,
use only the supplied AC power adaptor. Do not use any other type of AC
power adaptor.
•The unit is not disconnected from the AC power source (mains) as long as it is
connected to the wall outlet, even if the unit itself has been turned off.
• Use the unit within a temperature range of 0°C to 40°C (32°F to 104°F). If it is
used in temperatures higher than this range, numbers may appear in the display
which have nothing to do with the frequency being received. If it is used in
temperatures lower than this range, the numbers displayed may change very
slowly. (These irregularities will disappear and there will be no damage to the
unit when the unit is used in the recommended temperature range.)
•The nameplate indicating operating voltage, etc. is located on the bottom
exterior.
•Avoid exposure to temperature extremes, direct sunlight, moisture, sand, dust or
mechanical shock. Never leave in a car parked in the sun.
• Should any solid object or liquid fall into the unit, disconnect the AC power
adaptor and remove the batteries, and have the unit checked by a qualified
personnel before operating it any further.
• In vehicles or buildings, radio reception may be difficult or noisy. Try listening
near a window.
• Since a strong magnet is used for the speakers, keep away personal credit cards
using magnetic coding or spring-wound watches from the unit to prevent
possible damage from the magnet.
•To clean the casing, use a soft cloth dampened with a mild detergent solution.
Disposal of Old Electrical & Electronic Equipment (Applicable in the
European Union and other European countries with separate
collection systems)
This symbol on the product or on its packaging indicates that this
product shall not be treated as household waste. Instead it shall
be handed over to the applicable collection point for the
recycling of electrical and electronic equipment. By ensuring this
product is disposed of correctly, you will help prevent potential
negative consequences for the environment and human health,
which could otherwise be caused by inappropriate waste
handling of this product. The recycling of materials will help to
conserve natural resources. For more detailed information about
recycling of this product, please contact your local Civic Office, your household
waste disposal service or the shop where you purchased the product.
If you have any questions or problems concerning your unit, please
consult your nearest Sony dealer.
Troubleshooting
Should any problem persist after you have made the following checks, consult
your nearest Sony dealer.
Display is dim, or no indication is displayed.
•The unit is being used in extremely high or low temperatures or in a place with
excessive moisture.
Very weak or interrupted sound, or unsatisfactory reception.
• If you are in a building, listen near a window.
A service cannot be received when a PRESET button is pressed.
• The service has not been preset.
• Another service is preset. Preset the service again.
The preset services may be initialized, if a maintenance service is performed.
Please keep a copy of your settings in case you want to preset them again.
SLEEP
POWER
HOLD
TUNE MODE AUTO TUNE
PRESET / ENTER
SC
1 23
BETA 1
EUROPEAN EQUITIE
DSPL
CLOCK
LIGHT
DC IN 6V
POWER
Headphone
jack
VOL
PRESET 1, 2, 3
AUTO TUNESLEEP
SCTUNE MODE
PRESET/ENTER
U/u dial
DC IN 6V
HOLD
LIGHT
DISPLAY
CLOCK
AC power adaptor
(supplied)
DC IN 6V
Aerial
Insert the E side of the
battery first.
LR6 (size AA) × 4
Halogenated flame retardants are not
used in printed wiring boards.
Component label


