English
BGetting Started
Choosing a Power
Source
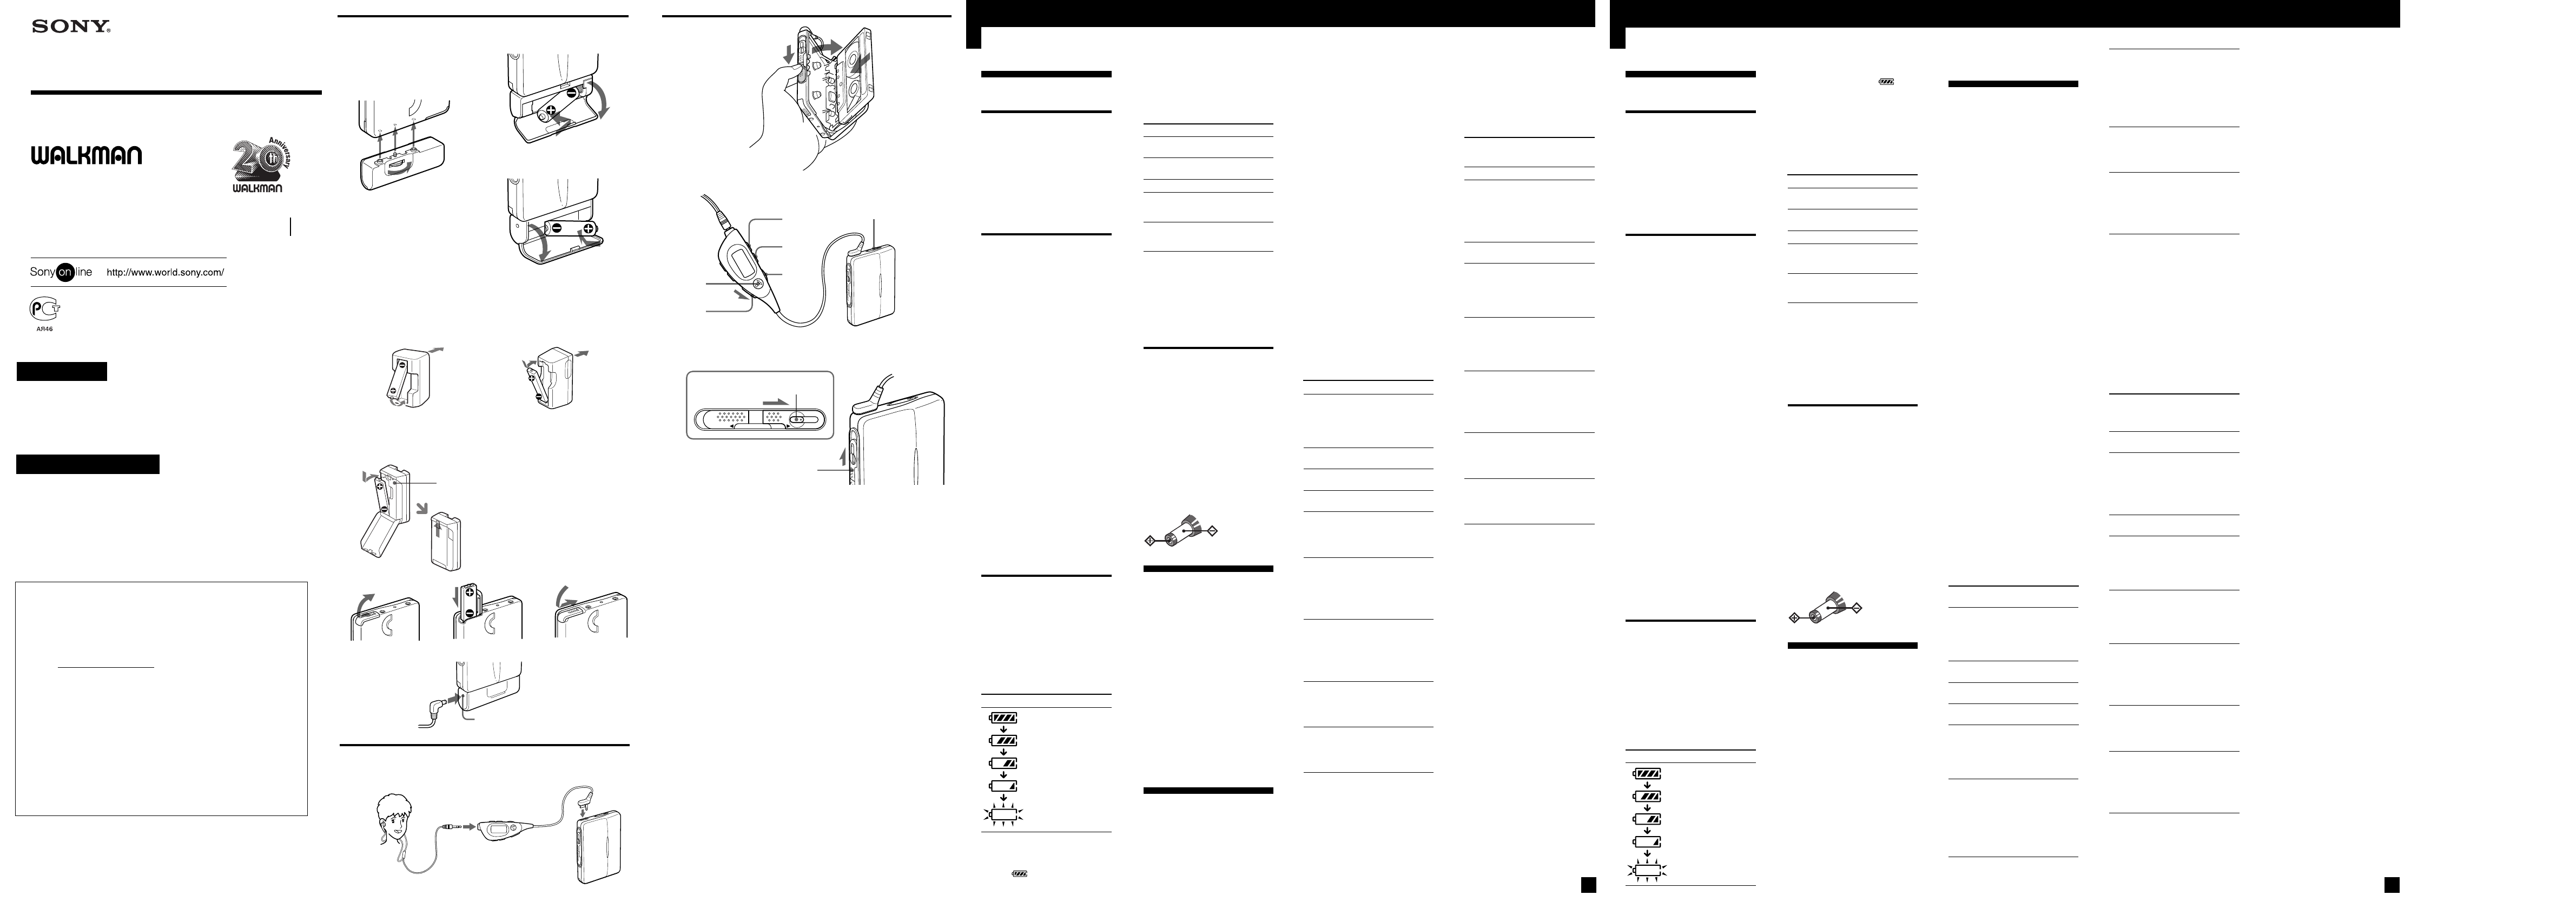
Dry Battery (see Fig. A-A)
Attach the supplied battery case,
and then insert one R6 (size AA)
battery with correct polarity.
Be sure to insert it from the E side
as illustrated.
Note
•For maximum performance we
recommend that you use a Sony
alkaline battery.
Rechargeable Battery (see
Fig. A-B)
1 Insert the supplied
rechargeable battery
(NC-6WM for U.S.A., Canada,
European, Australian, and
Hong Kong model/NH-14WM
for other countries model) into
the charger with correct
polarity.
2 Plug in the charger to the house
current (mains).
UK, Australian, and Hong
Kong model: Full charging
takes about 3.5 hours.
U.S.A., Canada, and European
Continent model: Full
charging takes about 2.5 hours.
Korean and other countries
model: Full charging takes
about 2 hours.
If the plug does not fit your
mains, attach the supplied AC
plug adaptor (Excluding
Korean model).
3 Insert the fully charged battery
into the rechargeable battery
compartment (see Fig. A-C).
You can charge the battery about
300 times.
When to replace/charge
the battery
The battery remainder mark has 5
steps to show the remaining battery
power.
When the battery is exhausted, tape
playback will become unstable and
noisy, and then the tape will stop.
Replace or charge the battery when
“e” flashes in the display.
Display Condition
There is enough battery
power.
The battery power is
decreasing.
The battery is exhausted.
Replace it with a new
battery.
Notes
• When you insert a charged battery,
the battery remainder mark may
show “ ” even if it is not fully
charged. But the actual battery life is
shorter.
• The battery remainder mark may
temporarily show a lower level
during fast forwarding or rewinding
or use in extremely low
temperatures.
Battery life
(Approx. hours) (EIAJ*)
Tape playback
Rechargeable NC-6WM 18
fully charged
Rechargeable NH-14WM 40
fully charged
Sony alkaline LR6 (SG) 60
Rechargeable NC-6WM 78
Sony alkaline LR6 (SG)
used together
Rechargeable NH-14WM 100
Sony alkaline LR6 (SG)
used together
* Measured value by the standard of
EIAJ (Electronic Industries
Association of Japan). (Using a Sony
HF series cassette tape)
Note
• The battery life may shorten
depending on the operation of the
unit.
House Current
(see Fig. A-D) (Excluding
European models)
Remove the rechargeable battery if
inserted. Attach the battery case
and connect the AC power adaptor
AC-E15HG (not supplied) to the DC
IN 1.5 V jack of the battery case and
to the wall outlet.
Do not use any other AC power
adaptor.
Specifications for AC-E15HG vary
for each area. Check your local
voltage and the polarity of the plug
before purchasing.
Polarity of
the plug
Connecting the
Earphones
(see Fig. B)
1 Connect the stereo mini plug
firmly to the remote control.
2 Connect the remote control
firmly to REMOTEi.
3 Wear the “L” marked side to
the left ear and the “R” marked
side to the right ear.
If the earphones do not fit to
your ears or the sound is
unbalanced, adjust the
earphones to fit to your ears
firmly.
BOperating the
Walkman
Playing a Tape
1 Slide the OPEN switch in the
direction of “b” to release the
cassette compartment cover.
Then, open it manually. Insert
the cassette with the exposed
end first (see Fig. C-A).
2 Make sure the HOLD function
of the remote control is turned
off.
If it is on, slide the HOLD
switch on the remote control to
turn it off (see Fig. C-B).
3 Press Y(play)•x(stop) and
adjust the volume with VOL on
the remote control (see Fig. C-
B).
Notes on volume control
• The VOLUME switch on the main
unit has three steps; AVLS MIN,
NORM, and MAX.
Generally, set it to NORM and make
fine volume adjustments on the
remote control. Set it to MAX when
the recording level is low. Set it to
AVLS MIN to activate AVLS (see
“Protecting Your Hearing—AVLS”).
• The sound cannot be turned down
all the way.
Note on the cassette holder
• When opening the cassette holder,
make sure the tape is stopped, then
slide the OPEN switch.
If the cassette holder is opened when
the tape is running, the tape may
loosen and be damaged.
Operation on the remote
control
To
Play the other
side
Stop playback
Fast forward*
Rewind*
Repeat the
current track
(Repeat Single
Track
Function)
Play the next
track/
succeeding 9
tracks from the
beginning
(AMS**)
Play the
current track/
previous 8
tracks from the
beginning
(AMS**)
Play the other
side from the
beginning
(Skip Reverse
function)
Play the same
side from the
beginning
(Rewind Auto
Play function)
* If Y•x on the remote control is
pressed during fast forward or
rewind, the Walkman switches to
playback.
**Automatic Music Sensor
Operation on the main unit
(see Fig. C-C)
You can operate the tape with the
operation button on the main unit.
If the operation button is locked,
slide HOLD/OPERATION switch
in the direction of “B” to release
hold.
To
Play back
Play the other
side
Stop playback
Play the next
track from the
beginning
(AMS*)
Play the current
track from the
beginning
(AMS*)
Repeat the
current track
(Repeat Single
Track function)
Play the other
side from the
beginning (Skip
Reverse
function)
Play the same
side from the
beginning
(Rewind Auto
Play function)
* Automatic Music Sensor
Note
• When you are not sure of the
playback status, press the operation
button once. The Walkman will
return to normal playback (except
when you have pressed the
operation button during normal
playback).
Note on side A/B detection
• This Walkman detects the side being
played using the cavity on side A of
the cassette. If there is no cavity on
the cassette or the cavity is on side B,
the detection will not be done
correctly.
Note on AMS and Repeat Single
Track
• The AMS and the Repeat Single
Track functions detect a blank of 4
seconds or longer between the
tracks. If there is noise between the
tracks, these functions may not
recognize the blank and may not
operate. Likewise, if there is a low-
level segment within a track, these
functions may recognize it as a blank
space.
(turn over)
Press (display)
Y•x for more
than a second
during playback
(“A” or “b” appears
according to the
playing side)
Y•x once during
playback
FF during stop
(“FF” appears)
REW during stop
(“REW” appears)
Y•x twice during
playback
To stop a single
repeat, press Y•x
once
FF once/for the
number of tracks to
be skipped during
playback (“AMS”
and the number of
tracks to be skipped
appear)
REW once/for the
number of tracks to
be skipped during
playback
(“AMS” and the
number of tracks to
be skipped appear)
FF for more than a
second during stop
(“FF” flashes)
REW for more than
a second during
stop (“REW”
flashes)
Press the operation
button (beeps in
the earphones)
Once
For more than a
second during
playback
(Switching to side A:
one short beep/
Switching to side B:
two short beeps)
Once
(One short beep)
Twice during
playback
(One short beep,
then repeated sets of
a short beep and a
long beep)
Three times during
playback
(One short beep,
then repeated sets of
two short beeps and
a long beep)
Four times during
playback
(Repeated sets of a
short beep, a long
beep and a short
beep when
rewinding)
Twice during stop
(One short beep,
then repeated single
beeps)
Three times during
stop
(One short beep,
then repeated sets of
two short beeps)
3-867-217-12(1)
Cassette Player
Operating Instructions
Mode d’emploi
WM-EX20
Sony Corporation © 1999 Printed in Malaysia
WALKMAN is a registered trademark of Sony Corporation.
WALKMAN est une marque déposée de Sony Corporation.
A
A
To prevent fire or shock hazard, do not expose
the unit to rain or moisture.
Listening for many hours at maximum volume may damage your hearing.
Afin d’éviter tout risque d’incendie ou
d’électrocution, ne pas exposer l’appareil à la
pluie ou à l’humidité.
A pleine puissance, l’écoute prolongée du baladeur peut endommager l’oreille de
l’utilisateur.
WARNING
AVERTISSEMENT
g
(This mark is valid for Russian version only.)
(Ce logo concerne uniquement la version russe.)
C
B
B
g
UK, Australian, and Hong
Kong model
Modèle pour le Royaume-
Uni, l’Australie et Hong-
Kong
to REMOTEi
à REMOTEi
Korean and other countries model
Modèles pour la Corée et les autres pays
CHARGE lamp
Voyant CHARGE
U.S.A., Canada, and European
Continent model
Modèle pour les Etats-Unis, le
Canada et le continent
européen
European models
Modèles européens
Other models
Autres modèles
DC IN 1.5 V
D
A
C
B
C
Y•x
HOLD
VOL
OPEN
OPERATION
Operation button
Touche d’exploitation
HOLD/OPERATION switch
Commutateur HOLD/OPERATION
g
FF
REW
Français
BPréparatifs
Sélection de la source
d'alimentation
Pile sèche (voir Fig. A-A)
Fixez l'étui de pile fourni, puis
insérez une pile sèche R6 (format
AA) en respectant la polarité.
Veillez à l’insérer par le côté E
comme indiqué sur l’illustration.
Remarque
• Il est conseillé d'utiliser une pile
alcaline Sony pour obtenir des
performances optimales.
Pile rechargeable (voir
Fig.
A-B)
1 Insérez la pile rechargeable
fournie (NC-6WM avec le
modèle pour les Etats-Unis, le
Canada, l'Europe, l’Australie et
Hong-Kong/NH-14WM avec le
modèle pour les autres pays)
dans le chargeur en respectant
la polarité.
2 Branchez le chargeur sur le
secteur.
Modèle pour le Royaume-Uni,
l’Australie et Hong-Kong: Une
recharge complète prend
environ 3,5 heures.
Modèle pour les Etats-Unis, le
Canada et le continent
européen: Une recharge
complète prend environ 2,5
heures.
Modèle pour la Corée et les
autres pays: Une recharge
complète prend environ 2
heures.
Si la fiche ne rentre pas dans
votre prise secteur, utilisez
l’adaptateur de fiche secteur
fourni (sauf modèle coréen).
3 Insérez la pile entièrement
rechargée dans le logement de
pile rechargeable (voir Fig. A-
C).
La pile peut être rechargée environ
300 fois.
Quand remplacer ou
recharger la pile
L’indicateur de capacité indique en
cinq niveaux la capacité restante de
la pile.
Lorsque la pile est épuisée, le son
est instable et parasité et la bande
s’arrête.
Remplacez ou rechargez la pile
lorsque “e” clignote dans
l’afficheur.
Afficheur État de la pile
La capacité de la pile est
suffisante.
La capacité de la pile
diminue.
La pile est épuisée.
Remplacez-la par une
neuve.
Remarques
• Lorsque vous insérez une pile
chargée, l’indicateur de pile peut
montrer une pile pleine “ ”
même si elle ne l’est pas. Mais
l’autonomie sera moins longue.
• L'indicateur de capacité peut
indiquer temporairement un niveau
inférieur pendant l'avance rapide ou
le rembobinage, ou pendant une
utilisation à très basse température.
Autonomie de la pile
(Env. en heures) (EIAJ*)
Lecture de cassette
Pile rechargeable NC-6WM 18
complètement rechargée
Pile rechargeable NH-14WM 40
complètement rechargée
Pile alcaline LR6 (SG) Sony 60
Pile rechargeable NC-6WM 78
Pile alcaline LR6 (SG) Sony
utilisées ensemble
Pile rechargeable NH-14WM 100
Pile alcaline LR6 (SG) Sony
utilisées ensemble
* Valeur mesurée conformément aux
normes de la EIAJ. (Electronic
Industries Association of Japan).
(Avec utilisation d'une cassette Sony
modèle HF)
Remarque
• L'autonomie de la pile peut être
inférieure selon les conditions de
fonctionnement de l'appareil.
Courant secteur
(voir Fig. A-D) (sauf modèle
européen)
Retirez la pile rechargeable si elle
est en place. Rattachez l’étui de
piles et raccordez l’adaptateur
secteur AC-E15HG (non fourni) à la
prise DC IN 1.5 V de l’étui de piles
et à une prise murale.
N’utilisez pas d’autres adaptateurs
secteur.
Les spécifications de l’AC-E15HG
varient pour chaque zone de
commercialisation. Vérifiez votre
tension secteur locale et la polarité
de la fiche avant d’acheter
l’adaptateur secteur.
Polarité de la
fiche
Raccordement des
écouteurs
(voir Fig. B)
1 Branchez fermement la
minifiche stéréo sur la
télécommande.
2 Raccordez la télécommande à
REMOTEi en l’insérant
fermement.
3 Mettez le côté marqué “L” sur
l'oreille gauche et le côté
marqué “R” sur l'oreille droite.
Si les écouteurs ne rentrent pas
bien dans vos oreilles, ou si le
son est déséquilibré, ajustez-les
de sorte qu’ils rentrent bien
dans vos oreilles.
BExploitation du
Walkman
Lecture de cassette
1 Faites glisser le commutateur
OPEN dans le sens de “b” pour
libérer le couvercle du
logement de la cassette. Puis,
ouvrez ce dernier à la main.
Insérez la cassette avec le côté
où la bande est visible vers
l’intérieur de l’appareil (voir
Fig. C-A).
2 Assurez-vous que la fonction
HOLD de la télécommande est
hors service.
Si elle est en service, poussez le
commutateur HOLD de la
télécommande pour la mettre
hors service (voir Fig. C-B).
3 Appuyez sur
Y(Lecture)•x(Arrêt) et
ajustez le volume avec VOL sur
la télécommande (voir Fig. C-
B).
Remarques sur le contrôle du
volume
• Le commutateur VOLUME du
Walkman est réglable sur trois
niveaux: AVLS MIN, NORM et
MAX.
Réglez-le habituellement sur NORM
et effectuez les réglages fins sur la
télécommande. Réglez-le sur MAX
quand le niveau d'enregistrement est
faible. Réglez-le sur AVLS MIN pour
activer le système AVLS (voir
“Protection de l'ouïe —AVLS”).
•Le son ne peut pas être
complètement réduit.
Remarque sur le logement de la
cassette
•Avant d’ouvrir le logement de la
cassette, arrêtez la bande et faites
glisser le commutateur OPEN.
Si le logement s’ouvre lorsque la
bande défile, celle-ci risque de se
détendre et d’être endommagée.
Fonctionnement de la
télécommande
Pour
Écouter l'autre
face
Arrêter la lecture
Avancer
rapidement*
Rembobiner*
Répéter la
plage actuelle
(Répétition
d’une seule
plage)
Reproduire la
plage suivante/
les 9 plages
suivantes à
partir du début
(AMS**)
Reproduire la
plage actuelle/
les 8 plages
précédentes à
partir du début
(AMS**)
Écouter l'autre
face à partir du
début
(Inversion
directe)
Écouter la même
face à partir du
début
(Lecture
automatique
après
rembobinage)
* Si vous appuyez sur Y•x de la
télécommande pendant l’avance
rapide ou le rembobinage, la lecture
commencera.
**Recherche de plage musicale
Fonctionnement de
l'appareil (voir Fig. C-C)
Vous pouvez faire fonctionner
l’appareil avec la touche
d’exploitation de l’appareil. Si la
touche d’exploitation est bloquée,
faites glisser HOLD/OPERATION
dans le sens de “B” pour la
débloquer.
Pour
Commencer la
lecture
Écouter l'autre
face
Arrêter la
lecture
Reproduire la
plage suivante
du début
(AMS*)
Reproduire la
plage actuelle
du début
(AMS*)
Répétition de la
plage actuelle
(Répétition
d'une plage
simple)
Écouter l'autre
face à partir du
début
(Inversion
directe)
Écouter la
même face à
partir du début
(Lecture
automatique
après
rembobinage)
* Recherche de plage musicale
Appuyez sur la
touche
d’exploitation (bip
dans les écouteurs)
Une fois
Pendant plus d'une
seconde en cours de
lecture
(Passage à la face A:
un court bip/
Passage à la face B:
deux courts bips)
Une fois
(Un court bip)
Deux fois pendant la
lecture
(Un court bip, puis
une séquence répétée
d'un court bip et
d'un long bip)
Trois fois pendant la
lecture
(Un court bip, puis
une séquence répétée
de deux courts bips
et d'un long bip)
Quatre fois pendant
la lecture
(Séquence répétée
d'un court bip, d'un
long bip et d'un
court bip pendant le
rembobinage)
Deux fois à l'arrêt
(Un court bip, puis
des bips simples
répétés)
Trois fois à l'arrêt
(Un court bip, puis
une séquence répétée
de deux courts bips)
REW une fois/le
nombre de fois
correspondant au
nombre de plages à
sauter pendant la
lecture
(“AMS” et le
nombre de plages à
sauter apparaissent)
FF pendant plus
d'une seconde à
l'arrêt (“FF”
clignote)
REW pendant plus
d'une seconde à
l'arrêt
(“REW” clignote)
Owner’s Record
The model number is located at the front
and the serial number is located inside
the tape holder. Record the serial
number in the space provided below.
Refer to them whenever you call upon
your Sony dealer regarding this product.
Model No. WM-EX20
Serial No.
INFORMATION
This equipment has been tested and
found to comply with the limits for a
Class B digital device, pursuant to Part
15 of the FCC Rules. These limits are
designed to provide reasonable
protection against harmful interference
in a residential installation. This
equipment generates, uses, and can
radiate radio frequency energy and, if
not installed and used in accordance
with the instructions, may cause harmful
interference to radio communications.
However, there is no guarantee that
interference will not occur in a particular
installation. If this equipment does cause
harmful interference to radio or
television reception, which can be
determined by turning the equipment off
and on, the user is encouraged to try to
correct the interference by one or more of
the following measures:
– Reorient or relocate the receiving
antenna.
– Increase the separation between the
equipment and receiver.
– Connect the equipment into an outlet
on a circuit different from that to which
the receiver is connected.
– Consult the dealer or an experienced
radio/TV technician for help.
This device complies with Part 15 of the
FCC Rules. Operation is subject to the
following two conditions: (1) This device
may not cause harmful interference, and
(2) this device must accept any
interference received, including
interference that may cause undesired
operation.
You are cautioned that any changes or
modifications not expressly approved in
this manual could void your authority to
operate this equipment.
For the customers in the United States
(Tourner la page)
Remarque
•Si vous n'êtes pas sûr du mode de
fonctionnement, appuyez une fois
sur la touche de fonctionnement. Le
Walkman reviendra au mode de
lecture normale (sauf si vous avez
appuyé sur la touche d’exploitation
pendant la lecture normale).
Remarque sur la détection de
face A/B
• Ce Walkman détecte la face en cours
de lecture grâce à la cavité sur la face
A de la cassette. Si la cassette n’a pas
de cavité ou si elle se trouve sur la
face B, la détection ne s’effectuera pas
correctement.
Remarque sur les fonctions AMS
et répétition de plage unique
• Les fonctions AMS et de répétition
d'une plage unique détectent un
espace de 4 secondes ou plus entre
les plages. S'il y a du bruit dans
l'espace entre les plages, cet espace
pourra ne pas être détecté et la
fonction n’agira pas. De même, si le
niveau d'enregistrement d'un
passage est assez faible à l'intérieur
d'une plage, ces fonctions risquent
d'identifier ce passage comme
espace vierge.
(à suivre)
Appuyez sur
(Afficheur)
Y•x pendant
plus d’une seconde
pendant la lecture
(“A“ ou “b”
apparaît selon la
face de lecture)
Y•x une fois
pendant la lecture
FF à l’arrêt
(“FF” apparaît)
REW à l'arrêt
(“REW” apparaît)
Y•x deux fois
pendant la lecture
Pour arrêter la
répétition d’une plage,
appuyez une seule fois
sur Y•x
FF une fois/le
nombre de fois
correspondant au
nombre de plages à
sauter pendant la
lecture
(“AMS” et le
nombre de plages à
sauter apparaissent)
VOLUME


