WARNING
To prevent fire or shock hazard, do not expose
the unit to rain or moisture.
To avoid electrical shock, do not open the
cabinet. Refer servicing to qualified personnel
only.
Before You Begin
Thank you for choosing the Sony Dream
Machine. The Dream Machine will give you
many hours of reliable service and listening
pleasure.
Before operating the Dream Machine, please read
these instructions thoroughly and retain them for
future reference.
These instructions cover these models: ICF-C113
and ICF-C113L.
Their differences are shown below.
Model Number ICF-C113 ICF-C113L
Band FM/AM FM/MW/LW
Features
•Date button to display the year, month and
date.
•D.S.T. (Daylight Saving Time)—Summer time
calculation (one-hour skip function).
•Dual alarm FM/AM (ICF-C113) or FM/MW/
LW (ICF-C113L) PLL (phase locked loop)
synthesized clock radio.
•5 random memory presets.
•Radio and buzzer alarms with the snooze
function.
•LCD with backlight which has a brightness
switch.
•LED indicators for Dual Alarm
•Backlight button to change the color of the
backlight to either green or amber.
•Self power back-up: Even if the power supply
is interrupted, the time setting and the memory
will be backed up for half an hour without
batteries.
Setting the Clock
1 Plug in the clock radio.
The display will flash “AM 12:00” or “0:00”.
2 Press CLOCK for a few seconds.
You will hear a beep and the year will start to
flash in the display.
3 Press TUNE/TIME SET + or – until the
correct year appears in the display.
4 Press CLOCK once.
5 Repeat steps 3 and 4 to set the month,
date, hour, and minute.
After setting the minute, press and release
CLOCK to start the counting of the seconds.
•To display the year and date, press SNOOZE/
DATE/SLEEP OFF once for the date and within
2 seconds press it again for the year. The date
or year will appear in the display for a few
seconds and then the display returns to the
current time.
When SNOOZE/DATE/SLEEP OFF is pressed
while the SNOOZE function is operating, the
year and date will not appear in the display.
•To set the current time rapidly, hold down the
+ or – button.
•The clock system varies depending on the
model you own.
12-hour system: “AM 12:00” = midnight
24-hour system: “0:00” = midnight
•To set the current time from zero seconds,
release CLOCK with the time signal at step 5.
To change the display to the
daylight saving time (summer time)
indication
Press D.S.T./SUMMER T.
“
” is displayed and the time indication
changes to summer time.
To cancel the summer time indication, press
D.S.T./SUMMER T. again.
Changing AM Channel
Step
(ICF-C113 only)
The channel step of this unit is factory-set to
9 kHz or 10 kHz to match the frequency
allocation system of the country as listed.
When needed, change the channel step before
listening to the radio.
Area Channel step
North and South 10 kHz
American countries
Other countries 9 kHz
1 Plug in the clock radio.
2 While holding down RADIO OFF, keep
pressing BAND until a beep sounds.
The AM channel step will be changed.
If you proceed to step 2 again, the channel
step changes again.
•When the AM channel step is changed, the
preset stations will be erased.
Operating the Radio
Manual Tuning
1 Press RADIO ON to turn on the radio.
The band and frequency will appear in the
display for a few seconds and then the
current time indication returns to the display.
2 Press BAND repeatedly to select the
desired band.
3 Use TUNE/TIME SET + or – to tune in
the desired station.
The FM channel step is set to 0.1 MHz and
the AM channel step is set to l0 kHz for the
model for the North and South America. The
FM channel step is set to 0.05 MHz and the
AM(MW) channel step is set to 9 kHz for the
model for other countries. (The FM frequency
indication changes every 0.1 MHz.)
The LW channel step is set to 9 kHz .
A beep sounds when the upper or lower
extremity of the band range is reached.
4 Adjust volume using VOLUME.
•To turn off the radio, press RADIO OFF.
•To improve reception
FM: Extend the FM wire antenna fully to
increase FM reception sensitivity.
AM(MW)/LW: Rotate the unit horizontally for
optimum reception. A ferrite bar is built in
to the unit.
•To check the current station, press the + or –
button lightly. The band and frequency are
displayed for a few seconds, after which the
current time indication returns to the display.
•If the radio alarm A RADIO comes on while
the radio is playing, the station switches to the
frequency set under preset number 1.
To set the brightness of the
backlight
Set BRIGHTNESS to H (high) or L (low) to make
the display more visible.
To change the color of the backlight
Press BACKLIGHT•GREEN/AMBER once to
changeover the color to either green or amber.
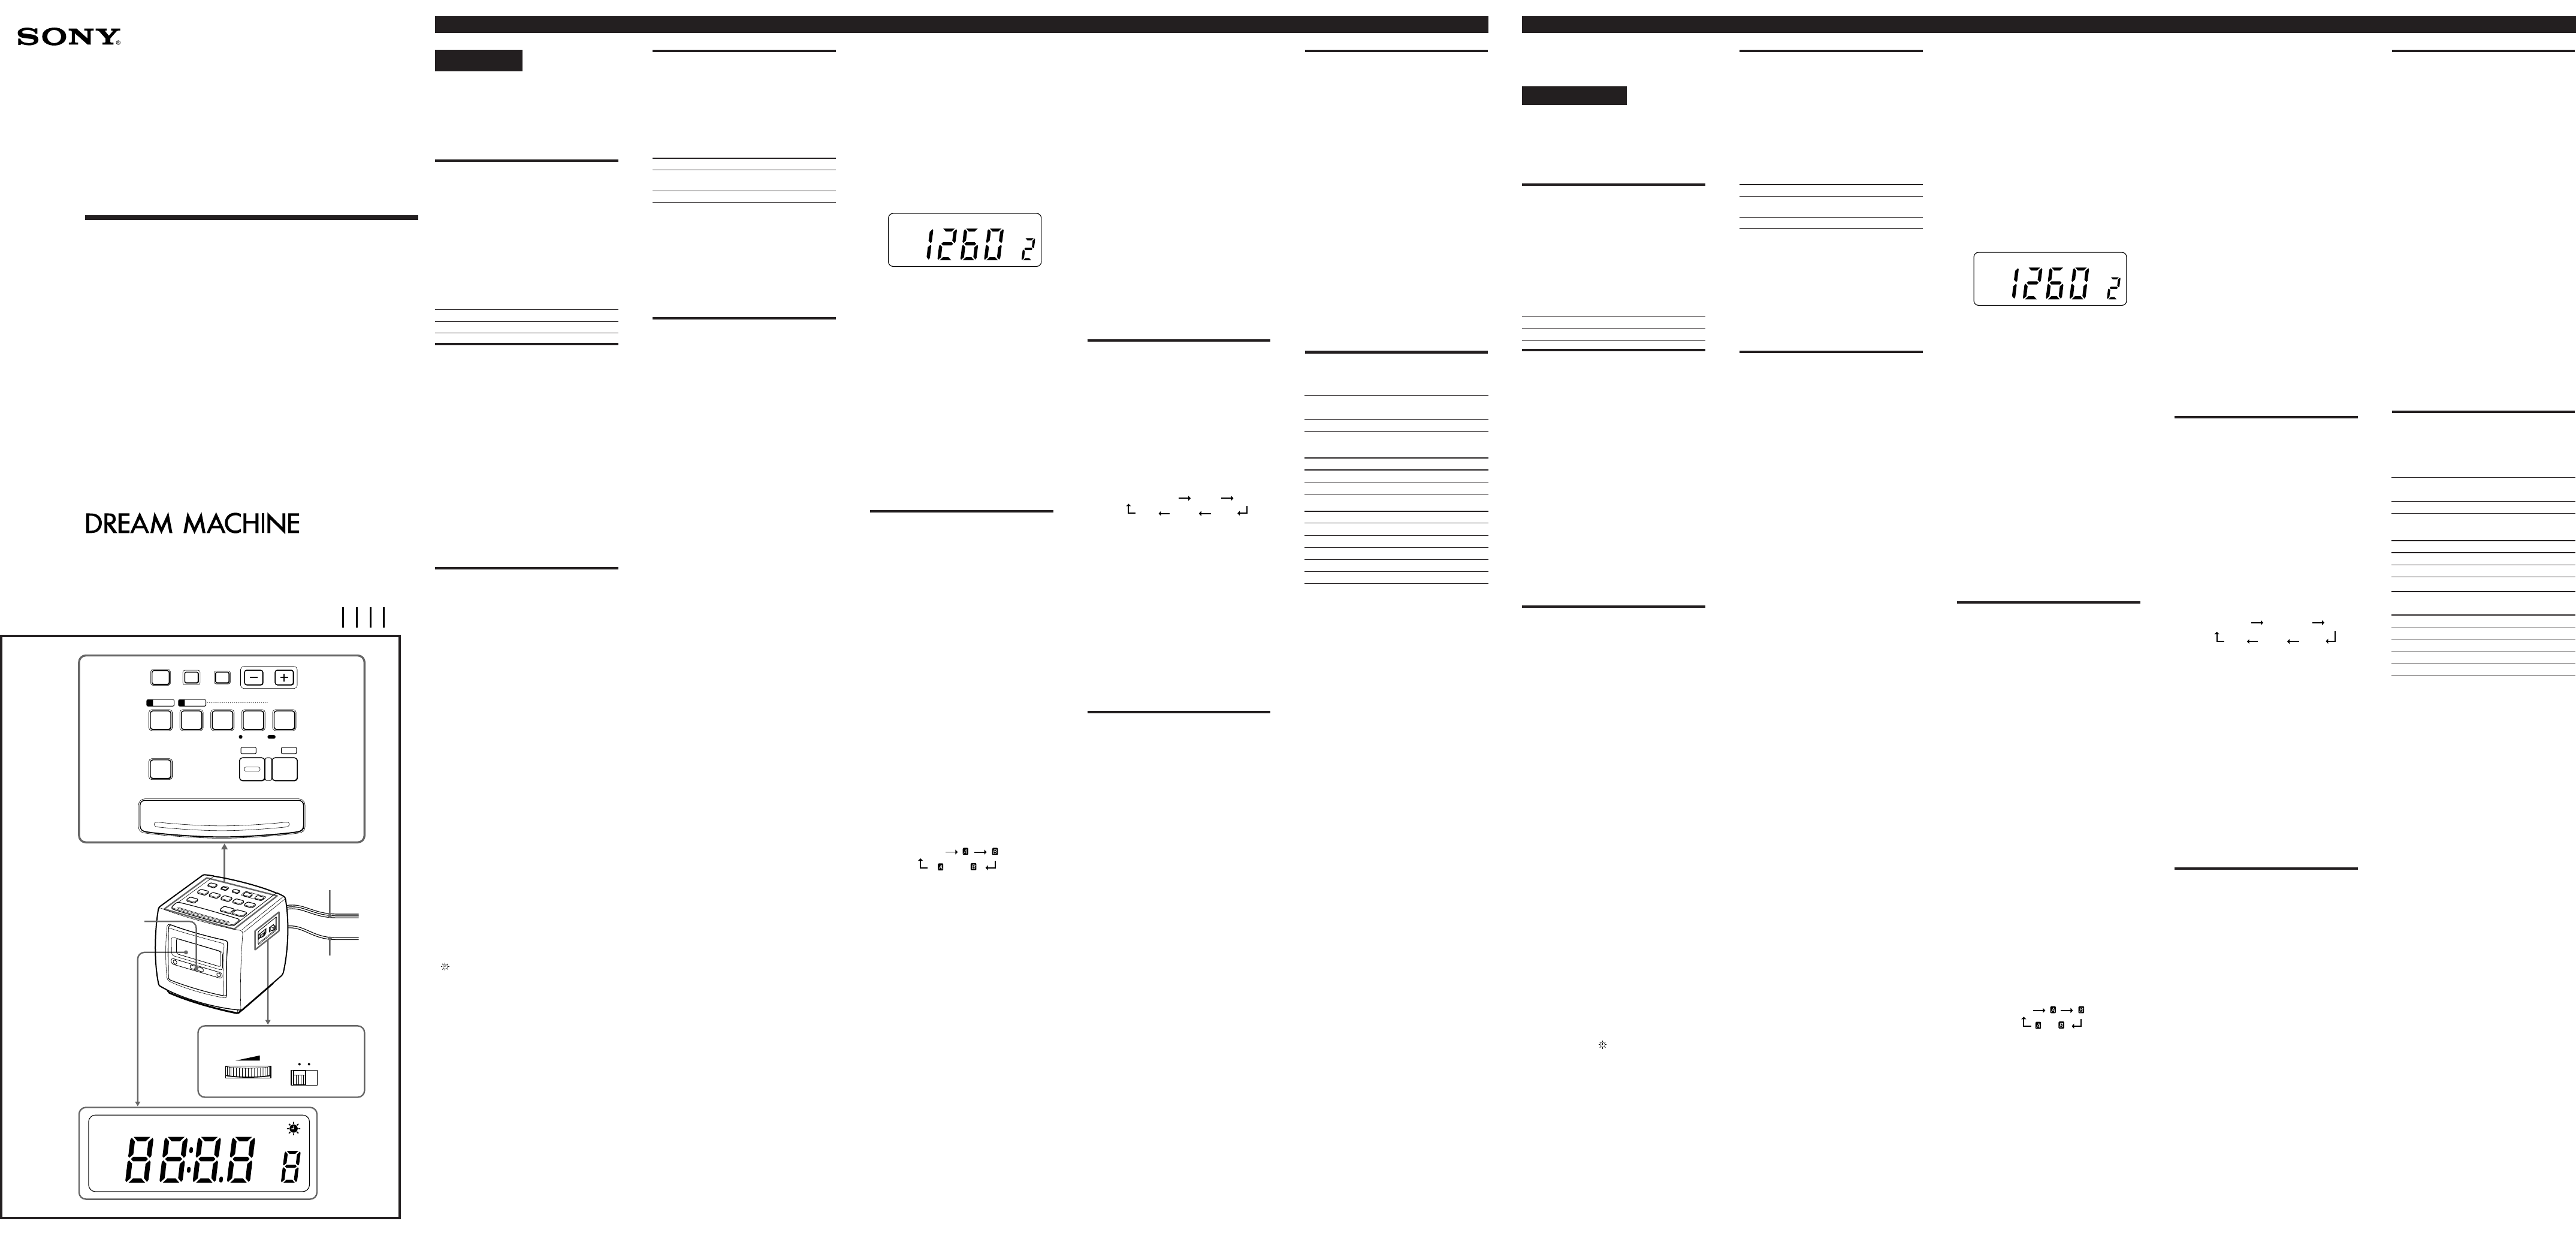
Preset Tuning
You can preset up to five stations for one-touch
tuning, one under each of preset buttons 1 to 5.
Presetting a station
Example: To set AM 1260 kHz in preset
button 2.
1 Press RADIO ON to turn on the radio.
2 Tune in the station you want to preset.
(See “Manual Tuning”)
3 Hold down the desired
STATION•SELECT/PRESET button (in
this case, 2) until you hear two short
beeps.
The frequency will appear for a few seconds
and then the display will return to the
current time.
•When using the radio alarm, preset the station
you wish to serve as the alarm under preset
button 1.
To change a preset station
Press the preset number again after tuning in
manually to a different station. The previous
station is replaced by the new one.
Tuning in a preset station
1 Press RADIO ON to turn on the radio.
2 Press the STATION•SELECT/PRESET
button under which the desired station
is stored.
3 Adjust volume using VOLUME.
After a few seconds, the display will return to
the current time but the preset number
indication will remain.
Setting the Alarm
You can set the radio and buzzer alarms at the
preset time. Before setting the alarm, be sure to
set the clock (See “Setting the Clock”) and preset
a radio station under preset button 1 (See “Preset
Tuning”).
1 Turn off the radio.
2 Hold down A RADIO or B BUZZER
until a short beep sounds.
The “A RADIO” or “B BUZZER” indicator
and the hour in the display will flash.
3 Press either TUNE/TIME SET + or –
until the desired hour appears in the
display.
4 Press A RADIO or B BUZZER to set the
minute.
The minute will flash in the display.
5 Press either TUNE/TIME SET + or –
until the desired minute appears in the
display.
6 Press A RADIO or B BUZZER.
Two short beeps sound to indicate successful
presetting.
7 Press ALARM MODE until the alarm
you want lights up.
Each time you press ALARM MODE, the
alarm indication changes as follows.
When the alarm time is reached, the radio or
buzzer sounds for 60 minutes or until turned off.
To stop the alarm
Press ALARM RESET while the alarm is
activated.
The alarm will function at the same time the next
day.
To cancel the alarm
Press ALARM MODE until neither the
“A RADIO” nor “B BUZZER” indicator
lights up.
Notes
•The alarm does not function, unless you set the
clock, A RADIO and B BUZZER function.
•If both the radio and buzzer alarm are set for
the same time, the radio alarm takes
precedence.
•You can check the alarm time setting by
pressing A RADIO or B BUZZER.
To doze for a few more
minutes
1 Press SNOOZE/DATE/SLEEP OFF.
The radio or buzzer will shut off but will
automatically come on again after about
8 minutes. You can repeat this process as
many times as you like.
•The alarm indication flashes continuously
during the snooze function.
Setting the Sleep
Timer
You can enjoy falling asleep to the radio using
the built-in sleep timer that turns off the radio
automatically after a preset duration.
1 Press SLEEP.
The radio turns on. It will go off after the
preset time has passed. You can set the sleep
timer to 90, 60, 30, or 15 minutes. Every push
changes the display as follows.
The radio will play for the time you set, then
shut off.
•To turn off the radio before the preset time,
press SNOOZE/DATE/SLEEP OFF.
To Use Both Sleep Timer
and Alarm
You can fall asleep to the radio sound and you
will be awakened by the radio or buzzer alarm at
the preset time.
1 Set the alarm. (See “Setting the
Alarm”.)
2 Set the sleep timer. (See “Setting the
Sleep Timer”.)
Troubleshooting
Should any problem occur with the unit, make
the following simple checks to determine
whether or not servicing is required.
If the problem persists, consult the nearest Sony
dealer.
The clock does not show the correct time.
•Has an electrical power outage lasting more
than half an hour occurred?
The radio or buzzer alarm does not sound at
the preset alarm time.
•Has the desired radio and/or buzzer alarm
mode been activated with the ALARM MODE
button (“A RADIO” and/or “B BUZZER”
indicator lit)?
3-861-951-41(1)
Operating Instructions
Istruzioni per l’uso
Manual de instrucciones (en el reverso)
xxxxxxxxxxxxx
FM/AM PLL Synthesized
Clock Radio ICF-C113
FM/MW/LW PLL
Synthesized Clock
Radio ICF-C113L
Sony Corporation © 1998 Printed in Malaysia
Precautions
•Operate the unit on the power sources
specified in “Specifications”.
•The nameplate indicating voltage, etc. is
located at the bottom of the unit.
•Disconnect the cord by grasping the plug.
Never pull it by the cord.
•Do not leave the unit in a location near a heat
source such as a radiator or airduct, or in a
place subject to direct sunlight, excessive dust,
mechanical vibration, or shock.
•Do not place the unit on surfaces (rugs,
blankets, etc.) or near materials (curtains,
draperies) that block the ventilation holes.
•Should any liquid or solid object fall into the
unit, unplug the unit and have it checked by
qualified personnel before operating it further.
•When the casing becomes soiled, clean it with a
soft cloth dampened with a mild detergent
solution. Never use abrasive cleaners or
chemical solvents, as they may mar the casing.
•The unit is not disconnected from the AC
power source (mains) as long as it is connected
to the wall outlet, even if the unit itself has
been turned off.
If you have any questions, please consult your
nearest Sony dealer.
Specifications
Time display
United Kingdom, 12 hour
North and South America
Other countries 24 hour
Frequency range
Model for North and South America
Band ICF-C113 Channel step
FM 87.5-108 MHz 0.1 MHz
AM 530-1,710 kHz 10 kHz
Model for other countries
Band ICF-C113 ICF-C113L Channel step
FM 87.5-108 MHz 87.5-108 MHz 0.05 MHz*
AM(MW) 531-1,602 kHz 531-1,602 kHz 9 kHz
LW — 153 - 279 kHz 9 kHz
FM 87.5-108 MHz — 0.1 MHz
AM 530-1,610 kHz — 10 kHz
* The frequency display is raised or lowered by
steps of 0.1 MHz.
(Example: Frequency 88.05 MHz is displayed
as “88.0 MHz”.)
Speaker
Approx. 6.6 cm (2
5
/8 in) dia.
Power output
130 mW (at 10% harmonic distortion)
Power requirements
North and South American model: 120 V AC,
60 Hz
Other models: 220–230 V AC, 50 Hz
Dimensions
Approx. 119 x 118 x 129.5 mm (w/h/d)
(4
3
/4 x 4
3
/4 x 5
1
/8 in) incl. projecting parts
and controls
Mass
Approx. 630g (1lb 6.2 oz)
ICF-C113L (UK model)
Approx. 670 g (1 lb 7.6 oz)
Design and specifications are subject to change
without notice.
English
FM wire antenna
Antenna FM a filo
AC power cord
Cavo di alimentazione CA
Si dichiara che l’apparecchio è stato fabbricato in
conformità all’art. 2 Comma 1 del D.M. 28. 08.
1995 n. 548.
ATTENZIONE
Per evitare il pericolo di incendi o scosse
elettriche, non esporre l’apparecchio alla pioggia
o all’umidità.
Per evitare scosse elettriche non aprire
l’apparecchio. Per riparazioni rivolgersi solo a
personale qualificato.
Prima di cominciare
Grazie per aver scelto la Dream Machine Sony.
La Dream Machine vi offrirà numerose ore di
funzionamento affidabile e piacere di ascolto.
Prima di usare la Dream Machine, leggere
attentamente queste istruzioni per l’uso e
conservarle per riferimenti futuri.
Queste istruzioni coprono i seguenti modelli:
ICF-C113 e ICF-C113L. Le differenze sono
indicate sotto.
Numero modello ICF-C113 ICF-C113L
Banda FM/AM FM/MW/LW
Funzioni
•Tasto di data per visualizzare anno, mese e
giorno.
•Calcolo dell’ora legale (orario estivo) (funzione
di salto di un’ora).
• Radiosveglia FM/AM (ICF-C113) o FM/MW/
LW (ICF-C113L) a sintetizzazione PLL (anello
ad aggancio di fase) con doppia sveglia.
• Possibilità di preselezionare 5 stazioni a
piacere.
• Sveglia al suono della radio e del cicalino con
funzione di ripetizione.
• Display a cristalli liquidi con
retroilluminazione, dotato di interruttore di
luminosità.
•Indicatori a LED per la doppia sveglia.
•Tasto di retroilluminazione per cambiare il
colore della retroilluminazione tra verde e
ambra.
•Sostegno di alimentazione incorporato: Anche
se la corrente viene interrotta, la regolazione
dell’orario e la memoria sono sostenute per
mezzora senza pile.
Regolazione
dell’orologio
1 Collegare la radiosveglia.
“AM 12:00” o “0:00” lampeggia sul display.
2 Premere CLOCK per alcuni secondi.
Si sente un segnale acustico e le cifre
dell’anno iniziano a lampeggiare sul display.
3 Premere TUNE/TIME SET + o – fino a
che l’anno corretto appare sul display.
4 Premere una volta CLOCK.
5 Ripetere i punti 3 e 4 per impostare il
mese, il giorno, le ore e i minuti.
Dopo aver impostato i minuti, premere e
rilasciare CLOCK per avviare il conteggio dei
secondi.
•Per visualizzare l’anno e la data, premere
SNOOZE/DATE/SLEEP OFF una volta per
vedere la data e di nuovo entro 2 secondi per
vedere l’anno. La data o l’anno appaiono sul
display per alcuni secondi e quindi
l’indicazione torna all’orario attuale.
Se si preme SNOOZE/DATE/SLEEP OFF mentre
ä attivata la funzione di ripetizione della
sveglia, l’anno e la data non appaiono sul
display.
•Per impostare rapidamente l’orario attuale,
tenere premuto il tasto + o –.
• Il formato dell’orario varia a seconda del
modello acquistato.
Formato 12 ore: “AM 12:00” = mezzanotte
Formato 24 ore: “0:00” = mezzanotte
•Per impostare l’orario attuale a partire da zero
secondi, rilasciare CLOCK in corrispondenza di
un segnale orario al punto 5.
Per passare a visualizzare
l’indicazione dell’ora legale (orario
estivo)
Premere D.S.T./SUMMER T.
Viene visualizzato “
” e l’indicazione
dell’orario passa all’ora legale.
Per disattivare l’indicazione dell’ora legale,
premere di nuovo D.S.T./SUMMER T.
Cambiamento del
passo di canale AM
(solo ICF-C113)
Il passo di canale di questo apparecchio è stato
regolato in fabbrica su 9kHz o 10 kHz in base al
sistema di allocazione delle frequenze del paese
come indicato.
Se necessario cambiare il passo di canale prima
di ascoltare la radio.
Area Passo di canale
Paesi dell’America 10 kHz
del Nord e del Sud
Altri paesi 9 kHz
1 Collegare la radiosveglia.
2 Tenendo premuto RADIO OFF, tenere
premuto BAND fino a sentire un
segnale acustico.
Il passo di canale AM sono cambiati.
Se si esegue di nuovo il punto 2 il passo di
canale cambia di nuovo.
•Quando il passo di canale AM viene cambiato,
le stazioni preselezionate vengono cancellate.
Uso della radio
Sintonia manuale
1 Premere RADIO ON per accendere la
radio.
La banda e la frequenza sono visualizzate sul
display per alcuni secondi e quindi
l’indicazione dell’orario attuale riappare sul
display.
2 Premere ripetutamente BAND per
selezionare la banda desiderata.
3 Usare TUNE/TIME SET + o – per
sintonizzare la stazione desiderata.
Il passo di canale FM è regolato su 0,1 MHz e
il passo di canale AM è regolato su 10 kHz
sui modelli per l’America del Nord e del Sud.
Il passo di canale FM è regolato su 0,05 MHz
e il passo di canale AM (MW) è regolato su 9
kHz sui modelli per gli altri paesi.
(L’indicazione di frequenza FM cambia ogni
0,1 MHz.) Il passo di canale LW è regolato su
9 kHz. Si sente un segnale acustico quando
viene raggiunto il limite superiore o inferiore
del campo di frequenza della banda.
4 Regolare il volume usando VOLUME.
•Per spegnere la radio, premere RADIO OFF.
•Per migliorare la ricezione
FM: Estendere completamente l’antenna FM a
filo per aumentare la sentibilità di
ricezione FM.
AM (MW)/LW: Ruotare orizzontalmente
l’apparecchio per ottenere la ricezione
ottimale. Un’antenna a barra di ferrite è
incorporata nell’apparecchio.
•
Per controllare la stazione attualmente
sintonizzata, premere leggermente il tasto + o –.
La banda e la frequenza sono visualizzate per
alcuni secondi e quindi l’indicazione dell’orario
attuale riappare sul display.
•Se la sveglia al suono della radio A RADIO si
attiva durante l’ascolto della radio, la stazione
viene cambiata nella frequenza memorizzata
sul numero di preselezione 1.
Per regolare la luminosità della
retroilluminazione
Regolare BRIGHTNESS su H (alta) o L (bassa) per
rendere visibili le indicazioni.
Per cambiare il colore della
retroilluminazione
Premere una volta BACKLIGHT•GREEN/AMBER
per passare al verde o all’ambra.
Sintonia preselezionata
È possibile preselezionare fino a cinque stazioni
per la sintonia al tocco di un tasto, una per
ciascuno dei tasti di preselezione da 1 a 5.
Preselezione di una stazione
Esempio: Per memorizzare AM 1260 kHz
sul tasto di preselezione 2.
1 Premere RADIO ON per accendere la
radio.
2 Sintonizzare la stazione che si desidera
preselezionare (vedere “Sintonia
manuale”).
3 Tenere premuto il tasto
STATION•SELECT/PRESET desiderato
(in questo caso il 2) fino ad udire due
brevi segnali acustici.
La frequenza appare per alcuni secondi e
quindi il display torna all’indicazione
dell’orario attuale.
•Quando si usa la sveglia al suono della radio,
preselezionare la stazione che si desidera usare
per la sveglia sul tasto di preselezione 1.
Per cambiare una stazione
preselezionata
Premere di nuovo il tasto di preselezione dopo
aver sintonizzato manualmente un’altra stazione.
La stazione precedente viene sostituita da quella
nuova.
Sintonia di una stazione
preselezionata
1 Premere RADIO ON per accendere la
radio.
2 Premere il tasto STATION•SELECT/
PRESET su cui è memorizzata la
stazione desiderata.
3 Regolare il volume con VOLUME.
Dopo alcuni secondi il display torna
all’indicazione dell’orario attuale ma
l’indicazione del numero di preselezione
rimane visualizzata.
Regolazione della
sveglia
È possibile regolare la sveglia al suono della
radio e del cicalino sull’orario desiderato. Prima
di regolare la sveglia, assicurarsi di regolare
l’orologio (vedere “Regolazione dell’orologio”) e
preselezionare una stazione sul tasto di
preselezione 1 (vedere “Sintonia
preselezionata”).
1 Spegnere la radio.
2 Tenere premuto A RADIO o
B BUZZER fino a sentire un breve
segnale acustico.
L’indicatore “A RADIO” o “B BUZZER” e la
cifra delle ore lampeggiano sul display.
3 Premere TUNE/TIME SET + o – fino a
che le ore desiderate appariono sul
display.
4 Premere A RADIO o B BUZZER per
impostare i minuti.
La cifra dei minuti lampeggia sul display.
5 Premere TUNE/TIME SET + o – fino a
che i minuti desiderati appaiono sul
display.
6 Premere A RADIO o B BUZZER.
Si sentono due brevi segnali acustici a
indicare che l’impostazione è stata
completata.
7 Premere ALARM MODE fino a quando
la sveglia desiderata si illuminano.
A ciascuna pressione di ALARM MODE,
l’indicazione della sveglia cambia come
segue.
Quando viene raggiunto l’orario di sveglia, la
radio o il cicalino suona per 60 minuti o fino a
quando la sveglia viene disattivata.
Disattivazione della sveglia
Premere ALARM RESET mentre è attivata
la sveglia.
La sveglia si attiva di nuovo alla stessa ora
il giorno dopo.
Per annullare la sveglia
Premere ALARM MODE fino a quando
non è più illuminato nè l’indicatore
“A RADIO” nè l’indicatore “B BUZZER”.
Note
•La sveglia non funziona se non si regolano
l’orologio e le funzioni A RADIO e B BUZZER.
•Se sia la sveglia con la radio che quella con il
cicalino sono regolate sullo stesso orario, la
sveglia con la radio ha la precedenza.
•È possibile controllare l’orario di sveglia fissato
premendo A RADIO o B BUZZER.
Per dormire ancora
qualche minuto
1 Premere SNOOZE/DATE/SLEEP OFF.
La radio o il cicalino smette di suonare ma si
riattiva automaticamente dopo 8 minuti circa.
È possibile ripetere questa operazione quante
volte si desidera.
•L’indicatore di sveglia lampeggia
continuamente mentre è attivata la funzione di
ripetizione della sveglia.
Regolazione del
timer di
spegnimento
ritardato
È possibile addormentarsi ascoltando la radio
usando la funzione di spegnimento ritardato, che
spegne la radio quando è trascorso il tempo
fissato.
1 Premere SLEEP.
La radio si accende. Si spegne dopo che
è trascorso il tempo fissato. È possibile
impostare il timer di spegnimento ritardato
su 90, 60, 30 o 15 minuti. A ciascuna
pressione l’indicazione cambia come segue.
La radio suona per il tempo fissato e quindi si
spegne.
•Per spegnere la radio prima che sia trascorso il
tempo fissato premere SNOOZE/DATE/SLEEP
OFF.
Per usare sia il timer di
spegnimento ritardato
che la sveglia
È possibile addormentarsi al suono della radio e
svegliarsi al suono della radio o del cicalino
all’orario fissato.
1 Regolare la sveglia. (Vedere
“Regolazione della sveglia”)
2 Regolare il timer di spegnimento
ritardato. (Vedere “Regolazione del
timer di spegnimento ritardato”)
Soluzione di
problemi
In caso di problemi all’apparecchio, eseguire i
seguenti controlli per stabilire se sono necessarie
riparazioni.
Se il problema rimane insoluto, consultare il
proprio rivenditore Sony.
L’orologio non indica l’orario corretto.
•Si è verificata un’interruzione di corrente di
durata superiore a mezzora?
La radio o il cicalino non suona all’orario di
sveglia fissato.
•Il modo di sveglia con la radio/cicalino
desiderato è stato selezionato con il tasto
ALARM MODE (indicatore “A RADIO” o “B
BUZZER” illuminato)?
Italiano
Precauzioni
•Alimentare l’apparecchio con le fonti di
alimentazione specificate in “Caratteristiche
tecniche”.
•La piastrina indicante la tensione, ecc. è situata
sul fondo dell’apparecchio.
•Scollegare il cavo afferrandone la spina. Non
tirare mai il cavo stesso.
•Non lasciare l’apparecchio nei pressi di fonti di
calore come caloriferi o condotti d’aria calda o
in luoghi esposti alla luce solare diretta,
polvere eccessiva, vibrazioni meccaniche o
scosse.
•Non collocare l’apparecchio su superfici
(tappeti, coperte, ecc.) o vicino a materiali
(tende, drappeggi) che possano bloccare i fori
di ventilazione.
•Se un liquido o un oggetto penetra
nell’apparecchio, scollegare l’apparecchio dalla
fonte di alimentazione e farlo controllare da
personale qualificato prima di usarlo
ulteriormente.
•Se il rivestimento è sporco, pulirlo con un
panno morbido inumidito con una blanda
soluzione detergente. Non usare mai pulitori
abrasivi o solventi chimici, che possono
rovinare la finitura.
•L’apparecchio non è scollegato dalla fonte di
alimentazione CA (corrente di rete) fintanto
che è collegato alla presa a muro, anche se
l’apparecchio stesso è stato spento.
In caso di interrogativi consultare il proprio
rivenditore Sony.
Caratteristiche
tecniche
Indicazione dell’orario
Regno Unito, America del 12 ore
Nord e del Sud
Altri paesi 24 ore
Campo di frequenza*
Modello per l’America del Nord e del Sud
Bande ICF-C113 Passo di canale
FM 87,5-108 MHz 0,1 MHz
AM 530-1.710 kHz 10 kHz
Modello per gli altri paesi
Bande ICF-C113 ICF-C113L Passo di
canale
FM 87,5-108 MHz 87,5-108 MHz 0,05 MHz
1)
AM(MW) 531-1.602 kHz 531-1.602 kHz 9 kHz
LW — 153-279 kHz 9 kHz
FM 87,5-108 MHz — 0,1 MHz
AM 530-1.610 kHz — 10 kHz
1)
La visualizzazione della frequenza sale o
scende in passi di 0,1 MHz.
(Esempio: La frequenza 88,05 MHz è
visualizzata come “88.0 MHz”.)
Diffusore
Circa 6,6 cm dia.
Uscita di potenza
130 mW (al 10% di distorsione armonica)
Alimentazione
Modello per l’America del Nord e del Sud:
120 V CA, 60 Hz
Altri modelli: 220-230 V CA, 50 Hz
Dimensioni
Circa 119 x 118 x 129,5 mm (l/a/p)
inclusi comandi e parti sporgenti
Massa
Circa 630 g
ICF-C113L (modello per il Regno Unito):
circa 670 g
Disegno e caratteristiche tecniche soggetti a
modifiche senza preavviso.
Nota
BANDE DI FREQUENZA
1. Bande di frequenza:
FM: 87,5 MHz – 108 MHz
OM: 531 kHz – 1.602 kHz
2. Frequenza intermedia:
FM: 10,7 MHz
AM: 450 kHz
3. Oscillatore locale:
Frequenza oscillatore locale
superiore a quella del segnale
* di cui al par. 3 dell’Allegato A al D.M. 25/06/
85 e al par. 3 dell’Allegato 1 al D.M. 27/08/87
Dream Machine is a trademark of Sony Corporation./Dream Machine è un marchio di
fabbrica della Sony Corporation./Dream Machine es marca comercial de Sony
Corporation./
1 2 3 4 5
BAND
SUMMER T. CLOCK
TUNE/TIME SET
D.S.T.
A RADIO B
BUZZER
ALARM
ALARM MODE
WAKE UP
STATION
SELECT/
BACKLIGHT
GREEN/AMBER
STATION PRESET
OFF ON
RADIO
ALARM RESET
SLEEP
SNOOZE
/ DATE / SLEEP OFF
VOLUME BRIGHTNESS
LH
FM
MW
AM
LW
PM
SLEEP
PRESET
MHz
kHz
AM
PRESET
kHz
OFF (current time)
On
90
30
15
60
and
No alarm
indication
30
15
60
OFF
(orario attuale)
On
(attivato)
90
e
Nessuna indicazione
di sveglia
AM
PRESET
kHz
ARADIO•ALARM•BUZZERB


