Operations
HEADPHONE jack
ON/OFF
VOL. +/-
MEMORY/CH+
CLOCK
All warranties implied by state law, including the implied warranties
of merchantability and fitness for a particular purpose, are expressly
limited to the duration of the limited warranties set forth above. With
the exception of any warranties implied by state law as hereby limited,
the foregoing warranty is exclusive and in lieu of all other warranties,
guarantees, agreements and similar obligations of manufacturer or seller
with respect to the repair or replacement of any parts. In no event shall
AVC be liable for consequential or incidental damages.
No person, agent, distributor, dealer or company is authorized to change,
modify or extend the terms of these warranties in any manner whatsoever.
The time within action must be commenced to enforce any obligation
of AVC arising under the warranty or under any statute, or law of the
United States or any state thereof, is hereby limited to one year from the
date of purchase. This limitation does not apply to implied warranties
arising under state law.
This warranty gives you specific legal rights and you may also have other
rights, which may vary, from state to state. Some states do not allow
limitation on how long an implied warranty lasts, when an action may
be brought, or the exclusion or limitation of incidental or consequential
damages, so the above provisions may not apply to you.
For more information on other products and services, please visit our
web site at
www.RCAav.com
Important: Also keep your “Bill of Sale” as proof of purchase.
Model no. .............................................................................................
Product name .......................................................................................
Type of set ............................................................................................
Serial no. ...............................................................................................
Invoice no. ............................................................................................
Purchased .............................................................................................
Dealer name .........................................................................................
FOR SERVICE AND REPAIR, PLEASE VISIT
www.RCAav.com
Specifications and external appearance are subject to change
without notice.
AVC MULTIMEDIA (“AVC”) makes the following limited warranty. This
limited warranty extend to the original consumer purchaser and is limited
to non-commercial use of the product.
One Year Parts & Labor Warranty
AVC products purchased in the United States are warranted to be free
from defects in materials or workmanship for a period of one year from
the date of their original retail purchase. If the unit fails to conform to
this warranty, we will service the product using new or refurbished parts
and products, at AVC’s sole discretion.
During a period of one year from the effective warranty date, AVC will
provide, when needed, service labor to repair a manufacturing defect at
its designated Service Center.
New or remanufactured replacements for defective parts or products will
be used for repairs by AVC at its designated Service Center for one year
from the effective warranty date. Such replacement parts or products
are warranted for an additional one year from the date of repair or
replacement. The Customer will be required to ship the unit to the Service
Center indicated at the time Customer Support is contacted to make
the necessary repairs. The customer is responsible for all transportation
charges to the service facility.
Packaging and Shipping Instruction
When you send the product to the AVC service facility you must use the
original carton box and packing material or an equivalent as designated
by AVC.
LIMITED WARRANTY
Your Responsibility
(1) You must retain the original sale receipt to provide proof of
purchase.
(2) These warranties are effective only if the product is purchased and
operated in the U.S.A. or Canada.
(3) Warranties extend only to defects in material or workmanship, and do
not extend to any product or parts which have been lost or discarded,
or damage to product or parts caused by misuse, accident, improper
operation or maintenance, or use in violation of instructions provided
with the product, or to product which has been altered or modified
without authorization of AVC, or to products or parts thereof which
have had the serial number removed or changed.
Out of Warranty
In the event your product requires repair after the limited warranty
period has expired, please visit our Customer Support Center at
www.RCAav.com
Important: You are responsible for any transportation, shipping or
insurance relative to the return of product to our Product Returns
Center.
User manual
Armband Radio
AM/FM Digital Tuner with LCD
RP312
EN/E
Safety Information
Before you begin
FCC Information
This device complies with Part 15 of the FCC Rules. Operation
is subject to the following two conditions: (1) This device may
not cause harmful interference, and (2) this device must accept
any interference received, including interference that may cause
undesired operation.
This equipment has been tested and found to comply with the
limits for a Class B digital device, pursuant to Part 15 of FCC Rules.
These limits are designed to provide reasonable protection against
harmful interference in a residential installation. This equipment
generates, uses, and can radiate radio frequency energy and, if not
installed and used in accordance with the instructions, may cause
harmful interference to radio communications. However, there
is no guarantee that interference will not occur in a particular
installation. If this equipment does cause harmful interference to
radio or television reception, which can be determined by turning
the equipment off and on, the user is encouraged to try to correct
the interference by one or more of the following measures:
• Reorient or relocate the receiving antenna.
• Increase the separation between the equipment and
receiver.
• Connect the equipment into an outlet on a circuit different
from that to which the receiver is connected.
• Consult the dealer or an experienced radio/TV technician for
help.
WARNING:
Changes or modifications to this unit not expressly approved by
the party responsible for compliance could void the user’s authority
to operate the equipment.
Headset Safety
• Do not play your headset at a high volume. Hearing experts
advise against continuous extended play.
• If you experience a ringing in your ears, reduce volume or
discontinue use.
• Do not use while operating a motorized vehicle or bicycle, it
may create a traffic hazard and is illegal in many areas.
• Even if your headset is an open-air type designed to let you
hear outside sounds, don’t turn up the volume so high that
you can’t hear what’s around you.
Power
This device operates with 2”AAA” batteries (not included).
NOTE:
After the radio has been used extensively, the quality of the sound
may deteriorate and volume may decrease. When this happens,
remove old batteries and replace with a complete new set.
This Class B digital apparatus complies with Canadian ICES-003.
It is important to read the user manual prior to using your
new product for the first time.
Limited Warranty
Printed in China 811-R31291W010
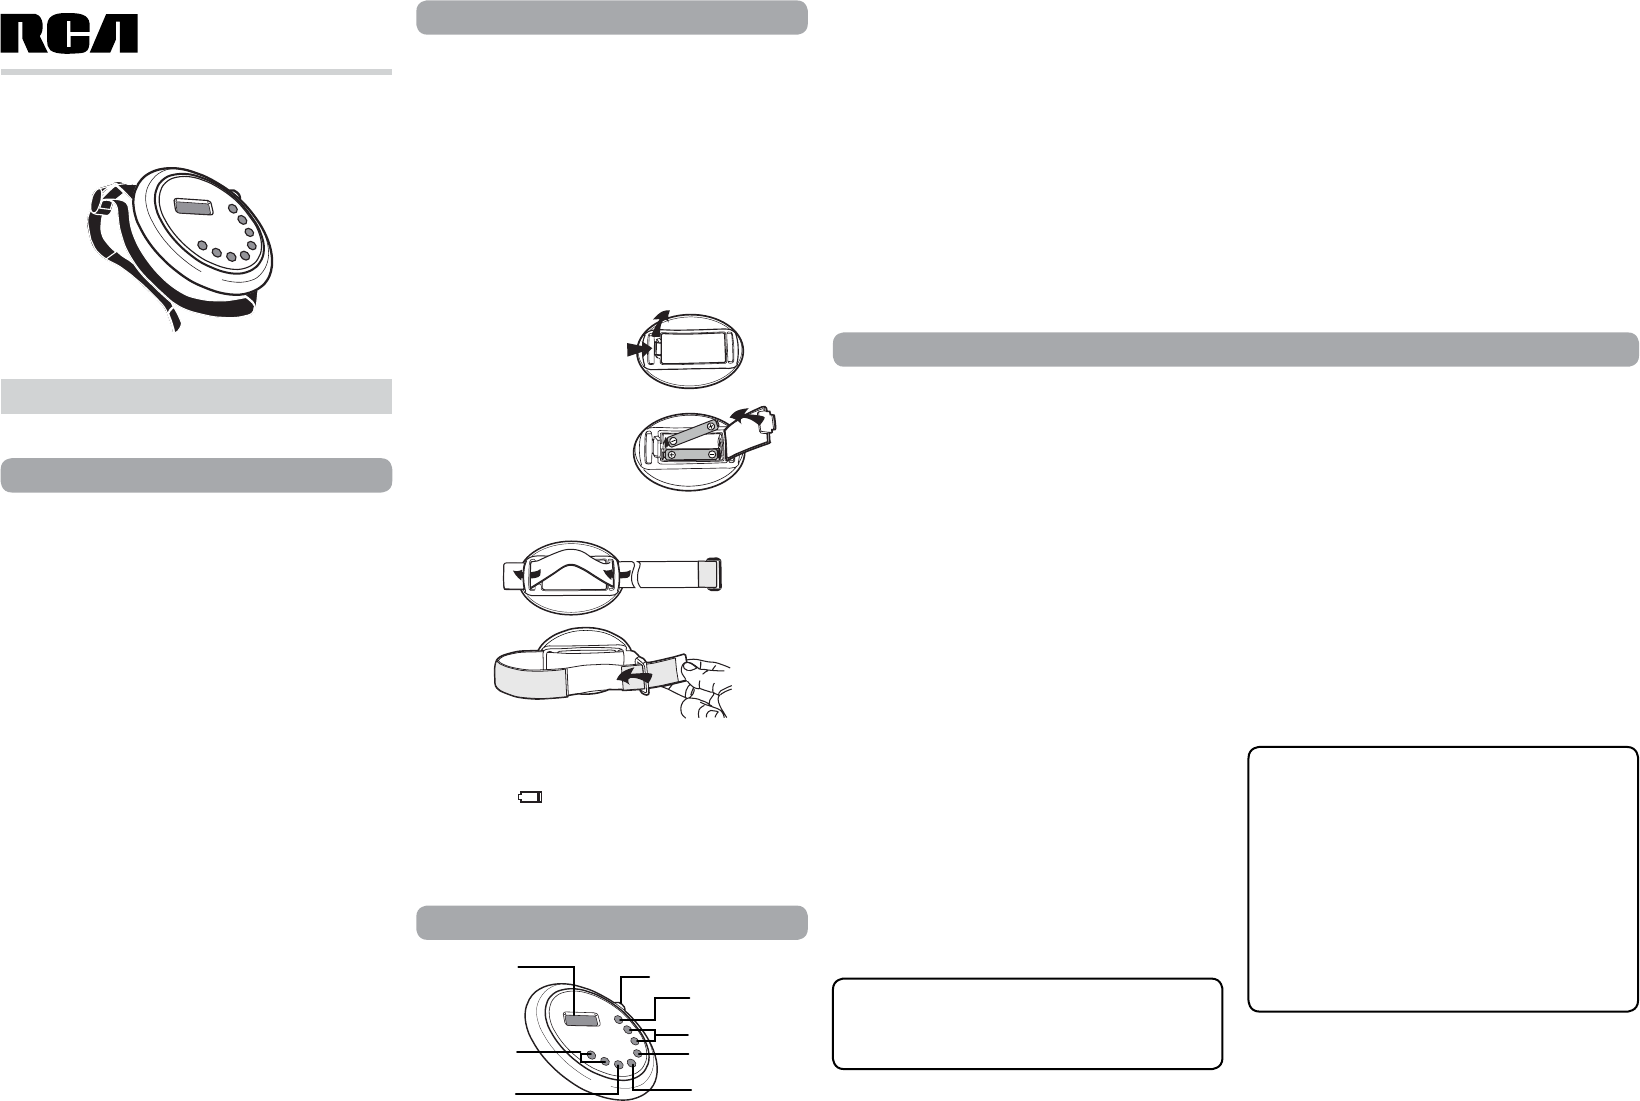
Batteries Installation
1.
Open the battery door.
Batteries Replacement
• The symbol“ “ icon will flash whenever the battery is
nearly exhausted, so please replace batteries.
• Turn off the radio before replace batteries since it can protect
the preset stations and all settings for about 1 minute during
batteries replacement, otherwise, all settings including preset
stations and clock will be reset.
4. Insert the belt and pull out the belt under the device until it
fits flush against the battery door.
NOTE:
For battery replacement, loosen the belt before opening the
battery door.
Important Battery Precaution
CAUTION: Danger of explosion if battery is incorrectly replaced.
Replace only with the same or equivalent type.
-
Any battery may present a risk of fire, explosion, or chemical burn
if abused. Do not try to charge a battery that is not intended to be
recharged, do not incinerate, and do not puncture.
-
Non- rechargeable batteries, such as alkaline batteries, may leak if left
in your product for a long time. Remove the batteries from the product
if you are not going to use it for a month or more.
- Do not mix old and new batteries and do not mix alkaline, standard
(carbon-zinc), or rechargeable (Ni-Cd, Ni-MH, etc.) batteries.
- Discard any leaky or deformed battery immediately. They may
cause skin burns or other personal injury.
- Batteries shall not be exposed to excessive heat such as
sunshine, fire or the like.
-
Please help to protect the environment by recycling or disposing
of batteries according to Federal, state, and local regulations.
Radio Operation
1. Press ON/OFF button to turn the radio ON or OFF.
2. Select FM or AM with the AM/FM button.
3.
Tap CH+ button to select next station. A total of 20FM and 10AM
stations can be stored.
4.
Tap < TUNE > buttons to decrease/increase frequency by 1 step.
5. Or press and hold either < TUNE > button to search for next
available station.
6.
Put on your armband radio on your arm and adjust the belt until
it feels comfortable.
7.
Press VOL+/- button to adjust headphone volume after
connecting the headphone.
Radio Station Preset and Select
1. Tune to desired station (refer to Radio Operation step 1 to 5).
2. Press and hold MEMORY button till “P xx” is flashing where
“xx” is the preset number to be stored.
3. Press < TUNE > buttons to select a preset number that you want
to store the station.
4.
Press MEMORY button to store your setting.
NOTE :
Press and Hold APP button to search the presetted station
automatically.
2.
Insert 2 “AAA” batteries. Be
sure to match the polarity of
the batteries as indicating inside
the battery compartment.
3. Close the battery door.
Display
< TUNE >
AM/FM/APP
Setting CLOCK
1. Press ON/OFF button until the CLOCK is displayed.
2. Press and hold CLOCK button until the HOUR digits are
flashing.
3. Press
< TUNE > buttons to adjust the HOUR digits.
4.
Press CLOCK button to set MINUTE digits (MINUTE digits are
flashing).
5. Press
< TUNE > buttons to adjust the MINUTE digits.
6.
Press CLOCK button to save the setting.
Antenna
This radio has a built-in AM antenna. Since the built-in AM antenna is
somewhat directional, it may be necessary on weaker AM stations to
rotate the radio slightly until you get the best possible reception. When
listening to FM programs, be sure to fully extend the headphone wire
since it is used as FM antenna.
Headphones
This radio has been equipped with a HEADPHONE jack for private
listening.
Please extend the headphone wire since it is also the antenna for FM
radio reception.