


© 2003 RadioShack Corporation.
All Rights Reserved.
RadioShack and RadioShack.com are trademarks
used by RadioShack Corporation.
OWNER’S MANUAL —
Please read before using this equipment.
www.radioshack.com
SM
Thank you for purchasing the RadioShack
Multifunction Travel Alarm Clock. It combines
the versatility of a clock, picture frame, and
name card holder into one convenient
system. You can insert a picture into the
frame to make a special keepsake. The 60-
year calendar goes from 1990 to 2050. Ô
REMOVING THE
BATTERY INSULATION
STRIP
To prevent battery drain during shipping, your
clock is shipped with an insulation strip that
you must remove before use. Turn the clock
over and pull up the back cover. Firmly grasp
the strip end and gently pull it out. The clock
beeps.
12:00 and the current temperature
appear.
SETTING THE DATE
AND TIME
1. Hold down ¯ until the clock sounds a
long beep and the hour digits flash.
2. Repeatedly press or hold down
e or d
to set the hour.
3. Press
¯ to store the hour. The minute
digits flash.
4. Repeat Steps 2 and 3 to set the minute,
year, month, and date. When you finish,
the current time appears. Ô
SETTING THE ALARM
TIME
You can set the clock to sound an alarm at a
specified time.
1. Hold down
ï until the clock beeps. 12:00
or the preset alarm time appears. The
hour digits flash.
2. Repeatedly press or hold down
e or d
to set the alarm hour.
3. Press
ï. The minute digits flash.
4. Repeatedly press or hold down
e or d
to set the alarm minute.
5. Press
ï to store the alarm time. The
alarm turns on and
ï appears. At the
preset alarm time, the alarm sounds for
one minute then automatically turns off.
To silence the alarm sooner, press any
key (except
SNOOZE/light).
6. To turn the alarm on or off at any time,
press
°/ON OFF.Toturnoffthealarm
when it sounds, press
°/ON OFF twice.
ï disappears.
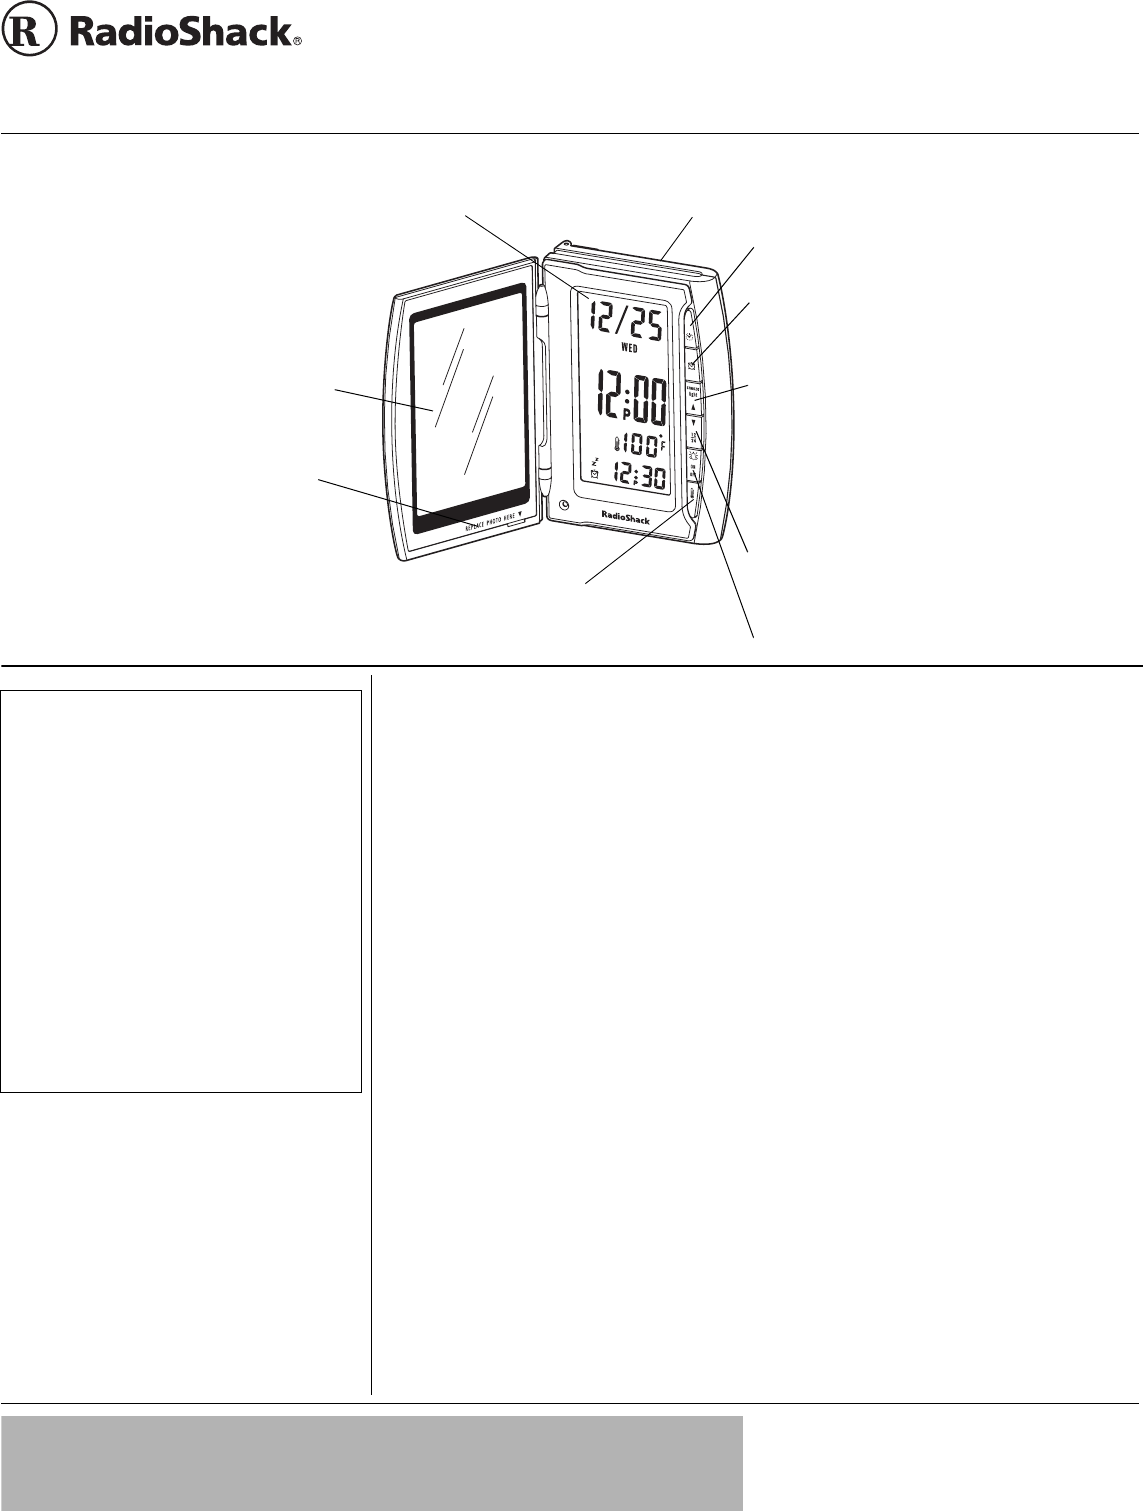
Large Display — Easily read all
information at the same time.
SNOOZE/light/
e
— Press while the alarm sounds to
activate the snooze feature. See “Using Snooze” on
Page 2.
Press SNOOZE/light once to view the time or
temperature in the dark. The backlight shines for abou
t
five seconds. Hold down SNOOZE/light to light the
clock display as long as you like.
Press while setting the date, time, or alarm time to
scroll upwards.
Repeatedly press ® to switch the temperature from Fahrenheit (
°
F) to
Celsius (
°
C) format or vice versa on the display. The temperature is
automatically updated every minute.
ï — Press to set and store the alarm time.
Photo Frame — Holds a 2.12 in. x 3.54 in.
(54 mm x 90 mm) picture. Pry out the
plate. Remove the sample photo, place
the picture on the top of the photo frame,
and replace the plastic plate.
You can remove this label if necessary.
Open the back cover and place up to 10 name cards in the holder.
¯
— Hold down to enter date and time setting mode
.
Press while in time setting mode to store your settings
.
°/ON OFF — Press at any time to turn the alarm on
or off.
d
/12/24 — Press while in time setting mode to
alternate between 12-and 24-hour time format, or to
scroll downwards while setting the date, time, or alarm
time.
Ô NOTE Ô
Your clock’s display is protected by a piece of
film during shipping. Open the front cover and
peel off this film before using the clock.
Setting the Date and Time
• When you set the date, the clock
automatically sets the day of the week.
• To switch between the 12- and 24- hour time
formats, press 12/24. In the 12-hour time
format,
P appears for a PM hour.
• If you press ï,
®,or°/ON OFF during the
time setting, the clock automatically returns to
the previous setting.
• While setting the time or alarm time, if you do
not press any key within 30 seconds, the
clock returns to the current time/temperature
display.
!
IMPORTANT
!
If an icon appears at the end of a paragraph, go to the box on that page with the corresponding icon for
pertinent information.
o
— Warning Ô —Note
Multifunction Travel Alarm Clock
63-1411