User manual
Manuel d'utilisation
Manual del usuario
Benutzerhandbuch
2
INTRODUCTION
Your portable DVD player
Your portable DVD player plays digital video discs conforming to the universal
DVD Video standard. With it, you will be able to enjoy full-length movies with
true cinema picture quality, and stereo or multichannel sound (depending on the
disc and on your playback set-up).
The unique features of DVD-Video, such as selection of soundtrack and subtitle
languages, and of different camera angles (again depending on the disc), are all
included.
What’s more, parental lock lets you decide which discs your children will be able
to see. You will find your player remarkably easy to use with the On-Screen
Display and player display in combination with the remote control.
Unpacking
First check and identify the contents of your package, as listed below:
• Portable DVD player • Remote Control
• Car adaptor (12V) • AC power adaptor
• Rechargeable battery pack • User Manual
• Warranty • Audio / Video cable
• S-Video cable • Component Video cable
• Travel bag (subject to region)
Placement
• Place the player on a firm, flat surface.
• Keep away from domestic heating equipment and direct sunlight.
• If the player cannot read CDs/DVDs correctly, try using a commonly
available cleaning CD/DVD to clean the lens before taking the player to be
repaired. Other cleaning methods may destroy the lens.
• Always keep the disc door closed to avoid dust on the lens.
• The lens may cloud over when the player is suddenly moved from cold to warm
surroundings. It is then not possible to play a CD/DVD. Leave the player in a warm
environment until the moisture evaporates.
FUNCTIONAL OVERVIEW
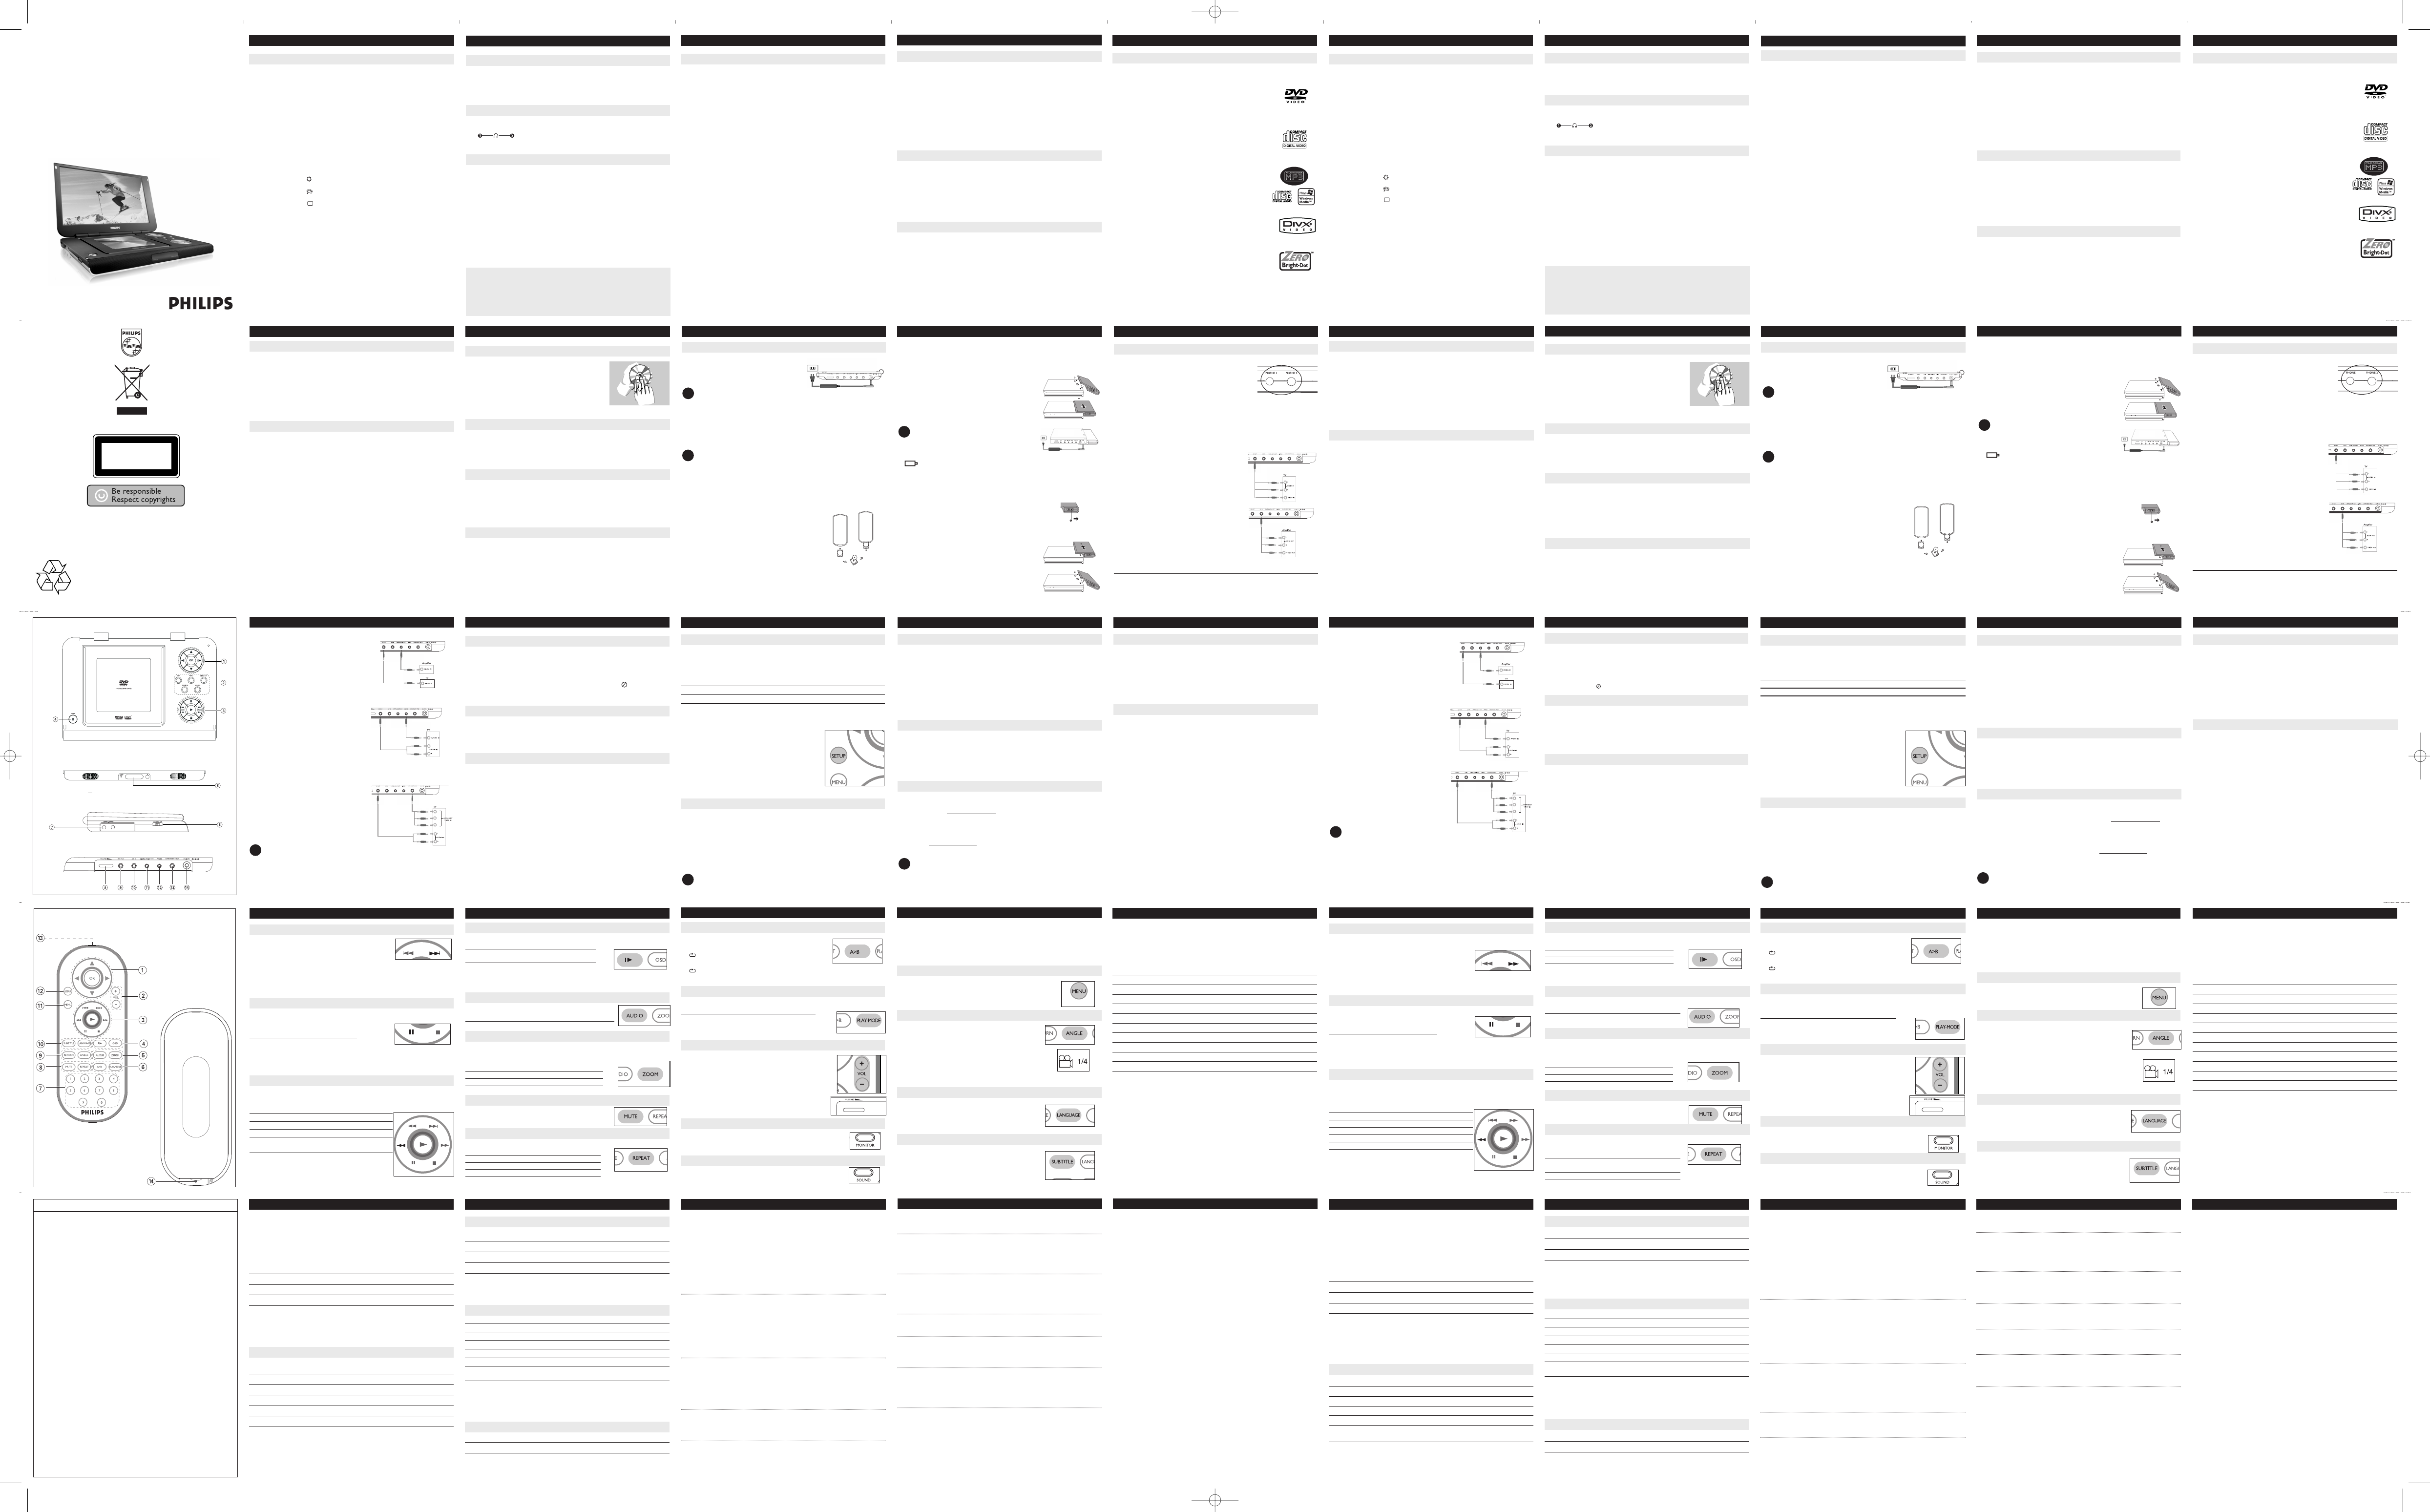
Front of player ( see figure 1)
5 POWER/CHG ......Power and charging indicator
IR ..........................Remote sensor
Left of player ( see figure 1)
6 ON . POWER . OFF .....Switche the player on / off
7 ........... Headphones jack
Right of player ( see figure 1)
8 VOLUME F .............Volume control.
9 A/V OUT....................... Audio/Video output jack
0 A/V IN........................... Audio/Video input jack
! DIGITAL AUDIO OUT Digital audio output jack
@ S-VIDEO.......................S-Video output jack
# COMPONENT VIDEO.Component video output jack
$ DC IN 9V....................Power supply socket
SPECIAL DVD FEATURES
Checking the contents of DVD-Video discs: Menus.
For titles and chapters, selection menus may be included on the disc.
The DVD’s menu feature allows you to make selections from these menus. Press
the appropriate numerical key; or use the 3, 4, 1, 2 keys to highlight your
selection, and press OK.
Disc menu
Press MENU. The menu may list, for example, camera angles,
spoken language and subtitle options, and chapters for the title.
Camera angle
If the disc contains sequences recorded from different
camera angles, the angle icon appears, showing the
number of available angles, and the angle being shown.
You can then change the camera angle if you wish.
Press ANGLE repeatedly until you have reached your desired
viewing angle.
To resume to normal viewing angle, press ANGLE repeatedly
until no angle related message is shown on the screen.
Changing the language
Press LANGUAGE. If the current disc has different
langauge options, this now appears on the screen.
Press LANGUAGE repeatedly until you have reached
your desired language option.
Subtitles
Press SUBTITLES. If the current disc has different
subtitles options, this now appears on the screen.
Press SUBTITLES repeatedly until you have reached
your desired subtitles option.
GENERAL FEATURES
Slow motion
Press > once or more for the following slow play options:
x 1 1/2 x 5* 1/2 x backward
x 2 1/4 x 6* 1/4 x backward
x 3 1/8 x 7* 1/8 x backward
x 4 1/16 x 8* 1/16 x backward
Press OK or 2 to resume normal playback.
*for DVDs only
Changing the audio output
Press AUDIO repeatedly for the following audio options.
x 1 Mono left x 2 Mono right
x 3 Mixed mono x 4 Stereo
ZOOM
The Zoom function allows you to enlarge the video image and to pan
through the enlarged image. Press ZOOM repeatedly to select the following
zooming options.
Zoom x 1 2X Zoom x 2 3X
Zoom x 3 4X Zoom x 4 1/2
Zoom x 5 1/3 Zoom x 6 1/4
Zoom x 7 normal
MUTE
Press MUTE once to mute player volume.
Press MUTE again to disable.
REPEAT
Press REPEAT repeatedly for the following repeat options:
DVD actions VCD actions
x 1 repeats chapter repeats track
x 2 repeats title repeats all
x 3 repeats all cancels repeat
x 4 cancels repeat
English
FUNCTIONAL OVERVIEW
Main unit controls ( see figure 1)
1 3, 4, 1, 2..........Up / down / left / right cursor
OK .........................Confirm selection
2 OSD.......................On Screen Display on / off
MENU .................Display MENU page
VIDEO OUT .........Selection video format
– COMPONENT OUT(YPBPR)
– COMPONENT OUT(YCBCR)
– A/V or S-VIDEO OUT
– A/V IN (AUX)
MONITOR ...........Selection display
To adjust the brightness with 12
To adjust the color with 12
To adjust the screen of 16:9 or 4:3 with 12
SOUND ...............Turn virtual on/off
3 ;... .........................Pause playback
2............................Start / resume playback
9............................Press twice to stop playback
J( / §... ...........For previous (J( ) or next (§) chapters, tracks or titles
5 / 6... ..............Search backward (5 ) or search forward (6)
4 0 OPEN...............Open disc door to insert or remove disc
REMOTE CONTROL
Remote controls ( see figure 2)
1 3, 4, 1, 2..........Up / down / left / right cursor
OK .........................Confirms selection
2 VOL+ / -................Volume control
3 J( / §... ...........For previous (J( ) or next (§) chapters, tracks or titles
;... .........................Pauses playback
2...........................Starts / resumes playback
9............................Press twice to stop playback
5 / 6... ..............Search backward (5 ) or search forward (6)
4 OSD.......................On Screen Display on / off
. ..........................Slow motion
5 AUDIO ..................Audio langauge selector
ZOOM...................Enlarges video image
6 A > B.....................To repeat or loop a sequence in a title
PLAY-MODE ........Selects play order options
7 0 - 9.......................Numeric keypad
8 MUTE....................Muting player volume
REPEAT ................Repeats chapter / title / disc
9 RETURN ...............For VCD menu page
ANGLE..................Selects DVD camera angle
0 SUBTITLE ............Subtitle language selector
LANGUAGE .........Language selector
! MENU...................Displays MENU page
@ SETUP ..................Enters SETUP menu
# Infra Red port
$ BATTERY COMPARTMENT
BASIC FUNCTIONS
Switching on for OSD language setup
English is the default language of your player’s on screen display. You may
choose to use English, French, Spanish, German, Simplified Chinese or Traditional
Chinese for your player’s on screen display.
Countries OSD Language Options
European English, French, Spanish, German
American English, French, Spanish
Asia Pacific English,Tradtional Chinese, Simplified Chinese
1 Slide the POWER switch to ON to switch on the
player.
2 Press SET UP for the set up menu.
3 Select GENERAL SETUP and press OK.
4 Scroll and select OSD LANG and press 2 to
select from OSD language options.
5 Select your preferred language and press OK.
Loading discs and switching on
1 Press OPEN to open the disc door.
2 Insert your chosen disc, label side up (also when a double sided
DVD disc is inserted). Make sure it is sitting properly in the correct recess.
3 Gently push to close the door.
4 Slide the POWER switch to ON to switch on the player.
TIP
A normal mechanical noise is heard during playback.
BASIC FUNCTIONS
Playing a DVD disc
After switching on, inserting the disc and closing the door, playback starts
automatically. The screen shows the type of disc loaded. The disc may invite you
to select an item from a menu. Use the 3, 4, 1, 2 keys to highlight your
selection,and press OK.
Note: Since it is usual for DVD movies to be released at different times in
different regions of the world, all players have region codes and discs can have
an optional region code. If you load a disc of a different region code to your
player, you will see the region code notice on the screen. The disc will not play,
and should be unloaded.
Playing an audio or video CD disc
• After switching on, inserting the disc and closing the door, the screen shows
the type of disc loaded as well as information about the disc’s contents.
Press 2 to start playback.
• While playing VCD with MTV/Karaoke, press number keys(0-9) to select the
track and press 2 or OK to play the track. Press RETURN to go back to menu
of the selection.
Playing DivX
®
disc
• Philips provide you the DivX
®
VOD(Video on Demand) registration code that
allows you to rent and purchase videos using the DivX
®
VOD service. For more
information, visit www
.divx.com/vod.
• Selection the DivX
®
VOD on the SETUP menu.
• The registration code will appear.
• Use the registration code to purchase or rent the videos from DivX
®
VOD
service at www
.divx.com/vod. Follow the instructions and download the video
onto a CD-R for playback on this DVD player.
TIP :
All the downloaded videos from DivX
®
VOD can only be played
back on this DVD player.
BASIC FUNCTIONS
Playing a WMA/ MP3-CD
The following playback features are available for WMA/MP3-CDs.
Please refer to the corresponding sections for more information.
Volume control, skipping tracks, searching, repeat, shuffle, etc.
Use the 3, 4, 1, 2 keys to highlight your selected music folder.
Press OK to play.
You cannot play WMA files that are copy protected.
Playing a JPEG discs
Use the 3, 4, 1, 2 keys to highlight your selected picture folder.
Press OK. The player will then automatically enter the slide show mode.
Using the full display screen, this shows the rest of the JPEG files, one-by-one,
located in the selected current folder.
• Use the 1, 2 to rotate the picture.
• Use the 3 to filp up/down.
• Use the 4 to flip left/right.
• During the slide show, press MENU to go back to folder screen.
• Press 9 to go to group preview.
• Use the 3, 4, 1, 2 to highlight the preview picture and access the
on-screen functions.
Note: Unless stated otherwise, all operations described are based on remote
control operation.
GENERAL FEATURES
Moving to another title / track / chapter
When a disc has more than one title or track, you can
move to another title/track/chapter as follows:
• Press § briefly during play to select the next title/
track / chapter.
• Press J( briefly during play to step back to the previous title/track/chapter.
• To go directly to any title, track or chapter, enter the corresponding
number using the numerical keys (0-9).
Still picture and step frame
Press ; once or more for the following still picture
and step frame options:
; x 1 Pause / Still picture
; x 2 screen shows ;2
After the icon ;2 is displayed, press ; repeatedly to play frame by frame.
Press OK to resume normal playback.
Search
Press 6 repeatedly for the following forward search options:
Press 5 repeatedly for the following backward search options:
56
2 X backwards 2 X forward
4 X backwards 4 X forward
8 X backwards 8 X forward
16 X backwards 16 X forward
32 X backwards 32 X forward
normal speed normal speed
Press OK or 2 to resume normal playback.
GENERAL FEATURES
Repeat A > B
To repeat or loop a sequence in a title:
• Press A > B at your chosen starting point;
A appears on the screen.
• Press A > B again at your chosen end point;
AB appears on the display, and the repeat sequence begins.
• To exit the sequence, press A > B.
Play modes
Press PLAY-MODE repeatedly for the following play order options:
x 1 Shuffle x 2 Random
x 3 Program
Use (0-9) and OK to key in specific settings.
Volume Control
• Press + / - to increase or decrease playback volume
in the Remote Control or
• Use the rotatary switch on the right side of the unit.
Monitor (on the main unit)
Press MONITOR repeatedly and use 1 / 2 to adjust
brightness, color and display mode (normal or full screen).
Sound (on the main unit)
Press SOUND repeatedly to adjust virtual surround sound.
CAUTION
Use of controls or adjustments or performance of procedures
other than herein may result in hazardous radiation exposure
or other unsafe operation.
http://www.philips.com
Printed in China
Specifications are subject to change without notice.
Trademarks are the property of Koninklijke Philips Electronics N.V.
or their respective owners
2005 © Koninklijke Philips Electronics N.V. All rights reserved.
PET1002
1
GENERAL EXPLANATION
About this manual
This manual gives the basic instructions for operating this DVD player.
Some DVD discs however are produced in a way that requires specific
operation or allows only limited operation during playback. In these cases
the player may not respond to all operating commands. When this occurs,
please refer to the instructions in the disc inlay. When a appears on
the screen, the operation is not permitted by the player
or the disc.
Remote control operation
• Unless otherwise stated, all operations can be carried out with the
remote control. Always point the remote control directly at the player,
making sure there are no obstructions in the path of the infrared beam.
• When there are corresponding keys on the main unit, they can also be used.
Menu navigation
• Your player has an intuitive menu navigation system to guide you through
various settings and operations.
• Use the function keys to activate / disable relevant operations.
• Use 3, 4, 1, 2 to browse through menus.
• Press OK key to confirm your selection.
TROUBLESHOOTING
Symptom Remedy
Disc can’t be played – Ensure the disc label is upwards.
– Clean the disc.
– Check if the disc is defective by trying
another disc.
The player does not – Aim the remote control directly at the
respond to the remote sensor on the front of the player. Avoid all
control obstacles that may interfere with the signal
path. Inspect or replace the batteries.
Distorted or B/W – Use only discs formatted according to the
picture with DVD TV-set used (PAL/NTSC).
No audio at digital – Check the digital connections.
output – Check the SETUP menu to make sure that
the digital output is set to on.
Player does not respond – Operations are not permitted by the disc.
to all operating – Refer to the instructions in the disc inlay.
commands during
playback
Player feels warm – When the player is in use for a long
period of time, the surface will be heated.
This is normal.
This set complies with the radio interference requirements of the
European Union.
PREPARATIONS
Power supply
Using the AC / DC adaptor
Connect the supplied adapter to the set
and the main power supply (as shown).
TIP
To avoid damage to the player, switch off before plugging or unplugging the
AC adaptor.
Using the car adapter
Connect the supplied car adapter to the set and the car cigarette lighter outlet.
TIP
• To avoid damage to the player, switch off before plugging or unplugging
the car adaptor.
• When connecting with car power (cigarette lighter) adaptor, be sure the
input voltage of the adaptor is identical with car voltage.
Powering your remote control
1 Open the battery compartment.
Remove the protective plastic tab
(first time users only).
2 Insert 1 x lithium 3V battery, type CR2025,
then close the compartment.
Batteries contain chemical substances, so they
should be disposed of properly.
Incorrect use of batteries can cause electrolyte leakage and will corrode the
compartment or cause the batteries to burst.
Remove the batteries if the set is not to be used for a long time.
GENERAL INFORMATION
Handling discs
• Do not attach paper or tape to the disc.
• Keep the disc away from direct sunlight or heat
sources.
• Store the disc in a disc case after playback.
• To clean, wipe the disc outwards from the center
with a soft, lint-free clean cloth.
On handling the LCD screen
The LCD is manufactured using high precision technology. You may, however, see
tiny black points and/or bright points(red,blue,green) that continuously appear on
the LCD. This is a normal result of the manufacturing process and does not
indicate a malfunction.
Environmental information
We have reduced the packaging to its minimum and made it easy to separate into
mono materials: cardboard, PS, PE and PET.
Your set consists of material which can be recycled if disassembled by a
specialized company. Please observe the local regulations to dispose of
packaging, exhausted batteries and old equipment.
Copyright information
“DivX, DivX” Certified, and associated logos are trademarks of DivXNetworks, Inc.
and are used under license.”
All other brand and product names are trademarks of their respective companies
or organizations.
Unauthorized duplication of any recordings downloaded from the internet or made
from CDs / VCDs / DVDs is a violation of copyright laws and international
treaties.
INTRODUCTION
Playable disc formats
In addition to DVD-Video disc, you will also be able to play all Video CDs and
audio CDs (including CDR, CDRW, DVD
±R and DVR±RW).
DVD-Video
Depending on the material on the disc (a movie, video clips,
a drama series, etc.) these discs may have one or more
Titles, and each Title may have one or more Chapters. To
make access easy and convenient, your player lets you move
between Titles, and also between Chapters.
Video CD
Depending on the material on the disc (a movie, video clips, a
drama series, etc.) these discs may have one or more Tracks,
and tracks may have one or more indexes, as indicated on
the disc case.To make access easy and convenient, your
player lets you move between tracks and between indexes.
Audio CD / MP3 / WMA CD
Audio CDs / MP3/WMA CD contain music tracks only. You can
play them in the conventional way through a stereo system
using the keys on the remote control and/or main unit, or via
the TV using the On Screen Display (OSD).
CD with JPEG files
You can also view JPEG still photos on this player.
DivX video discs
You can also view discs containing DivX
®
video on this player.
• Official DivX
®
Certified
TM
product
• Plays DivX
®
5, DivX
®
4, DivX
®
3, and DivX
®
VOD video content.
Zero Bright Dot
TM
Enjoy highest-quality images that are free from annoying blank spots on
the LCD screen. LCD displays commonly have imperfections, termed as
'bright dots' by the LCD industry. A limited number of bright dots were
once considered an inevitable side effect of LCD mass production. With
Philips' strict quality control procedures used in our Portable DVD Players,
our LCD displays are produced with zero tolerance for bright dots.
Select Portable DVD Players come with Philips Zero
Bright Dot
TM
Policy to guarantee optimal screen quality.
Warranty service varies from region to region. Contact your local Philips
representative for more detailed information.
GENERAL INFORMATION
Power Sources
This unit operates on a supplied AC adaptor, car adapter, or a rechargeable
battery pack.
• Make sure that the input voltage of the AC adaptor is in line with the local
voltage. Otherwise, the AC adaptor and unit may be damaged.
• Do not touch the AC adaptor with wet hands to prevent electric shock.
• When connecting with car power (cigarette lighter) adaptor, be sure the
input voltage of the adaptor is identical with car voltage.
• Unplug the AC adaptor from the outlet or remove the battery pack when
the unit is not used for long periods of time.
• Hold the plug to disconnect the AC adaptor. Do not pull the power cord.
Safety and maintenance
• Do not disassemble the unit for laser rays are dangerous to eyes.
Any service should be done by qualified service personnel.
• Unplug the AC adaptor to cut the power if liquid or objects get inside the unit.
• Take care not to drop the unit or subject it to strong shocks, which may
cause malfunction.
• Hearing safety: listen at a moderate volume. Using headphones at high
volume can impair your hearing.
• Important (for models with by-packed headphones): Philips guarantees
compliance with the maximum sound power of its audio players as
determined by relevant regulatory bodies only with the original model of
provided headphones. In case this one needs replacement, we recommend that
you contact your retailer to order a model identical to that of the original
provided by Philips.
• Traffic safety: do not use while driving or cycling as you may cause an accident.
• Do not expose to excessive heat caused by heating equipment or
direct sunlight.
• This product is not waterproof: do not allow your player to be submersed
in water. Water entering the player may cause major damage.
• Do not use any cleaning agents containing alcohol, ammonia, benzene,
or abrasives as these may harm the player.
• Apparatus shall not be exposed to dripping or splashing. Do not place any
sources of danger on the appartus (e.g. liquid filled objects,lighted candles)
• Do not touch the lens!
Note: When the player is in use for a long period of time, the surface will be
heated. This is normal.
PREPARATIONS
Attaching and charging the battery pack*
1 Switch off the set. Attach the battery pack
as shown.
2 Connect the supplied adapter to the set and
the main power supply (as shown). Charge
until the red indicator turns off (approximately
4.5 - 6.5 hours when unit is charged from
power off).
TIP
• It is normal for the battery pack to become
warm during charging.
• is shown on the screen when battery
power is running.
Detaching the battery pack
1 Switch off the set.
2 Unplug the AC adapter.
3 Turn the player upside down.
4 Press down the battery pack lock switch.
5 Slide off the battery pack as shown.
* Rechargeable batteries have a limited
number of charge cycles and may
eventually need to be replaced. Battery
life and number of charge cycles vary by
use and settings.
POWERPOWER
ONON OFFOFF
POWERPOWER
ONON OFFOFF
POWERPOWER
ONON
POWERPOWER
ONON OFFOFF
OFFOFF
OSD OPERATIONS
In addition to using remote control keys, you can also change disc playback
options from OSD.
1 Press OSD during disc playback. A list of features is shown.
2 Use the 3 4keys to highlight your selection.
When the cursor highlights these settings, press OK to:
FILE key in desired file number
TITLE key in desired title number
CHAPTER key in desired chapter number
AUDIO select audio options
SUBTITLE select subtitle options
ANGLE select camera angle options
FILE TIME key in starting point for file play time
TT TIME key in starting point for title play time
CH TIME key in starting point for chapter play time
REPEAT select repeat options
TIME DISP. select time display options
3 Use (0-9) to key in specific settings.
4 Press 1 to abort current setting or go back to previous menu level.
5 Press OSD to exit.
SETUP OPERATIONS
To maximize your playback experience, use SETUP to fine tune your settings.
Use the 3,4,1, 2 keys to highlight your selection, and press OK.
1 Press SETUP. A list of features is shown.
2 Use the 3 4keys to highlight your selection.
When the cursor highlights these settings, press OK to:
GENERAL SETUP select display and other options
AUDIO SETUP select audio options
PREFERENCES select playback preferences
PASSWORD SETUP select password options
3 Press 1 to abort current setting or go back to previous menu level.
4 Press SETUP to exit.
General Setup
When the cursor highlights these settings, press OK to:
TV DISPLAY select display ratio
TV TYPE select video standard of external TV set
OSD LANG select on screen display language
SPDIF select digital audio options
CAPTIONS select captions options
SCREEN SAVER select screen saver options
Press 1 to abort current setting or go back to previous menu level
SETUP OPERATIONS
Audio Setup
When the cursor highlights these settings, press OK to:
SPEAKER SETUP select speaker options
DOLBY DIGITAL SETUP select dobly sound options
CHANNEL EQUALIZER select equalizer options
3D PROCESSING select surround sound options
Press 1 to abort current setting or go back to previous menu level
Preferences
When the cursor highlights these settings, press OK to:
AUDIO select audio language options
SUBTITLE select subtitle language options
DISC MENU select disc menu language options
PARENTAL select parental options
DivX
®
VOD get DivX ID for VOD
POWER SAVING activate power saving mode when using battery
playback
DEFAULT Restore factory settings
Press 1 to abort current setting or go back to previous menu level
Note: Parental options are only selectable when password mode is deactivated.
Password Setup
When the cursor highlights these settings, press OK to:
PW MODE switch password on / off
PASSWORD change existing password (default: 99999)
Press 1 to abort current setting or go back to previous menu level
TROUBLESHOOTING
If it appears that the DVD-Video player is faulty, first consult this checklist.
It may be that something has been overlooked.
WARNING
Under no circumstances should you try to repair the set yourself as this
will invalidate the guarantee.
If a fault occurs, first check the points listed, before taking the set for
repair. If you are unable to solve a problem by following these hints,
consult your dealer or service centre.
Symptom Remedy
No power – Check if both plugs of the mains cord are
properly connected.
– Check if there is power at the AC outlet by
plugging in another appliance.
– Check if battery pack is inserted appropriately.
– Check if car adaptor is connected appropriately.
Distorted picture – Check the disc for fingerprints and clean with
a soft cloth, wiping from centre to edge.
– Sometimes a small amount of picture
distortion may appear. This is not a
malfunction.
Completely distorted – The NTSC/PAL setting may be in the wrong
picture / no colour in status. Match your TV’s setting with the
the TV screen player’s setting.
No sound – Check audio connections. If using a HiFi
amplifier, try another sound source.
TECHNICAL DATA
Dimensions 26 x 18 x 3.0 cm
10.2 x 7 x 1.2 inches
Weight 1.13 kg / 2.48 lb
Power supply DC 9V 2.2A
Power Consumption 30W
Operating temperature range 0 - 50°C (32 ~ 122°F)
Laser wavelength 650nm
Video system NTSC / PAL / AUTO
Frequency response 20Hz ~ 20KHz ± 1dB
Signal/noise ratio ≥ 85dB
Audio distortion + noise ≤ -80(1KHz)
Channel separation ≥ 85dB
Dynamic range ≥ 80dB
Output
Audio out (analog audio) Output level: 2V ± 10%
Load impedance: 10KΩ
Video out Output level: 1Vp - p ± 20%
Load impedance: 75Ω
PHILIPS reserves the right to make design and specification
changes for product improvement without prior notice.
Modifications not authorized by the manufacturer may void users
authority to operate this device.
All rights reserved.
INTRODUCTION
Votre lecteur de DVD portable
Votre lecteur de DVD portable lit les disques vidéonumériques conformes au
standard universel DVD-Vidéo. Vous pourrez désormais grâce à lui apprécier
pleinement les films de long métrage avec une qualité d'image digne du cinéma et
un son stéréo ou multicanal (selon le disque et votre réglage de lecture).
Les caractéristiques uniques du DVD-Vidéo, comme la sélection de la langue de
doublage et celle des sous-titres, ainsi que les différents angles de caméra (à
nouveau en fonction du disque mis en place) sont toutes présentes.
En outre, la fonction de verrouillage du disque de Philips permet aux parents de
sélectionner les disques que leurs enfants pourront regarder.
Vous verrez comme la fonction de réglage à l'écran, l'afficheur du lecteur et la
télécommande facilitent l'utilisation du lecteur de DVD.
Déballage de l'appareil
Vérifiez et identifiez tout d'abord le contenu de l'emballage de votre lecteur de
DVD-Vidéo qui doit être composé comme suit :
• Lecteur de DVD portable • Télécommande
• Adaptateur allume-cigares (12V) • Adaptateur CA/CC
• Piles rechargeables • Mode d'emploi
• Garantie • Câble AV
• Câble S-Vidéo • Câble vidéo composantesj
• Sacoche de transport (disponibilité selon les régions)
Disposition
• Disposez le lecteur sur une surface plate et rigide.
• Veillez à ne pas le placer à proximité de sources de chaleur, ni au soleil direct.
• Si le lecteur de DVD-Vidéo ne peut lire correctement les CD/DVD, nettoyez la
lentille avec un disque de nettoyage spécial avant de porter l'appareil à réparer.
D'autres méthodes de nettoyage peuvent détruire la lentille.
• Gardez toujours le couvercle du disque fermé pour éviter que la poussière ne
se dépose sur la lentille.
• De la buée peut se former sur la lentille lorsque l'appareil passe rapidement d'un
environnement froid à un environnement chaud. Dans ce cas, il est impossible
de lire un CD/DVD et il faut attendre que l'humidité s'évapore.
APERÇU DES FONCTIONS
Face avant du lecteur ( voir figure 1)
5 POWER/CHG ......Voyant d'alimentation et de charge
IR ..........................Capteur infrarouge pour la télécommande
Face gauche du lecteur ( voir figure 1)
6 ON . POWER . OFF .....Permet la mise sous/hors tension du lecteur
7 ........... Prise écouteurs
Face droite du lecteur ( voir figure 1)
8 VOLUME F .............Augmentation / réduction du volume
9 A/V OUT....................... Sortie audio/vidéo
0 A/V IN........................... Entrée audio/vidéo
! DIGITAL AUDIO OUT Sortie audio numérique
@ S-VIDEO.......................Sortie S-vidéo
# COMPONENT VIDEO.Sortie Vidéo composantes
(Vidéo composantes)
$ DC IN 9V....................Prise d'alimentation
FONCTIONS SPÉCIALES DES DISQUES DVD-VIDÉO
Vérification du contenu des disques DVD-Vidéo : Menus.
Il est possible d'inclure sur le disque des menus de sélection pour
les titres et les chapitres.
La fonction de menu du DVD vous permet d'effectuer des choix à partir de ces
menus. Appuyez sur la touche chiffrée appropriée ou utilisez les touches
3, 4, 1, 2 pour mettre votre sélection en surbrillance et appuyez sur OK.
Menu du disque
Appuyez sur MENU. Le menu peut mentionner, par
exemple, les angles de caméra, les langues de doublage
et de sous-titres, ainsi que les chapitres du titre concerné.
Angle de caméra
Si le disque comporte des séquences enregistrées à partir
d'angles de caméra différents, une icône spéciale apparaît et
propose le nombre d'angles disponibles, ainsi que l'angle
actuellement présenté. Vous pouvez alors, si vous le désirez,
changer l'angle de la caméra.
Appuyez plusieurs fois sur ANGLE jusqu'à atteindre
l'angle de vue souhaité.
Pour revenir à l'angle de vue normal, appuyez plusieurs fois sur
ANGLE jusqu'à ce que plus aucun message relatif à l'angle ne s'affiche.
Modification de la langue de doublage
Appuyez sur LANGUAGE. Si le disque actuel offre plusieurs
options de langue, celles-ci apparaissent à l'écran.
Appuyez plusieurs fois sur LANGUAGE (LANGUE)
jusqu'à atteindre la langue souhaitée.
Langue des sous-titres
Appuyez sur SUBTITLES. Si le disque actuel offre plusieurs
options de sous-titrage, celles-ci apparaissent à l'écran.
Appuyez plusieurs fois sur SUBTITLES (SOUS-TITRES)
jusqu'à atteindre l'option de sous-titrage souhaitée.
FONCTIONS GÉNÉRALES
Ralenti
Appuyez plusieurs fois sur > pour afficher les options de ralenti suivantes :
x 1 1/2 x 5* 1/2 x en arrière
x 2 1/4 x 6* 1/4 x en arrière
x 3 1/8 x 7* 1/8 x en arrière
x 4 1/16 x 8* 1/16 x en arrière
Appuyez sur OK ou 2 pour reprendre la lecture. *pour DVD uniquement
Modification de la sortie audio
Appuyez plusieurs fois sur AUDIO pour afficher les options audio suivantes :
x 1 Mono gauche x 2 Mono droit
x 3 Mono mixte x 4 Stéréo
ZOOM
La fonction de zoom permet d'agrandir l'image vidéo et de faire un panoramique
sur l'image agrandie. Appuyez plusieurs fois sur ZOOM pour sélectionner une
des options de zoom suivantes :
Zoom x 1 2X Zoom x 2 3X
Zoom x 3 4X Zoom x 4 1/2
Zoom x 5 1/3 Zoom x 6 1/4
Zoom x 7 affichage normal
Suppression du son
Appuyez sur MUTE (SUPPRESSION DU SON) pour
désactiver le volume du lecteur. Appuyez de nouveau
sur MUTE (SUPPRESSION DU SON) pour le réactiver.
Répétition
Appuyez plusieurs fois sur REPEAT (RÉPÉTER) pour
afficher les options de répétition suivantes :
Actions de DVD Actions de VCD
x 1 répète le chapitre répète la piste
x 2 répète le titre répète tout
x 3 répète tout annule la répétition
x 4 annule la répétition
Français APERÇU DES FONCTIONS
Commandes de l’unité principale ( voir figure 1)
1 3, 4, 1, 2..........Déplacement du curseur (haut, bas, gauche, droite)
OK .........................Pour accepter la sélection du menu
2 OSD.......................Accès au menu de réglage à l'écran ou sortie de ce menu
MENU .................Accès au menu d'un disque DVD
VIDEO OUT .........Sélection du format vidéo
– COMPONENT OUT(YPBPR)
– COMPONENT OUT(YCBCR)
– A/V ou S-VIDEO OUT
– A/V IN (AUX)
MONITOR ............Sélection de l'affichage
(Moniteur) Pour régler la luminosité au moyen de 12
Pour régler les couleurs au moyen de 12
Pour régler le format d'image sur 16:9 ou 4:3 au moyen
de 12
SOUND ...............Activer/désactiver son Virtual Surround
3 ;... .........................Suspend la lecture
2............................Commence / reprend la lecture
9............................Appuyer deux fois pour interrompre la lecture
J( / §... ...........Pour les chapitres, pistes ou titres précédents (J( ) ou
suivants (§)
5 / 6... ..............Recherche en arrière (5 ) ou recherche en avant (6)
4 0 OPEN...............Pour ouvrir le couvercle et insérer ou retirer le disque
TÉLÉCOMMANDE
Télécommande ( voir figure 2)
1 3, 4, 1, 2..........Déplacement du curseur (haut, bas, gauche, droite)
OK .........................Pour accepter la sélection du menu
2 VOL+ / -................Augmentation/réduction du volume
3 J( / §... ...........Pour les chapitres, pistes ou titres précédents (J( ) ou
suivants (§)
;... .........................Suspend la lecture
2............................Commence / reprend la lecture
9............................Appuyer deux fois pour interrompre la lecture
5 / 6... ..............Recherche en arrière (5 ) ou recherche en avant (6)
4 OSD.......................Accès au menu de réglage à l'écran ou sortie de ce menu
. ..........................Ralenti
5 AUDIO ..................Sélection de la langue du doublage
ZOOM...................Agrandit l'image vidéo
6 A > B.....................Répétition séquence
PLAY-MODE ........Sélectionne les options d'ordre de lecture
7 0 - 9.......................Pavé numérique
8 MUTE....................Activation / désactivation de la sourdine
REPEAT ................Répétition chapitre, plage, titre, disque
9 RETURN ...............Pour accéder à la page du menu VCD
ANGLE..................Permet de choisir l'angle de caméra du DVD
0 SUBTITLE ............Sélection de la langue du doublage
LANGUAGE .........Sélection de la langue
! MENU...................Affiche la page MENU
@ SETUP ..................Affiche le menu SETUP (CONFIGURATION)
# Port infrarouge
$ Compartiment de la batterie
FONCTIONS DE BASE
Allumage pour le réglage de la langue de l'affichage à l'écran (OSD)
L'anglais est la langue par défaut de l'affichage à l'écran de votre lecteur.
Vous avez le choix entre les langues d'affichage suivantes : anglais, français,
espagnol, allemand, chinois simplifié ou chinois traditionnel.
Pays Options de langue OSD
Européens Anglais, Français, Espagnol, Allemand
Américains Anglais, Français, Espagnol
Asie-Pacifiques Anglais, Chinois Traditionnel, Chinois Simplifié
1
Réglez l'interrupteur POWER (ALIMENTATION) sur ON (MARCHE) pour allumer
le lecteur
.
2 Appuyez sur SET UP (CONFIGURATION)
pour afficher le menu d'installation.
3 Sélectionnez GENERAL SETUP (RÉGLAGES
GÉNÉRAUX), puis appuyez sur OK.
4 Déplacez le curseur et sélectionnez OSD LANG
(LANGUE OSD), puis appuyez sur 2pour
sélectionner les options de langue OSD.
5 Sélectionnez votre langue et appuyez sur OK.
Mise en place des disques et mise sous tension
1
Appuyez sur la touche OPEN (OUVRIR) pour ouvrir le tiroir du disque.
2 Posez le disque de votre choix dans le tiroir de chargement, face comportant
l'étiquette orientée vers le haut (même s'il s'agit d'un disque DVD double face).
Assurez-vous qu'il est correctement mis en place dans l'évidement prévu.
3 Repoussez douccement le tiroir pour le refermer.
4 Réglez l'interrupteur
POWER
(ALIMENTATION) sur
ON
(MARCHE)
pour allumer le lecteur.
ASTUCE :
Un bruit mécanique normal se fait entendre au cours de la lecture.
FONCTIONS DE BASE
Lecture d'un disque DVD-Vidéo
Après l'allumage, l'insertion du disque et la fermeture du couvercle, la lecture
commence automatiquement. L'écran indique le type de disque chargé. Vous
pouvez être invité à sélectionner une rubrique dans un menu. Utilisez les touches
3, 4, 1, 2 pour mettre votre sélection en surbrillance, puis appuyez sur OK.
Remarque: Les films DVD étant en général mis en vente à différents moments
dans les diverses régions du monde, tous les lecteurs sont dotés d'un code de
zone géographique et les disques peuvent avoir un code régional en option.
Si vous insérez un disque doté d'un code de région différent de celui de votre
lecteur, vous verrez apparaître sur l'écran un message concernant le code de
région. Le disque ne pourra pas être lu et vous devrez le retirer du lecteur.
Lecture d'un disque CD-Audio ou CD-Vidéo
• Après l'allumage, l'insertion du disque et la fermeture du couvercle, l'écran affiche
le type de disque chargé et des informations sur son contenu. Appuyez sur 2
pour commencer la lecture.
• Pendant la lecture d'un VCD via MTV/karaoké, utilisez les touches numérotées
(0~9) pour sélectionner la piste, puis appuyez su 2 ou OK pour lancer la
lecture. Appuyez sur RETURN pour revenir au menu de sélection.
Lecture d'un disque DivX
®
• Philips vous fournit le code d'enregistrement DivX
®
VOD (Video On Demand)
permettant de louer et d'acheter des vidéos via le service DivX
®
VOD. Pour
plus d'informations, visitez le site Web à l'adresse www
.divx.com/vod.
• Sélection du service DivX
®
VOD via le menu SETUP (Configuration).
• Le code d'enregistrement s'affiche.
• Ce code d'enregistrement vous permet d'acheter ou de louer des vidéos via le
service DivX
®
VOD disponible sur le site Web www
.divx.com/vod. Suivez les
instructions, puis téléchargez la vidéo sur un CD-R en vue d'une lecture sur
le
lecteur de DVD.
ASTUCE :
Les vidéos téléchargées via le service DivX
®
VOD peuvent uniquement
être lues sur ce lecteur de DVD.
FONCTIONS DE BASE
Lecture de disque WMA/ MP3-CD
Les fonctions de lecture suivantes sont disponibles pour les CD-MP3/WMA.
Pour plus d'informations, reportez-vous aux sections correspondantes.
Réglage du volume, passage à la piste suivante, recherche, répétition,
lecture aléatoire, etc.
Utilisez les touches 3, 4, 1, 2 pour sélectionner votre dossier musical.
Appuyez sur OK pour lire.
Vous ne pouvez pas écouter les fichiers WMA protégés contre la copie.
Lecture de disque JPEG
Utilisez les touches 3, 4, 1, 2 pour sélectionner votre dossier d'image
Appuyez sur OK. Le lecteur bascule automatiquement en mode diaporama.
En mode plein écran, le lecteur affiche les autres fichiers JPEG situés dans le
dossier sélectionné.
• Utilisez 1, 2 pour faire pivoter l'image.
• Utilisez 3 pour retourner l'image verticalement.
• Utilisez 4 pour retourner l'image horizontalement
• En mode diaporama, appuyez sur MENU pour revenir à l'écran des dossiers.
• Appuyez sur 9 pour passer à l'aperçu du groupe..
• Utilisez 3, 4, 1, 2 pour sélectionner l'aperçu de l'image et accéder aux
fonctions à l'écran.
Remarque: Sauf indication contraire, toutes les opérations décrites sont
effectuées depuis la télécommande.
FONCTIONS GÉNÉRALES
Passage à un autre titre ou à une autre plage
Lorsqu'un disque comporte plus d'un titre ou d'une plage, vous pouvez passer d'un
titre à l'autre comme suit:
• Appuyez brièvement sur § pendant la lecture pour
passer au titre suivant ou à la plage suivante.
• Appuyez brièvement sur J( pendant la lecture pour
revenir au début du titre ou de la plage en cours.
• Pour aller directement sur un titre, une piste ou un chapitre, entrez le numéro
correspondant à l'aide des touches numériques (0-9).
Arrêt sur image et lecture image par image
Appuyez plusieurs fois sur ; pour afficher les options
d'arrêt sur image et d'image par image suivantes :
; x 1 Pause / arrêt sur image
; x 2 ;2 apparaît sur l'écran
Lorsque l'icône ;2 s'affiche à l'écran, appuyez plusieurs fois sur ; pour une
lecture image par image.Appuyez sur OK pour reprendre la lecture.
Recherche
Appuyez plusieurs fois sur 6 pour afficher les options de recherche en avant
suivantes: Appuyez plusieurs fois sur 5 pour afficher les options
de recherche en arrière suivantes :
56
2 X en arrière 2 X en avant
4 X en arrière 4 X en avant
8 X en arrière 8 X en avant
16 X en arrière 16 X en avant
32 X en arrière 32 X en avant
Vitesse normale Vitesse normale
Appuyez sur OK ou 2 pour reprendre la lecture.
FONCTIONS GÉNÉRALES
Répétition A > B
Pour répéter une séquence d'un titre ou la lire en boucle :
• Appuyez sur A > B au point de départ choisi ;
A apparaît sur l'écran.
• Réappuyez sur A > B au point final choisi ;
AB apparaît sur l'afficheur et la répétition de la séquence commence.
• Appuyez de nouveau sur A > B pour quitter la séquence.
Modes de lecture
Appuyez plusieurs fois sur PLAY MODE (MODE DE LECTURE) pour afficher les
options d'ordre de lecture suivantes :
x 1 Lecture aléatoire x 2 Aléatoire
x 3
Programmation
Utilisez (0-9) et OK pour introduire des réglages spécifiques.
Augmentation / réduction du volume
• Appuyez sur la touche +/- pour augmenter ou
diminuer le volume à l'aide de la télécommande ou
• Utilisez le bouton rotatif situé sur le côté droit
de l'appareil.
Moniteur (commande de l'unité principale)
Appuyez plusieurs fois sur MONITOR (MONITEUR)
et utilisez 1 / 2 pour régler : la luminosité, la couleur et le
mode d'affichage (normal ou plein écran).
Son (commande de l'unité principale)
Appuyez plusieurs fois sur la touche SOUND pour régler le
son Virtual Surround.
PRÉSENTATION GÉNÉRALE
Introduction
Ce manuel fournit les instructions de base permettant d'utiliser ce lecteur de
DVD. Toutefois, certains disques DVD sont produits de manière à nécessiter une
utilisation spécifique ou ne permettent qu'une utilisation limitée pendant la
lecture. Dans ces cas, il se peut que le lecteur ne réagisse pas à toutes les
commandes. Veuillez alors vous reporter aux instructions du disque.
Lorsque le symbole apparaît sur autorisée par le lecteur ou par le disque.
Télécommande
• Sauf indication contraire, toutes les opérations peuvent être effectuées à l'aide
de la télécommande. Orientez toujours la télécommande directement vers le
lecteur en vous assurant qu'il n'y a pas d'obstacles sur le trajet du faisceau
infrarouge.
• Les touches correspondantes sur la façade du lecteur peuvent aussi être
utilisées.
Navigation dans les menus
• Votre lecteur dispose d'un système intuitif de navigation de menus qui vous
guide tout au long des paramétrages et des opérations.
• Utilisez les touches de fonction pour activer ou désactiver les opérations
adéquates.
• Utilisez 3, 4, 1, 2 pour vous déplacer dans les menus.
• Appuyez sur OK pour confirmer votre choix.
GUIDE DE DÉPANNAGE
Symptôme Remède
Le disque ne peut – Assurez-vous que l'étiquette du disque est
être lu orientée vers le haut.
– Nettoyez le disque.
– Vérifiez si le disque est défectueux en
essayant avec un autre disque.
Le lecteur ne réagit pas – Orientez la télécommande directement vers
à la télécommande le capteur situé en façade du lecteur. Évitez
tout obstacle pouvant interféfer avec le trajet
du signal. Vérifiez ou remplacez les piles.
Image déformée ou – Utilisez uniquement des disques dont le
image N/B avec disques format est compatible avec celui du
DVD-Vidéo téléviseur utilisé (PAL/NTSC).
Absence de son par – Vérifiez les branchements numérique.
la sortie numérique – Vérifiez dans le menu des réglages que la
sortie numérique est activée.
Le lecteur ne répond – Ces commandes ne sont pas autorisées par
pas à toutes les le disque.
commandes pendant – Consultez les instructions du disque.
la lecture
Le lecteur chauffe – La surface du lecteur chauffe lorsque celui-ci
est utilisé pendant une période prolongée.
Cette réaction est normale.
Cet appareil est conforme aux normes de la Communauté européenne
en matière d'interférences radio.
PRÉPARATION
Alimentation
Utiliser l'adaptateur
Connectez l'adaptateur fourni à l'appareil et
à la prise secteur (voir illustration).
ASTUCE
Pour éviter d'endommager le lecteur, éteignez-le avant de brancher/débrancher
l'adaptateur CA/CC.
Utilisation de l'adaptateur allume-cigares
Connectez l'adaptateur allume-cigares fourni (12V) à l'appareil et
à l'allume-cigares.
ASTUCE
•
Pour éviter d'endommager le lecteur, éteignez-le avant de brancher/débrancher
l'adaptateur de voiture
• Si vous connectez l'appareil à l'adaptateur allume-cigares, vérifiez
que la tension d'entrée de l'adaptateur est identique à celle de la voiture.
Télécommande
1 Enlevez le compartiment à piles. Retirez la
languette de protection en plastique (lors de la
première utilisation).
2 Insérez 1x pile lithium 3 V, CR2025, puis fermez le
compartiment.
Les piles contiennent des substances chimiques:
mettez-les au rebut en prenant toutes les précautions qui s'imposent.
L'emploi incorrect des piles peut causer des fuites électrolytiques et ce faisant,
contaminer le compartiment ou causer l'éclatement des dites piles.
Enlevez les piles si l'équipement n'est pas utilisé pendant une période prolongée.
GÉNÉRALITÉS
Manipulation des disques
• N'écrivez jamais et n'apposez jamais d'etiquette
sur un disque.
• Conservez les disques à l'abri de la lumière directe
du soleil et des sources de chaleur.
• Prenez toujours le disque par le bord et rangez-le
dans sa boîte après usage pour le protéger des
rayures et de la poussière.
• Lorsqu'un disque devient sale, nettoyez-le à l'aide
d'un chiffon en le frottant du centre vers la périphérie.
À propos de l'afficheur LCD
La fabrication de l'afficheur LCD repose sur une technologie de haute précision. Il
est toutefois possible de voir de petits points noirs et/ou brillants (rouges, bleus,
verts) apparaître sur l'afficheur LCD. Ce phénomène est tout à fait normal et ne
constitue en aucun cas un dysfonctionnement de l'appareil.
Informations relatives à l'environnement
Nous n'avons pas utilisé de matériaux d'emballage non nécessaires.Vous pouvez
facilement séparer les matériaux d'emballage en éléments principaux: carton,
polystyrène extensible et polyéthylène.
L'appareil est constitué de matériaux qu'il est possible de recycler, s'il est
démonté par une société spécialisée. Veuillez avoir l'obligeance de respecter les
réglementations locales concernant la manière de se débarrasser des matériaux
d'emballage, piles épuisées et matériel usé.
Information sur le droit d'auteur
“DivX, DivX” Certified, and associated logos are trademarks of DivX Networks,
Inc. and are used under license.”
Les marques et noms de produits sont des marques commerciales appartenant à
leurs sociétés ou organisations respectives.
La duplication non autorisée et la distribution d'enregistrement à partir d'Internet
ou de CD / VCD / DVD viole la loi sur le droit d'auteur et les traités
internationaux
.
INTRODUCTION
Formats de disque acceptés
Outre les disques DVD-Vidéo, vous pourrez également visionner tous les
CD-Vidéo et CD audio (y compris les CD-R, CD-RW, DVD
±
R et les DVD
±
RW).
DVD-Vidéo
En fonction de leur contenu (film, clips vidéo, série dramatique, etc.),
ces disques peuvent comporter un ou plusieurs titres et chaque titre
peut être subdivisé en un ou plusieurs chapitres. Pour une lecture
aisée et pratique, le lecteur vous permet de passer d'un titre et d'un chapitre à l'autre.
CD-Vidéo
En fonction de leur contenu (film, clips vidéo, série dramatique,
etc.), ces disques peuvent comporter une ou plusieurs plages et
les plages peuvent présenter un ou plusieurs index, comme
indiqué sur le boîtier du disque. Pour une lecture aisée et
pratique, le lecteur vous permet de passer d'une plage et d'un
index à l'autre.
CD Audio / MP3 / WMA-CD
Les CD Audio / CD MP3/WMA comportent uniquement des plages
musicales. Ils peuvent être lus sur un système stéréo classique à
l'aide des touches de la télécommande et/ou de l'unité principale
ou via le téléviseur à l'aide de l'affichage à l'écran (OSD).
CD contenant des fichiers JPEG
Ce lecteur permet également de visualiser des photos JPEG.
Disque DivX
®
vidéo
Ce lecteur permet également de visualiser des disques
contenant des vidéos au format DivX.
• Produit officiel DivX
®
Certified
TM
.
• Lit les contenus vidéo au format DivX
®
5, DivX
®
4, DivX
®
3 et DivX
®
VOD.
Zero Bright Dot
TM
Appréciez des images de la meilleure qualité possible, sans aucun
point brillant gênant sur l'écran LCD. Les écrans LCD présentent
généralement des imperfections appelées 'points brillants' par les
constructeurs. Jusqu'à peu, un nombre limité de tels points était
considéré comme un effet secondaire inévitable de la production en masse d'écrans
LCD. Avec les procédures de contrôle strict de la qualité mises en place par Philips
pour la fabrication de nos lecteurs de DVD portables, nos écrans LCD vous sont livrés
avec une tolérance nulle quant à ces points brillants. Tous nos lecteurs de DVD
portables bénéficient de la politique Zero Bright Dot
TM
de Philips pour vous garantir la
meilleure qualité possible en matière d'écran.
Le service de garantie peut changer d'une région à l'autre. Consultez votre
représentant Philips local pour plus d'informations.
GÉNÉRALITÉS
Alimentation
L'appareil fonctionne avec un adaptateur secteur, un adaptateur allume-cigares ou un boîtier
de piles rechargeables (le tout étant fourni).
• Contrôlez si la tension secteur indiquée sur la plaquette signalétique à la base de
l'équipement correspond à la tension secteur locale. Toute autre source d'alimentation
pourrait endommager l'adaptateur secteur et l'appareil.
• Ne touchez pas l'adaptateur secteur si vos mains sont mouillées : vous risquez une
électrocution.
• Si vous connectez l'appareil à l'adaptateur allume-cigares, vérifiez que la tension d'entrée
de l'adaptateur est identique à celle de la voiture.
• Débranchez l'adaptateur secteur de la prise ou le boîtier de piles si vous n'utilisez pas
l'appareil pendant un certain temps.
• Tenez la prise pour débrancher l'adaptateur secteur. Ne tirez pas sur le cordon
d'alimentation.
Sécurité et Maintenance
• Ne démontez pas l'appareil car les rayons laser pourraient entraîner des lésions oculaires.
Toute opération d'entretien doit être effectuée par un personnel qualifié.
• Débranchez l'adaptateur secteur si un liquide ou des objets ont pénétré dans l'appareil.
• Ne donnez pas de chocs au le lecteur. Les chocs violents et les vibrations importantes
peuvent provoquer des dysfonctionnements.
• Sécurité pour l'audition: Ecoutez à un volume modéré. Une écoute à un volume élevé peut
altérer l'audition.
• Important (pour les modèles fournis avec des écouteurs) : Philips garantit la conformité de
la puissance audio maximale de ses lecteurs, telle que définie par les organismes chargés
de la réglementation applicable, uniquement avec le modèle d'origine des écouteurs
fournis. Si un remplacement s'avère nécessaire, nous vous recommandons de contacter
votre revendeur afin de commander un modèle identique à celui d'origine fourni par
Philips.
• Sécurité routière: pour éviter tout risque d'accident, n'utilisez jamais l'appareil au volant
ou à vélo.
• Ne pas exposer l'appareil à une chaleur excessive causée par un appareil de chauffage ou au
rayonnement direct du soleil.
• Cet appareil n'étant pas étanche, évitez de plonger le lecteur dans l'eau. Toute infiltration
d'eau risque d'endommager sérieusement l'appareil et d'entraîner la formation de rouille.
• Évitez d'utiliser des agents nettoyants contenant de l'alcool, de l'ammoniac, du benzène ou
des substances abrasives susceptibles d'endommager le lecteur.
• L'appareil ne doit pas etre exposé a des égouttements ou des éclaboussures. Ne posez
aucun élément pouvant etre source de danger sur l'appareil. (ex. des objets contenant du
liquide, des bougies allumèes).
• Ne touchez jamais le lentille du lecteur!
Remarque: La surface du lecteur chauffe s'il est utilisé pendant une période prolongée.
Cette réaction est normale.
PRÉPARATION
Branchement du boîtier de piles et mise en charge*
1 Éteignez l'appareil. Branchez le boîtier de piles
comme illustré.
2 Connectez l'adaptateur fourni à l'appareil et à la
prise secteur (voir illustration). Chargez les piles
jusqu'à ce que le voyant rouge s'éteigne (4,5 à 6,5
heures après la mise hors tension).
ASTUCE
• Il est normal que le boîtier de piles chauffe au
cours de la charge.
• s'affiche à l'écran lorsque les piles sont
faibles.
Retrait du boîtier de piles
1 Éteignez l'appareil.
2 Débranchez l'adaptateur secteur.
3 Retournez le lecteur.
4 Enfoncez l'interrupteur de verrouillage du boîtier
de piles.
5 Faites glisser le boîtier de piles comme illustré.
*Les piles ne sont rechargeables qu'un certain
nombre de fois, aussi aurez-vous peut-être à
les remplacer. La durée de fonctionnement des
piles et le nombre de charges possibles
dépendent de votre utilisation et des réglages.
POWER
ONON OFFOFF
POWERPOWER
ONON OFFOFF
POWER
ONON
POWERPOWER
ONON OFFOFF
OFFOFF
OPÉRATIONS À L'ÉCRAN
Outre l'utilisation des touches de la télécommande, vous pouvez modifier les
options de lecture du disque à partir de l'affichage à l'écran.
1 Appuyez sur OSD (Affichage à l'écran) lors de la lecture du disque.
Une liste de fonctions apparaît.
2 Utilisez les touches 3 4 pour mettre votre sélection en surbrillance.
Lorsque ces paramètres sont sélectionnés, appuyez sur OK pour :
FICHIER entrer le nombre de fichiers souhaité
TITRE entrer le nombre de titres souhaité
CHAPITRE entrer le nombre de chapitres souhaité
AUDIO sélectionner les options audio
SOUS-TITRES sélectionner les options de sous-titrage
ANGLE sélectionner les options d'angle de vue
HEURE DU FICHIER entrer l'heure de début pour la lecture du fichier
TEMPS TT entrer le point de départ de l'heure de lecture d'un titre
TEMPS CH entrer le point de départ de l'heure de lecture d'un titre
RÉPÉTER sélectionner les options de répétition
TIME DISP. sélectionner les options d'affichage de l'heure
3 Utilisez (0-9) pour introduire des réglages spécifiques.
4 Appuyez sur 1 pour annuler le réglage actuel ou revenir au niveau de menu
précédent.
5 Appuyez sur OSD (Affichage à l'écran) pour quitter.
OPÉRATIONS SETUP (CONFIGURATION)
Pour profiter de toutes les options de lecture, utilisez SETUP (CONFIGURATION)
pour affiner vos réglages. Utilisez les touches 3,4,1, 2 pour mettre votre
sélection en surbrillance, puis appuyez sur OK.
1 Appuyez sur SETUP. Une liste de fonctions apparaît.
2 Utilisez les touches 3 4pour mettre votre sélection en surbrillance.
Lorsque ces paramètres sont sélectionnés, appuyez sur OK pour:
RÉGLAGES GÉNÉRAUX sélectionner l'affichage et d'autres options
RÉGLAGES AUDIO sélectionner les options audio
PRÉFÉRENCES sélectionner les préférences de lecture
DÉFINITION MOT DE PASSE sélectionner les options de mot de passe
3 Appuyez sur 1 pour annuler le réglage actuel ou revenir au niveau de menu
précédent.
4 Appuyez su SETUP (CONFIGURATION) pour quitter
Réglages généraux
Lorsque ces paramètres sont sélectionnés, appuyez sur OK pour:
AFFICHAGE TV sélectionner le rapport d'affichage
TYPE TV sélectionner le standard vidéo du téléviseur externe
LANGUE OSD sélectionner la langue d'affichage
SPDIF Sortie sélectionner les options audio numériques
SS-TITRES sélectionner les options de sous-titres
MALENTENDANTS
ÉCRAN DE VEILLE sélectionner les options d'économiseur d'écran
Appuyez sur 1 pour annuler le réglage actuel ou revenir au niveau de menu
précédent.
OPÉRATIONS SETUP (CONFIGURATION)
Réglages audio
Lorsque ces paramètres sont sélectionnés, appuyez sur OK pour:
RÉGLAGES HAUT-PARLEURS sélectionner les options de haut-parleurs
RÉGLAGES DOLBY DIGITA sélectionner les options de son Dolby
ÉGALISEUR CANAL sélectionner les options d'égaliseur
PAGE DE PROCESSUS 3D sélectionner les options de son Surround
Appuyez sur 1 pour annuler le réglage actuel ou revenir au niveau de menu
précédent.
Préférences
Lorsque ces paramètres sont sélectionnés, appuyez sur OK pour:
AUDIO
sélectionner les options de langue de doublage
SOUS-TITRES sélectionner les options de sous-titrage
MENU DISQUE sélectionner les options de langue des menus du disque
PARENTAL
sélectionner les options parentales
DivX
®
VOD obtenir ID du DivX pour VOD
ÉCONOMIE D'ÉNERGIE active le mode économie d'énergie lorsque vous
utilisez la pile
PAR DÉFAUT restaurer les paramètres par défaut
Appuyez sur 1 pour annuler le réglage actuel ou revenir au niveau de menu
précédent.
Remarque: Les options parentales peuvent être sélectionnées uniquement lorsque
le mode mot de passe est désactivé.
Définition mot de passe
Lorsque ces paramètres sont sélectionnés, appuyez sur OK pour:
MODE MOT DE PASSE activer / désactiver le mode mot de passe
MOT DE PASSE modifier le mot de passe actuel (par défaut : 99999)
Appuyez sur 1 pour annuler le réglage actuel ou revenir au niveau de menu
précédent.
GUIDE DE DÉPANNAGE
En cas de difficultés d'utilisation du lecteur de DVD-Vidéo, veuillez tout d'abord
consulter cette liste de points à vérifier.
AVERTISSEMENT
N'essayez en aucun cas de réparer l'appareil vous-même, sous peine
d'invalider la garantie.
Dans le cas d'une anomalie de fonctionnement, commencez par vérifier les
points ci-dessous avant de donner votre appareil à réparer. Si vous ne
parvenez pas à résoudre le problème en suivant ces instructions, veuillez
consulter votre fournisseur ou votre centre SAV.
Symptôme Remède
Pas d'alimentation – Vérifiez que les deux fiches du câble
d'alimentation sont connectées
correctement.
– Vérifiez qu'il y a bien du courant à la prise
secteur en y branchant un autre appareil.
– Vérifiez que le boîtier de piles est inséré
correctement.
– Vérifiez que l'adaptateur allume-cigares est
branché correctement..
Image déformée – Vérifiez que le disque ne comporte pas de traces
de doigts et nettoyez le avec un chiffon doux en
partant du centre vers la périphérie.
– Parfois, une légère distorsion de l'image peut se
produire. Il ne s'agit pas d'un
dysfonctionnement.
L'image est complètement – Le réglage NTSC/PAL est peut-être erroné.
déformée /en noir et blanc Faites correspondre les réglages de votre
avec le menu du lecteur téléviseur et de votre lecteur.
Pas de son –
Vérifiez les branchements audio. Si vous
utilisez un amplificateur HiFi, essayez une
autre source sonore.
CARACTÉRISTIQUES TECHNIQUES
Dimensions 26 x 18 x 3.0 cm
10.2 x 7 x 1.2 pouces
Poids 1.13 kg / 2.48 lb
Alimentation CC 9V 2.2A
Consommation électrique 30W
Plage de température de 0 - 50°C (32 ~ 122°F)
fonctionnement
Longueur d'onde du laser 650nm
Système vidéo NTSC / PAL / AUTO
Bande passante 20Hz ~ 20KHz ± 1dB
Rapport signal sur bruit ≥ 85dB
Distorsion du son + bruit ≤ -80(1KHz)
Séparation des canaux ≥ 85dB
Gamme dynamique ≥ 80dB
Sortie
Sortie audio (audio analogique) Niveau de sortie: 2V ± 10%
Impédance de charge: 10KΩ
Sortie vidéo. Niveau de sortie: 1Vp - p ± 20%
Impédance de charge: 75Ω
Dans un souci constant d'amélioration de ses produits, PHILIPS
se réserve le droit de modifier le design et les caractéristiques
de ce produit à tout moment.
Les modifications non autorisées par le fabricant peuvent annuler
le droit des utilisateurs à utiliser cet appareil.
Tous droits réservés.
ATTENTION
L’utilisation des commandes ou réglages ou le non respect des
procédures ci-incluses peuvent se traduire par une exposition
dangereuse à l’irradiation.
Important notes for users in the UK
Mains plug
This apparatus is fitted with an approved 13 Amp plug. To change a
fuse in this type of plug proceed as follows:
1. Remove fuse cover and fuse.
2. Fix new fuse which should be a BS1362 5 Amp, A.S.T.A. or BSI
approved type.
3. Refit the fuse cover.
If the fitted plug is not suitable for your socket outlets, it should be cut
off and an appropriate plug fitted in its place. If the mains plug
contains a fuse, this should have a value of 5 Amp. If a plug without a
fuse is used, the fuse at the distribution board should not be greater
than 5 Amp.
Note: The severed plug must be disposed of to avoid a possible shock
hazard should it be inserted into a 13 Amp socket elsewhere.
How to connect a plug
The wires in the mains lead are coloured with the following code: blue
= neutral (N), brown = live (L). As these colours may not correspond
with the colour markings identifying the terminals in your plug, proceed
as follows:
• Connect the blue wire to the terminal marked N or coloured black.
• Connect the brown wire to the terminal marked L or coloured red.
• Do not connect either wire to the earth terminal in the plug, marked
E (or e) or coloured green (or green and yellow).
• Before replacing the plug cover, make certain that the cord grip is
clamped over the sheath of the lead - not simply over the two wires.
Copyright in the U.K.
Recording and playback of material may require consent. See Copyright
Act 1956 and The Performer’s Protection Acts 1958 to 1972.
✔
✔
✔
✔
✔
✔
✔
✔
✔
✔
PRÉPARATION
Connexions
Connexion des écouteurs
Connectez les écouteurs à la prise PHONE 1 ou
PHONE 2 de votre appareil.
Connexion d'un équipement auxiliaire
• Éteignez votre appareil avant de le connecter à tout équipement auxiliaire.
• Vous pouvez connecter le lecteur à un téléviseur ou à un amplificateur
pour lire un DVD ou jouer un karaoké.
A/V OUT
Appuyez sur la touche VIDEO OUT du lecteur
de DVD pour sélectionner A/V ou
S-VIDEO OUT
A/V IN
Appuyez sur la touche VIDEO OUT du lecteur de
DVD pour sélectionner A/V IN (AUX)
Connexion Vidéo Audio (Gauche) Audio (Droite)
Coleur Jaune Blanc Rouge
blanc
rouge
jaune
blanc
rouge
jaune
PREPARATIONS
Digital Audio Out
S Video
On the DVD player panel, press VIDEO OUT
to select A/V OR S-VIDEO OUT
Component Video
On the DVD player panel, press VIDEO OUT
to select COMPONENT OUT (YPBPR) or
COMPONENT OUT (YCBCR)
TIP
• You can also make use of the COAXIAL jack for digital audio output.
• Please refer to the user manuals of your additional equipment for more
information about connection.
• Players support NTSC/PAL/AUTO television sets.
Yellow
White
White
Red
Red
Green
Blue
Red
✔
PRÉPARATION
Sortie audio numérique
S-Vidéo
Appuyez sur la touche VIDEO OUT du lecteur
de DVD pour sélectionner A/V ou
S-VIDEO OUT
Vidéo composantes
Appuyez sur la touche VIDEO OUT du lecteur
de DVD pour sélectionner COMPONENT OUT
(YPBPR) ou COMPONENT OUT (YCBCR)
ASTUCE
• Vous pouvez également utiliser la prise COAXIAL pour la sortie audio
numérique.
• Reportez-vous au manuel d'utilisation de votre équipement auxiliaire pour plus
d'informations sur la connexion.
• Les lecteurs sont compatibles avec les téléviseurs NTSC/PAL/AUTO.
jaune
Blanc
Rouge
Blanc
Rouge
Vert
Bleu
Rouge
✔
PREPARATIONS
Connections
Connecting headphones
Connect the headphones into the PHONE 1 or the
PHONE 2 jack of your set.
Connecting additional equipment
• Turn off your set before connecting to any additional equipment.
• You can connect the player to a TV or an amplifier to enjoy DVDs or karaoke.
AV OUT
On the DVD player panel, press VIDEO OUT to
select A/V OR S-VIDEO OUT
A/V IN
On the DVD player panel, press VIDEO OUT to
select A/V IN (AUX)
Connection Video Audio (Left) Audio (right)
Color Yellow White Red
White
Red
Yellow
White
Red
Yellow
FRONT VIEW
REAR VIEW
pet1002 (A) 12/29/05 4:49 PM Page 1


