


C8314A Size: A4
OVERVIEW
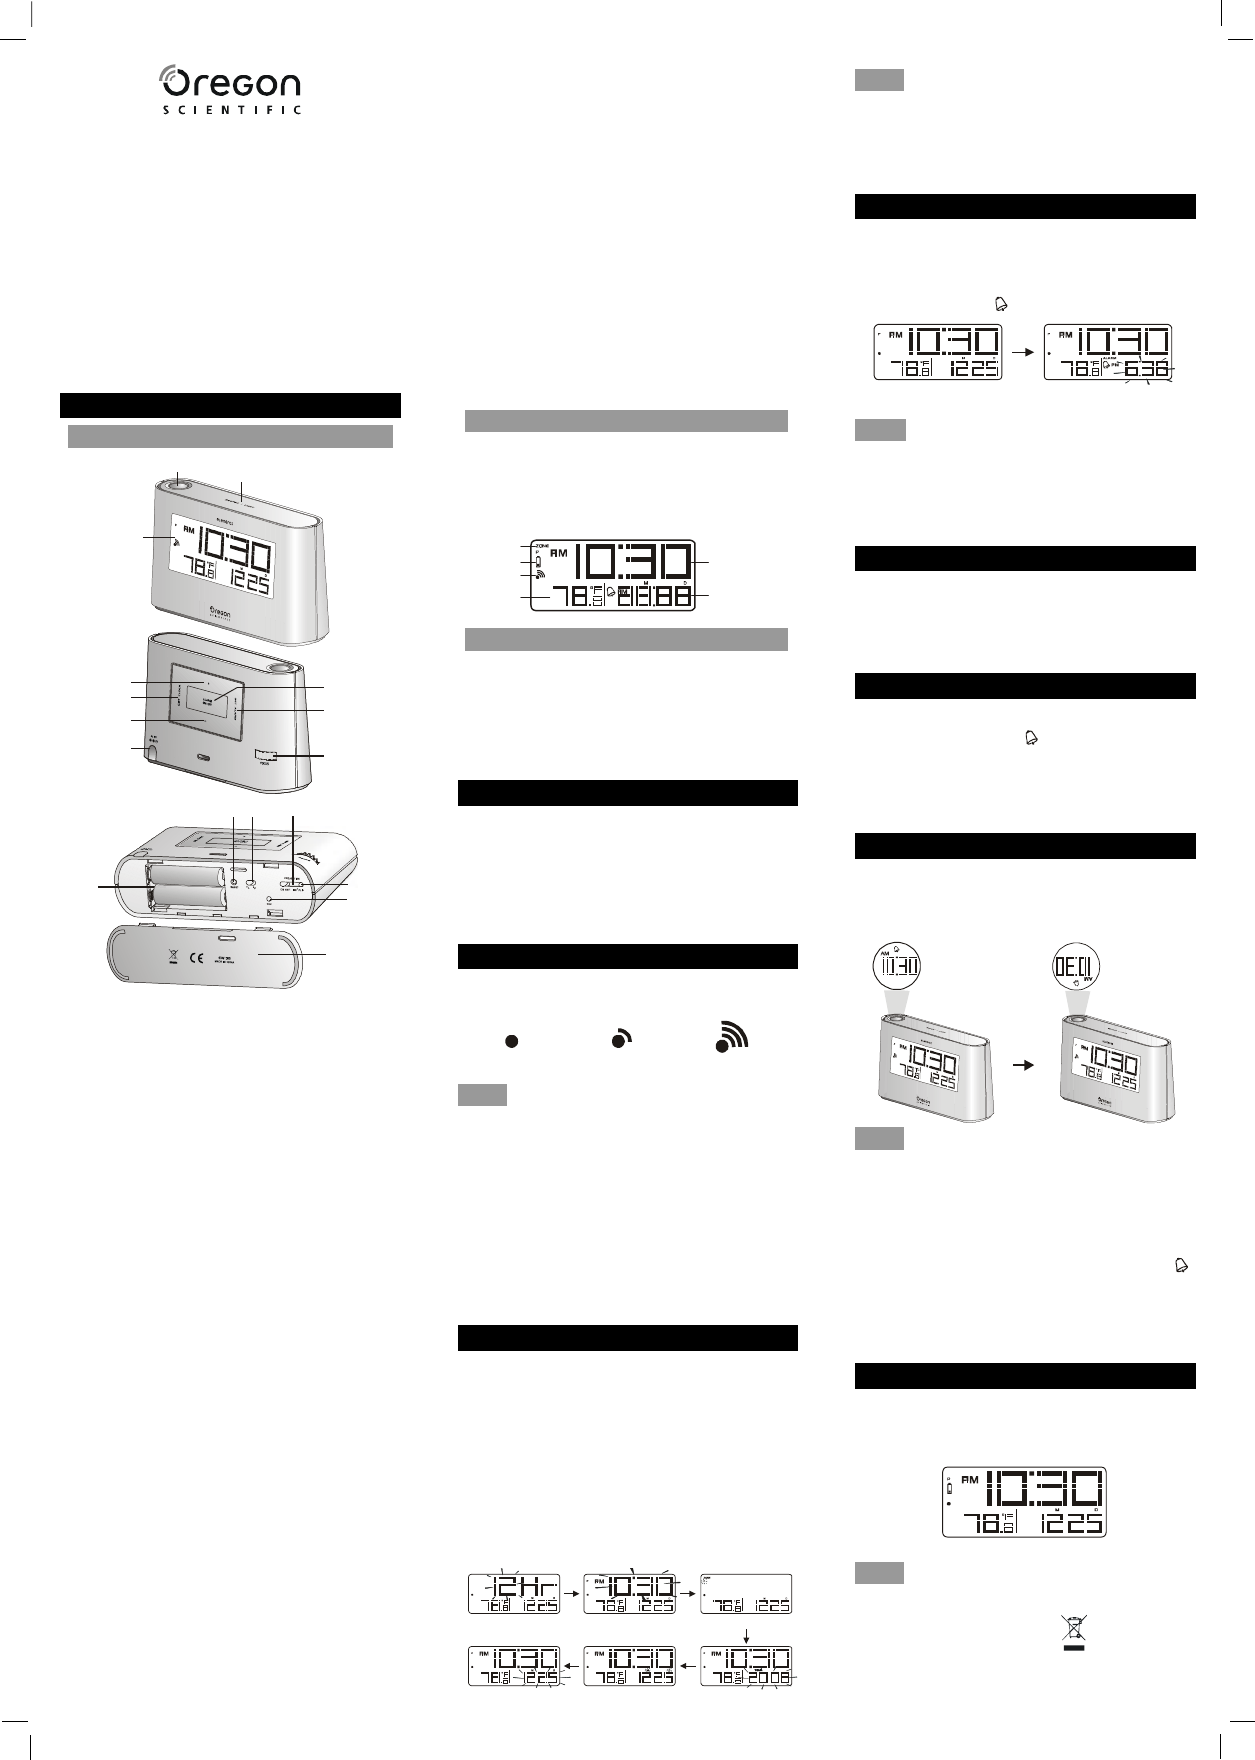
RECEIVER
1.Projector:
• Use it to project the time.
2.SNOOZE/LIGHT key:
• In normal time mode, press it once to turn on
the backlight for 5 seconds.
• Press it to silence the current alarm when it is
going and enter the snooze mode for 8 minutes.
3.LCD display:
• Displays time, indoor temperature and date.
4.+ key:
• In time setting mode, press it to increase the
setting values.
5.SET CLOCK key:
• In normal time mode, press it once to enter the
normal time setting mode.
• In normal time setting mode, press it to step
the setting items. Press and hold it to exit the
setting mode in any step.
6.- key:
• In time setting mode, press it to decrease the
setting values.
7.DC jack:
• Plug DC adaptor to power the clock.
8.ALARM ON/OFF key:
• Press it once to turn on the backlight and display
the alarm time for 5 seconds.
• Press it again to turn on/off the alarm.
9.SET ALARM key:
• Press it once to turn on the backlight for 5
seconds, and press it again to enter the alarm
time setting mode.
• In alarm time setting mode, press it to step the
setting items.
10.FOCUS turning knob:
• Focus the projected image.
RECEPTION OF RADIO CONTROLLED TIME SIGNAL
The time and calendar are radio-controlled. The current
time and calendar are automatically synchronized with
the atomic clock signal from Fort Collins, Colorado.
When used for the first time (after inserting batteries
or pressing “RESET” key), the clock will start to search
for the atomic clock signal and the signal reception
icon will flash for 5 minutes.
SIGNAL RECEPTION INDICATOR
The wave segment flashing means time signals are
being received. The signal quality could be classified
into 3 types:
Note
1. The unit will automatically search for the time
signal at 2:00am (3:00am or 4:00am is also
available if the signal is not received at 2:00am),
8:00am, 2:00pm, and 20:00 each day.
2. Always place the unit away from electrical
devices such as televisions, computers,
telephones, etc.
3. Avoid placing the unit on or next to metal plates.
4. If possible, place the unit next to a window.
Signal reception is greatly decreased when located
in closed areas like basements or metal buildings.
5. Do not start reception in moving vehicles or trains.
TIME AND CALENDAR MANUAL SETTING
If you are out of reach of the Radio Controlled sensor
or if the reception is not reachable, the time and calendar
can be set manually. As soon as the signal of sensor
is received again, the clock will automatically
synchronize with the exact time and calendar.
1. In normal time mode, press “SET CLOCK” key
once to enter the time setting mode.
2. Press “+” or “-” key to change the settings.
3. Press “SET CLOCK” to confirm. The setting order
is: 12/24-hr format, time, time zone offset, year,
day/month format, date.
4. Press “SET CLOCK” key to save and exit the
setting mode.
Note
1. During the setting period, press and hold “+” or “-”
key to speed up the change of settings.
2. The time zone indicators are abbreviated as
below: P=Pacific, M=Mountain, C=Central,
E=Eastern.
ALARM TIME SETTING
1. In normal time mode, press “SET ALARM” key
once to enter the alarm time setting mode.
2. Press “+” or “-” key to set hour/minute.
3. Press “SET ALARM” key to save and exit the
setting mode. “ ” indicates alarm is ON.
Note
1. The alarm will be automatically turned on when
you set the alarm time.
2. During the alarm time setting period, press and
hold “+” or “-” key to speed up the change of
settings.
USING ALARM FUNCTION
1. Follow the directions above to set the alarm
time.
2. In normal time mode, press “ALARM ON/OFF”
key once to display the current alarm time.
3. Press it again to turn alarm ON/OFF.
TO SILENCE THE ALARM
1. Press “SNOOZE/LIGHT” to silence the alarm
for 8 minutes. The “ ” will be flashing.
2. Press any other key to turn the alarm off and
activate it again after 24 hours.
3. If no key is pressed within 120 seconds, the
alarm will be turned off and be activated again
after 24 hours.
USING THE PROJECTOR
Slide the “PROJECTION ON/OFF” switch to turn on/
off the projection light. The projection light must be on
a dark background and within 1-4 meters (3 to 12 feet)
from the clock, see example below:
Note
1. Slide “PROJECTION ON/OFF” to turn on the
projection function.
2. Press “SNOOZE/LIGHT” to turn on the projector
for 5 seconds.
3. When using DC power adapter, the projector will
be turned on all the time.
4. If the alarm is set to go off, the alarm icon “ ”
will be projected.
5. Press “180 FLIP” to rotate the projected image
by 180°.
6. Turn “FOCUS” knob to focus the projected image.
BATTERY REPLACEMENT
If the low battery icon turns on next to time, replace
the main unit’s battery with 2 new AA batteries.
Note
Attention! Please dispose of the used unit or batteries
in an ecologically safe manner.
No signal Weak signal
Excellent signal
1
3
5
6
2
4
ALARM
Projection Alarm Clock
with Indoor Thermometer
Model: EW96
USER MANUAL
Thank you for your purchase of this Projection Alarm
Clock. Please read these instructions carefully and
keep the manual well for future reference.
The unit has a clear and easy-to-read display that
shows the indoor temperature, time and date.
This product is designed to synchronize its date and
time automatically once it is within range of the WWVB-
60 signal from the atomic clock in Fort Collins, Colorado.
12/24 Hr setting
Time setting
Time zone setting
Year setting MD/DM settingMonth-Date setting
Normal time mode
Alarm time setting
Low battery indicator
1
2
3
11
12
13
14
16
17
15
4
5
6
7
9
10
8
11.BATTERY COMPARTMENT:
• Accommodates 2 AA size batteries.
12.RESET key:
• Press it to return all values to default values.
• In case of malfunction, the unit may be required
to reset.
13.°C/°F slide switch:
• Slide it to switch between Celsius and Fahrenheit.
14.PROJECTION ON/OFF slide switch:
• Slide it to turn on/off the projector.
15.180° FLIP key:
• Press it to rotate the projected image by 180°.
16.RCC key:
• In normal time mode, press it once to receive
the RC signal for reception testing.
17.BATTERY DOOR
LCD DISPLAY
1. Time zone
2. Low battery indicator
3. Signal reception indicator
4. Indoor temperature
5. Time
6. Alarm time & Date
OPERATING THE MAIN UNIT
1. Remove the battery door and insert 2 new AA
size batteries as per the polarity information
marked on the battery compartment.
2. Press “RESET” key to restart the clock.
3. Slide “°C/°F” switch to select between Celsius
and Fahrenheit.
4. Replace the battery door.