


Touch-Control AM/FM Atomic Weather
Clock with Dual Alarm
Model: BARM699A
USER MANUAL
INTRODUCTION
Thank you for selecting the Oregon Scientific
TM
Touch-
Control AM/FM Atomic Weather Clock with Dual
Alarm (BARM699A). The main unit can support up
to 3 sensors. To purchase additional sensors, please
contact your local retailer.
NOTE Please keep this manual handy as you use
your new product. It contains practical step-by-step
instructions, as well as technical specifications and
warnings you should know about.
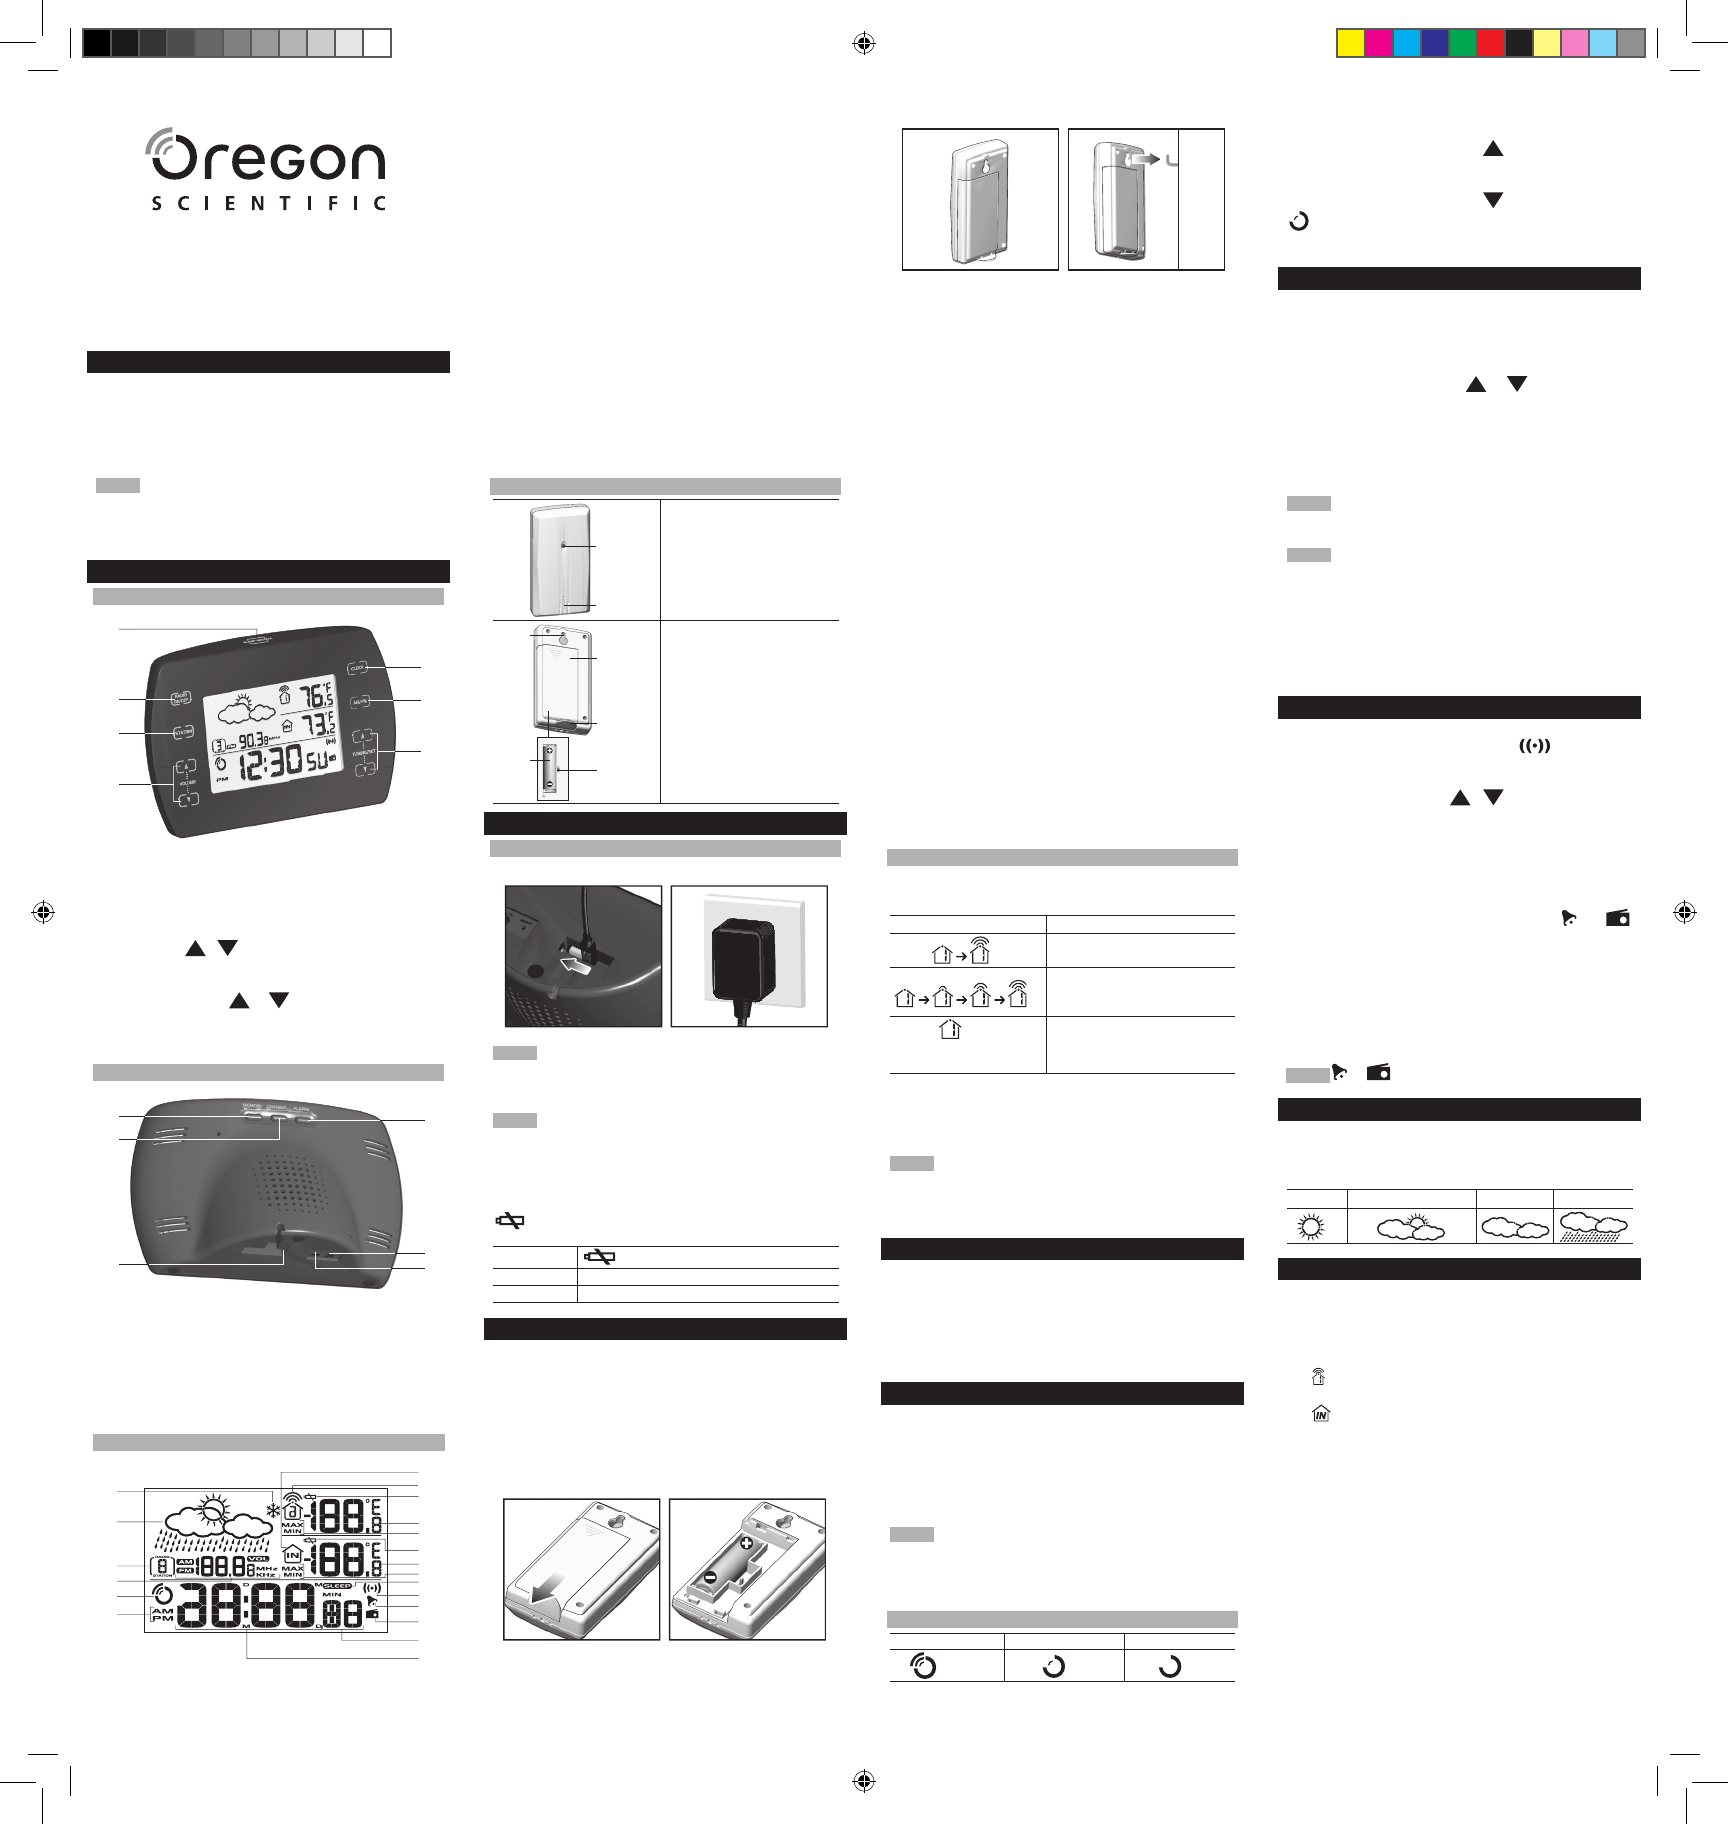
OVERVIEW
FRONT VIEW
1. SLEEP / SNOOZE: Activate snooze; set the sleep
timer
2. RADIO ON / OFF: Turn radio ON / OFF
3. STATION: Toggle between 16 preset radio channels;
save a channel
4. VOLUME / : Increase / decrease volume
5. CLOCK: Change setting / display
6. AM / FM: Toggle between AM and FM
7. TUNING / SET / : Increase / decrease
setting; activate / deactivate clock reception signal;
change radio frequency
BACK VIEW
1. MEMORY: View current, maximum and minimum
temperature
2. CHANNEL: Switch remote sensor display
3. Adapter socket
4. ALARM: View alarm status; set alarm
5. °C / °F: Select temperature unit °C / °F
6. RESET: Reset unit to default settings
LCD
1. Ice warning
1
5
6
7
2
3
4
1
4
5
6
2
3
1
8
7
9
10
13
14
15
16
17
18
20
19
11
12
2
3
4
5
6
2. Weather forecast
3. Preset radio station number
4. AM / FM station; radio frequency in MHz or KHz and
volume level
5. Radio-controlled clock reception icon
6. 12-hour clock
7. Indoor temperature display icon
8. Channel number and sensor reception status
9. Sensor low battery warning
10. Outdoor temperature reading
11. Maximum / minimum outdoor temperature reading
12. Main unit low battery warning
13. Indoor temperature reading
14. Maximum / minimum indoor temperature reading
15. Sleep function is activated
16. Alarm is displayed
17. Beep alarm is set
18. Radio alarm is set
19. US time zone, weekday or seconds
20. Time, alarm and date
REMOTE SENSOR
1. LED status indicator:
Blinks red during data
transmission
2. Ventilation duct
1. Wall mount
2. Battery compartment
3. Battery door
4. Table stand
5. CHANNEL switch
GETTING STARTED
POWER
Plug adapter into main unit.
NOTE This product may malfunction when radio
interference appears on the AC power line. The unit will
revert to normal operation when interference stops.
NOTE Install the remote sensor battery and plug in the
main unit. Press
RESET after each battery change. Do
not use rechargeable batteries. It is recommended that
you use alkaline batteries with this product for longer
performance.
shows when battery is low.
UNIT LOCATION
Main Indoor temperature area
Remote Outdoor temperature area
REMOTE SENSOR
The sensor collects temperature readings approx. every
40 seconds and sends them to the main unit. The main
unit can collect data from up to 3 sensors.
To set up the sensor
:
1. Slide open the battery door.
2. Insert the battery, matching the polarity (+ / -).
3. Select a channel. Make sure you use a different
channel for each sensor.
4. Close the battery compartment.
5. Secure the sensor in the desired location using the
wall mount or table stand.
12 3
CHANNEL
1
2
3
4
5
1
2
For best results:
•
Place the sensor out of direct sunlight and
moisture.
•
Do not place the sensor more than 30 meters (100
feet) from the main (indoor) unit.
•
Position the sensor so that it faces the main (indoor)
unit, minimizing obstructions such as doors, walls,
and furniture.
•
Place the sensor in a location with a clear view to
the sky, away from metallic or electronic objects.
•
Position the sensor close to the main unit during cold
winter months as below-freezing temperatures may
affect battery performance and signal transmission.
The transmission range may vary depending on many
factors. You may need to experiment with various
locations to get the best results.
Standard Alkaline batteries contain significant
amounts of water. Because of this they will freeze
in low temperatures of approximately -12°C (10°F).
Disposable Lithium batteries have a much lower
threshold for temperature with an estimated freezing
range of below -30°C (-22°F).
Wireless ranges can be impacted by a variety of factors
such as extremely cold temperatures. Extreme cold
may temporarily reduce the effective range between the
sensor and the base station. If the unit’s performance
fails due to low temperature, the unit will resume proper
functioning as the temperature rises to within the
normal temperature range (i.e. no permanent damage
will occur to the unit due to low temperatures).
SENSOR DATA TRANSMISSION
The reception icon shown in the outdoor temperature
area shows the status.
ICON DESCRIPTION
Main unit is searching for
the sensor(s)
A channel has been found
and signal is being
received
and “- -“ The sensor cannot be found.
(Outdoor temperature Search for the sensor or
area) check the battery
To search for a sensor
:
Simultaneously, press and hold
MEM and CHANNEL
for 2 seconds.
NOTE The sensor LED flashes when data is being
sent to the main unit. If the sensor signal is still not
found, check the battery, obstructions, and remote unit
location.
LIGHT TOUCH KEY
The touch keys used in this product have a key lock
function that prevents accidental changes to user
settings. When the clock keys have not been used in
the last minute, the key lock function is automatically
activated. Press any key once to disable the key lock
function and then operate the clock as usual.
CLOCK RECEPTION
This product is designed to synchronize its date and
time automatically once it is within range of the WWVB-
60 signal from the atomic clock in Boulder, Colorado.
The sensor collects the radio signals whenever it is
within 3219 km (2000 miles) of a signal.
NOTE Initial reception takes 2-10 minutes for first set
up or when
RESET is pressed. Once complete, the
reception icon will stop blinking. If the signal is weak, it
can take up to 24 hours to get a valid signal.
RECEPTION SIGNAL
STRONG WEAK NO SIGNAL
To enable and force a signal search:
Press and hold TUNING / SET for 2 seconds.
To disable the signal reception
:
Press and hold TUNING / SET for 2 seconds.
flashes when it is searching for the atomic clock
signal and disappears when it is disabled.
CLOCK
To manually set the clock make sure the clock signal
reception is disabled.
To manually set the clock
:
1. Press and hold
CLOCK for 2 seconds.
2. Press TUNING / SET
/ to change the
settings.
3. Press
CLOCK to confirm.
4. The setting sequence is: US time zone, 12 / 24
hour format, hour, minute, year, day / month format,
month, day, and display language.
NOTE The US time zone options are Pacific (PA),
Mountain (MO), Central (CE) and Eastern (EA).
NOTE The language options are (E) English, (F)
French, (D) German, (I) Italian, and (S) Spanish.
To switch the clock display
:
Press CLOCK to toggle between:
•
Clock with seconds
•
Clock with weekday
•
Calendar
ALARM
To set the alarm:
1. Press
ALARM to view the alarm. will show on
the display.
2. Press and hold
ALARM for 2 seconds.
3. Press TUNING / SET
/ to change the hour,
minute, beep or radio alarm. If you select the radio
alarm, press AM / FM and STATION to select the
band and station respectively.
4. Press
ALARM to confirm.
To activate or deactivate the alarm
:
Press ALARM when in the alarm display. or
appears when the alarm is set.
To silence the alarm
:
•
Press SNOOZE to silence it for 8 minutes.
OR
•
Press any key except SNOOZE to turn the alarm off
and activate it again after 24 hours.
NOTE or flashes when snooze is activated.
WEATHER FORECAST
This product forecasts the weather for the next 12 to 24
hours within a 19-31 mile (30-50 km) radius, with 70 to
75 percent accuracy.
SUNNY PARTLY CLOUDY CLOUDY RAINY
TEMPERATURE
To change the temperature measurement unit:
Press °C / °F on the bottom of the unit.
To view outdoor sensor(s) temperature readings
:
Press CHANNEL.
•
shows which remote sensor’s data you are
viewing.
•
is permanently displayed in the indoor
temperature area.
To auto-scan between sensors
:
Press and hold CHANNEL for 2 seconds. Each sensor’s
data is displayed for 3 seconds.
To end auto-scan
:
Press CHANNEL or MEMORY.
To toggle between current, minimum and maximum
records for the selected sensor:
Press MEMORY repeatedly.
To clear the records
:
Select the channel to clear the memory, then press and
hold MEMORY for 2 seconds.
BARM699A_EN_R5.indd 1 2/17/06 2:04:50 PM