Thank you for your purchase of the Onkyo speaker system.
Please read this manual thoroughly before using it.
Following the instructions in this manual will enable you to
obtain optimum performance and listening enjoyment from
your new speaker system.
Please retain this manual for future reference.
Before using this unit
The speaker cabinet is made of wood and is therefore
sensitive to extreme temperatures and humidity. Avoid
placing the speaker systems in locations subjected to direct
sunlight, or in smokey or in humid places, such as near an
air conditioner, humidifier, bathroom, or kitchen. Doing so
may result in damage to the speaker.
Place the unit on a rigid, level surface. Placing it on a
slanted surface or weak base not only may cause the unit to
fall, but also results in decreased sound quality.
Be sure to turn off your amplifier before connecting the
speaker system. Connecting them with the amplifier's power
on may result in damage to the amplifier or the speaker
system.
Keep water or other liquids away from the unit. If water is
spilled into the unit, not only the unit but also the speakers
themselves may be damaged.
Name and function of each part
Precaution on use
This speaker system can handle the specified input power
when it is used for ordinary music reproduction. If the
following abnormal signals are fed to the speaker, however,
an overcurrent may flow in the internal circuits, causing
burning or breakage of the wires even if the input power is
below the specified rating.
1. Noise produced when FM station is not tuned in
2. Sound produced when fast-forwarding cassette tape
deck
3. High-frequency sound generated by an oscillator, an
electronic musical instruments, etc.
4. Oscillating amplifier signals
5. Special test signals produced by audio checking CD, etc.
6. Sound produced when connecting or disconnecting audio
connection cables (Always turn off the amplifier’s power
before connecting or disconnecting cables.)
7. Howling when a microphone is used
Do not place magnetic objects such as screwdrivers and iron
parts near the speaker system since they use speakers with
strong magnets. Otherwise, the objects may be attracted,
causing injury or damaging the diaphragm.
Connection
Turn the sound volume to the minimum and turn OFF the
amplifier power switch (POWER) before connecting the speaker
cables.
The nominal impedance of this speaker system is 6
Ω
. Use only
amplifiers capable of handling this impedance.
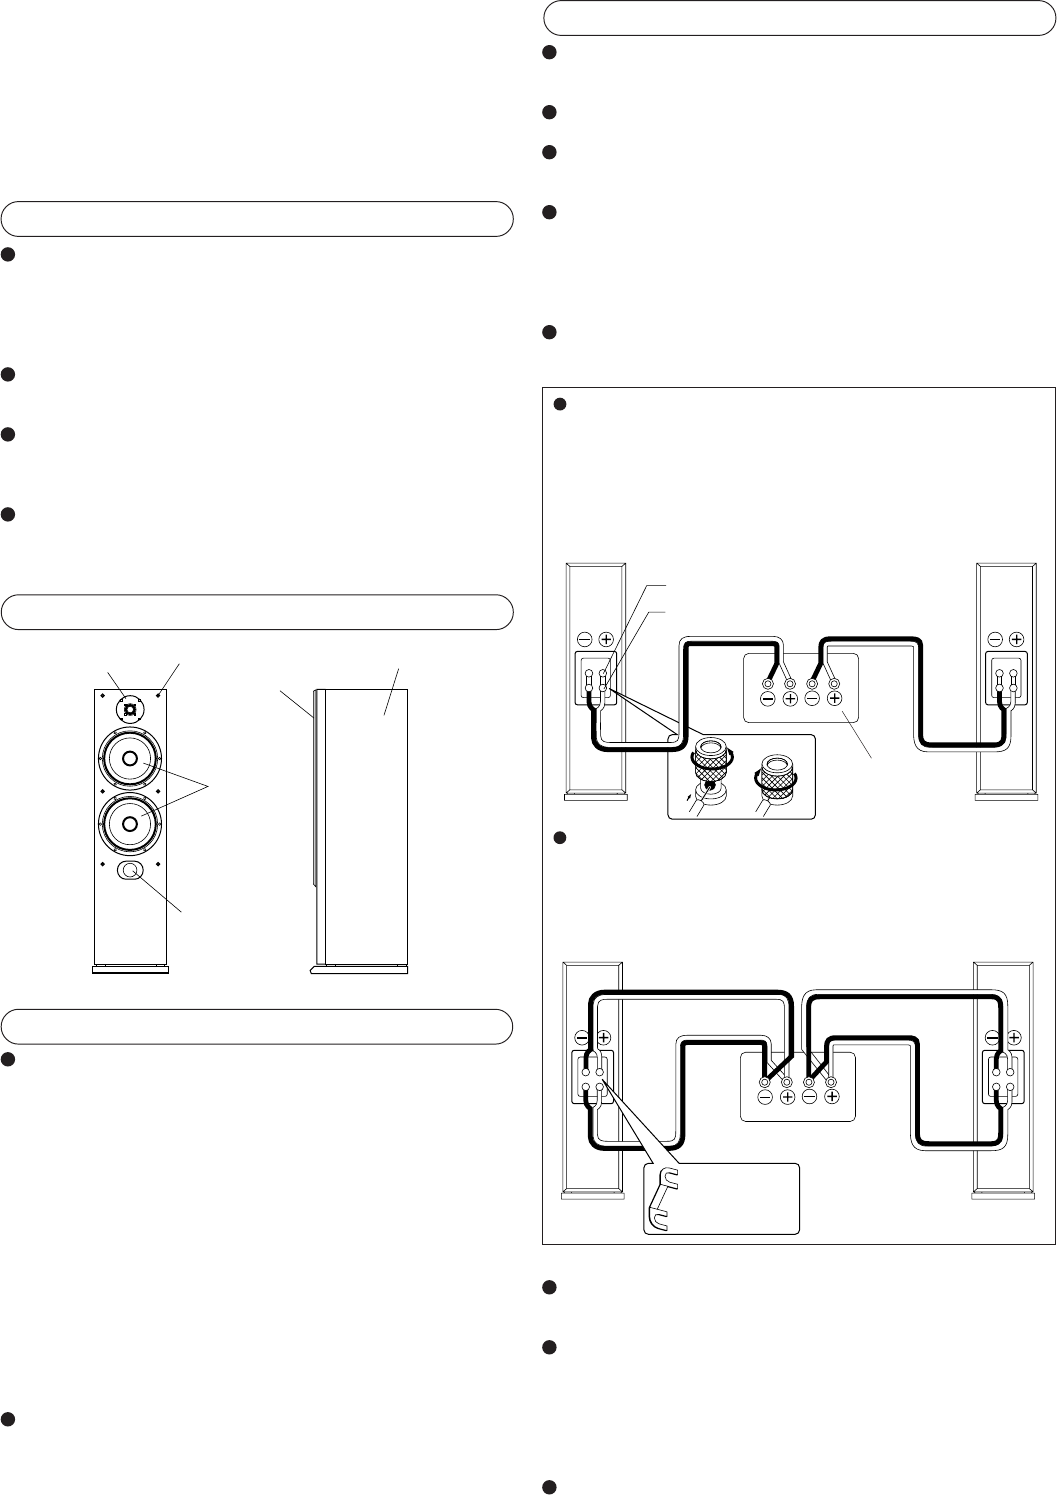
Use the supplied speaker cables to connect between speaker 's
binding posts and the amplifier's speaker terminals as illustrated
below.
Connect the speaker cables securely to the terminals, with the
core wires twisted properly. In this case, make sure that the core
wires do not touch each other. Note that a short circuit in core
wires may result in damage to the amplifier.
✩ This speaker system uses banana-plug compatible binding
posts.
Connect the Right and Left speakers (as viewed from the
listening position) to the amplifier's corresponding Right and Left
speaker terminals.
SKF-201
Front Speaker System
Before turning on the amplifier's power switch:
Make sure that the positive (+) and negative (–) speaker
cables do not contact each other. Otherwise, a short-circuit
may occur, causing damage to the amplifier.
Be sure to connect the speaker cables with correct polarity
(connect the speaker's positive (+) and negative (–) binding
posts with the amplifier's corresponding speaker terminals).
Reversed polarity results in impaired bass-range
reproduction, causing mislocalization of the sound image.
Also, be sure to connect the Right and Left speakers with
the amplifier's corresponding speaker terminals.
Pull lightly on the speaker cables to ensure that they are
connected firmly.
RL
RL
Ordinary connection (single-wiring)
1. Loosen the LOW-FREQUENCY binding post screws, with the
jumper bars attached.
2. Insert the speaker wires to the connection holes. Fasten the
screws securely again.
*To use banana-plug speaker cables, insert the banana plug
into the center hole of each binding post.
Note:
Make sure that the HIGH-FREQUENCY jumper bars are not loosened.
Bi-wiring connection (Remove the attached jumper bars.)
1. Using two sets of speaker cables, connect the HIGH FRE-
QUENCY and LOW-FREQUENCY binding posts independently
to your amplifier.
2. On the amplifier, connect the speaker cables to the speaker
output terminals paying close attention to maintain consistent
polarity (See below.).
Remove the
jumper bars.
Amplifier's speaker output
terminals
(Or AV amplifier's front
speaker output terminals)
Amplifier's speaker output terminals
(Or AV amplifier's front speaker output
terminals)
Cabinet
Grille
Grille plug holes
Woofer
Tweeter
Bass-reflex port
LOW-FREQUENCY binding post
HIGH-FREQUENCY binding post


