


18
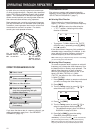
6 MEMORY CHANNELS
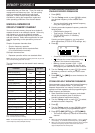
MEMORY CHANNEL GROUPS
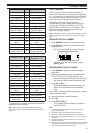
400 memory channels have been divided into
8 groups of 50. Group 0 contains memory channel
numbers 0 ~ 49, group 1 is 50 ~ 99, group 2 is 100 ~
149, and so on. You can categorize each group to
store similar data, same frequency bands or same
modes for ease of use.
#puorG lennahCyromeM #puorG lennahcyromeM
0puorG94~04puorG942~002
1puorG99~055puorG992~052
2puorG941~0016puorG943~003
3puorG991~0517puorG993~053
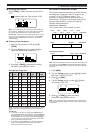
RECALLING A MEMORY CHANNEL USING
MEMORY GROUP FUNCTION
It is sometimes a tedious endeavor to scroll through
400 memory channels sequentially. However, using a
Group memory recall function, you can access your
desired memory channel numbers more quickly.
1 Press [MR] to enter Memory Recall mode.
2 While pressing and holding [LAMP], turn the
Tuning control to select a group.
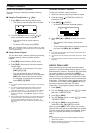
• Each click of the Tuning control, the lowest
memory channel number of each group is
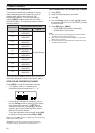
recalled. For example, if you have the following
memory channels that contain data:
#puorG ataDniatnoCtahtslennahCyromeM
0puorG0201510354
1puorG0516568789
2puorG301111321
3puorG251661
4puorG
5puorG062082
6puorG503223333543
7puorG993
Memory channels 0, 50, 103, 152, 260, 305, 399,
and then 0 are recalled sequentially while pressing
and holding [LAMP].
3 Release [LAMP] and turn the Tuning control to
select the desired memory channels within the
selected group.
Note: If you have configured Menu No. 3 (MR METHOD) as
“CURRENT BAND” {page 16}, only memory channels that have the
same frequency band data are recalled.
ERASING MEMORY CHANNELS USING MEMORY
GROUP DELETE FUNCTION
Instead of erasing each unnecessary channel one by
one, you can erase an entire group of memory
channels at once. For example, if you erase group 2
memory channels, all the data in memory channels
100 ~ 149 are erased.
1 Press [MR].
• Turn the Tuning control or press [ ]/ [ ] to
select a memory channel in the group you want
to erase (for example, memory channel
No. 111, in Group 2).
2 Press [ ] (POWER) to turn the transceiver OFF.
3 Press [MHz]+[ ] (POWER).
• An erase confirmation message appears.
4 Press [MR] ([ ] or [MNU]) to proceed.
Otherwise, press any other key to cancel the
erase.
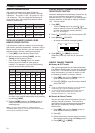
MEMORY CHANNEL TRANSFER
■ Memory \ VFO Transfer
After retrieving frequencies and associated data
from Memory Recall mode, you can copy the data
to the VFO. This function is useful, for example,
when the frequency you want to monitor is near
the frequency stored in a memory channel.
1 Press [MR], then turn the Tuning control to
recall a desired memory channel.
2 Press [F], [VFO] to copy the memory channel
data to the VFO.
Note:
◆
To copy an odd-split channel data {page 15}, turn the Reverse
function ON {page 14} before performing the transfer.
◆
You can also transfer the Program Scan memory channels
(L0/U0 ~ L9/U9), Priority Channels (Pr1 and Pr2), and
Information Channels (I–0 ~ I–9) to the VFO.
■ Channel \ Channel Transfer
You can also copy channel information from one
memory channel to another. This function is
useful when storing frequencies and associated
data that you temporarily change in Memory
Recall mode.
1 Press [MR], then turn the Tuning control to
recall a desired memory channel.
2 Press [F].
3 Select the memory channel where you would
like the data copied, using the Tuning control.
4 Press [MR] ([ ] or [MNU]).